Nomad Shepherd’s Pie

Nomad Shepherd’s Pie

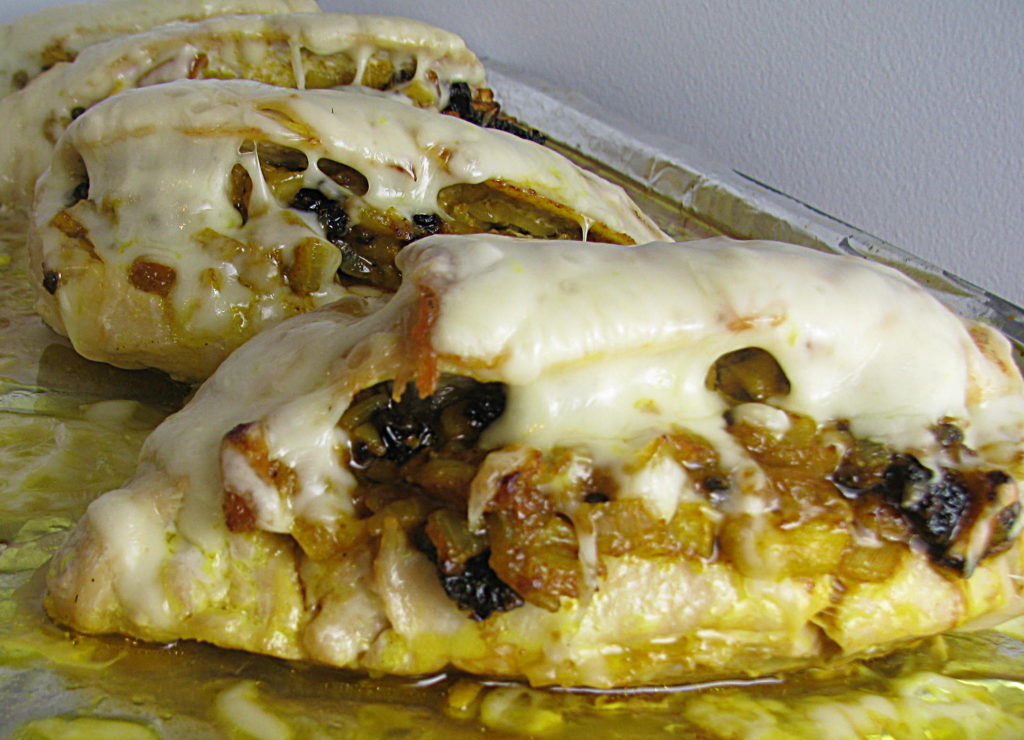
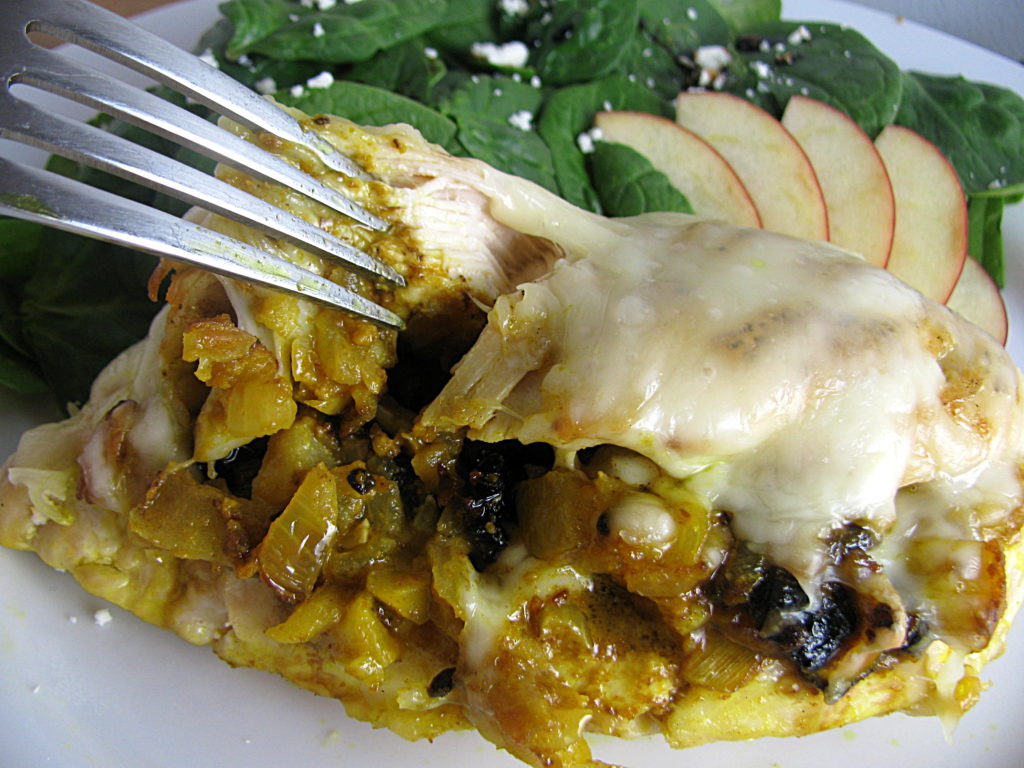
I wanted to take a classic Irish dish and give it an interesting new twist, in honor of St. Patrick’s day this week. Shepherd’s pie has been done in every form you can think of: loaded baked potato versions and mini versions and hand-pie versions are plentiful. I thought about doing a breakfast concept, which led me to want to cross Shepherd’s Pie with the wildly different Shakshuka. Shakshuka has been fairly trendy in the last couple of years, but in case you just think it just sounds like a sneeze, it’s a dish of cooked, seasoned tomatoes/tomato sauce, with fried eggs on top, sometimes involving cheese and/or meat.

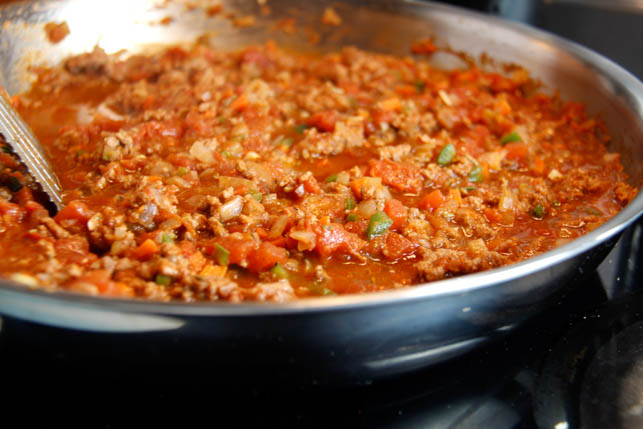
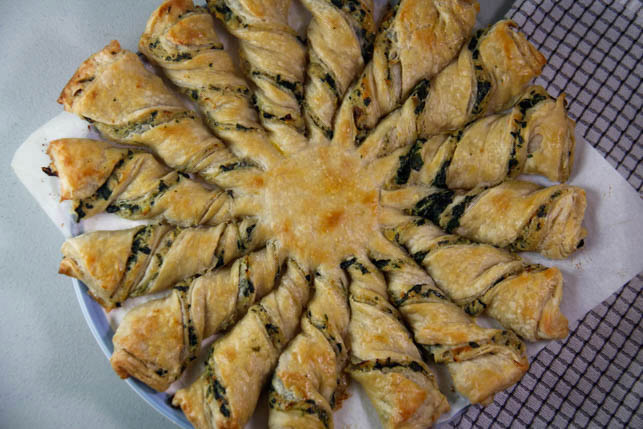
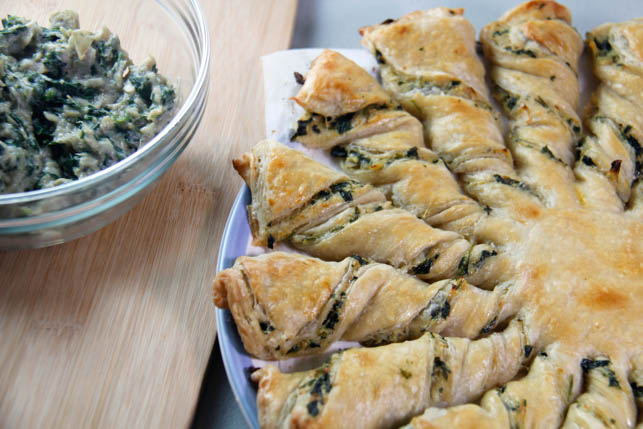
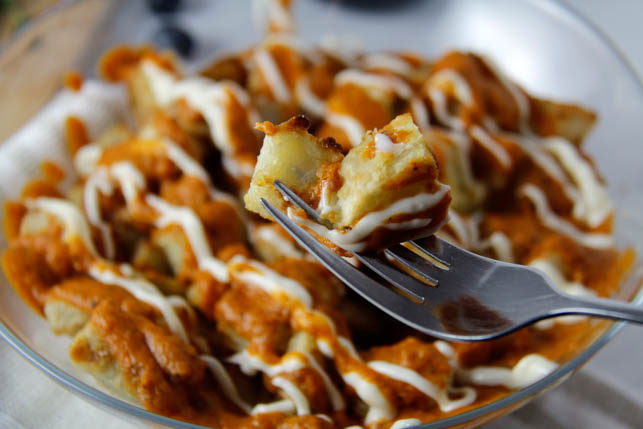
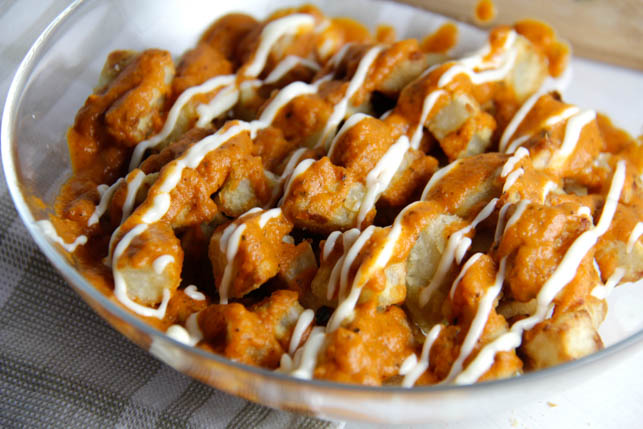
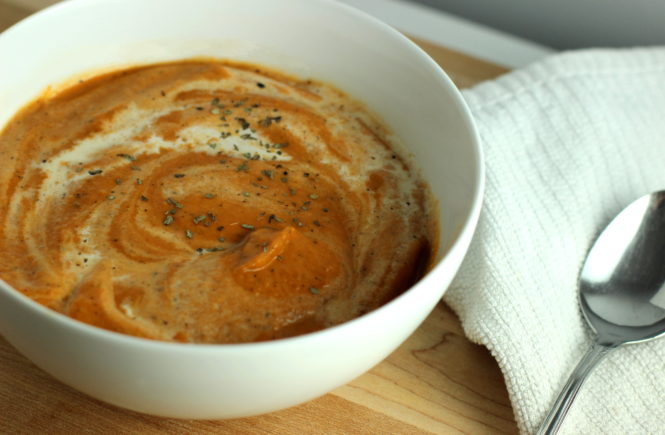
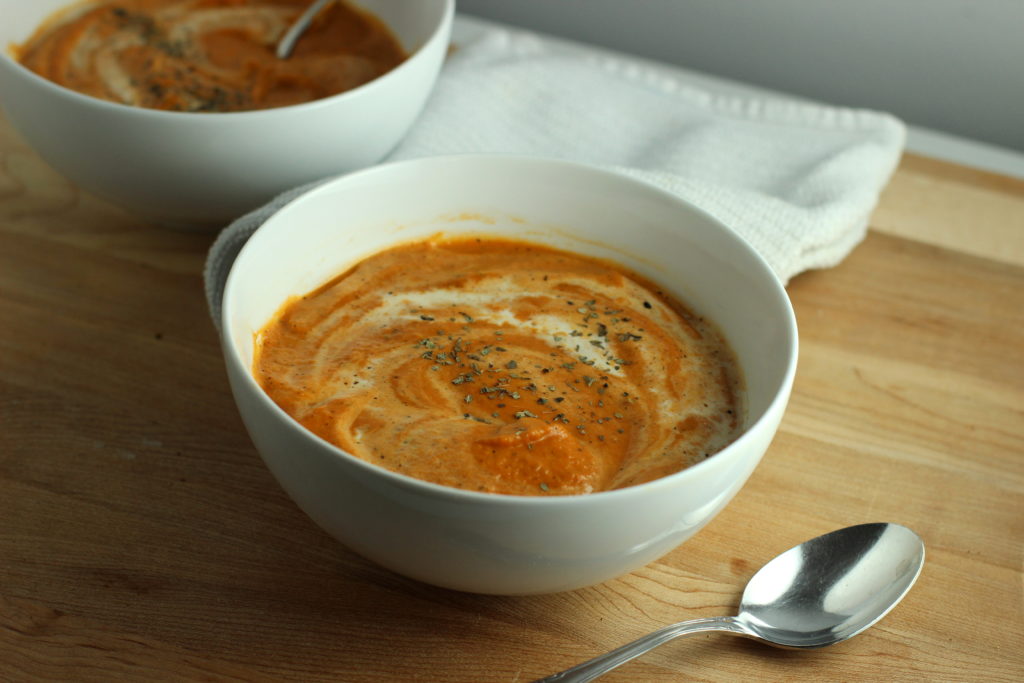
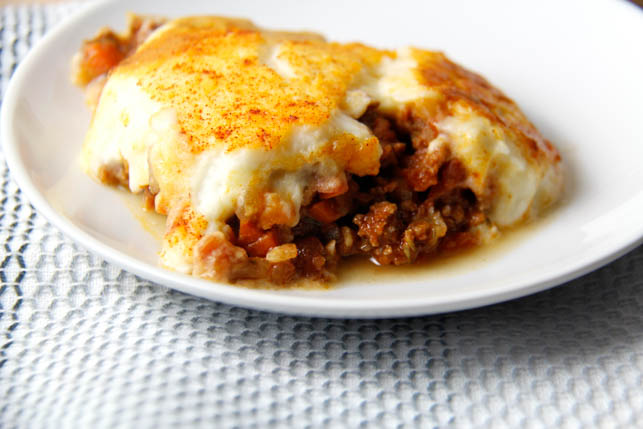
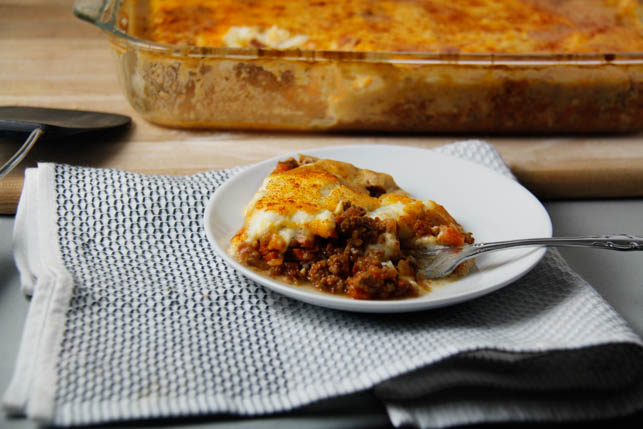
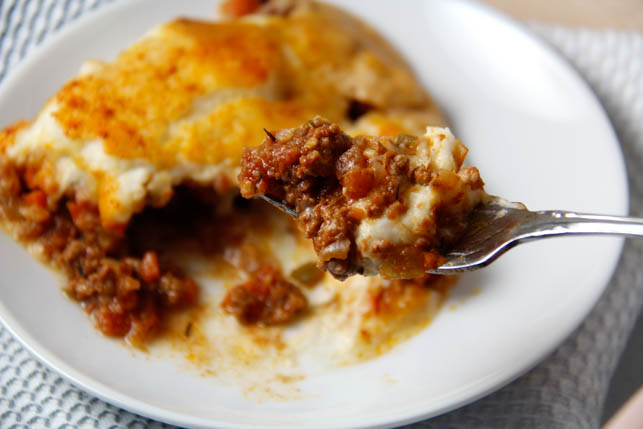
Experimenting with Shakshuka Shepherd’s Pie, or “Shak-shepherd,” as I’ve been referring to it, led to what I’ve decided to call my Nomad Shepherd’s Pie. It’s got inspiration and flavors from all over the place. The filling starts like a normal Shepherd’s Pie filling does, with ground beef, carrots, onions, garlic, and peas, but it takes a turn for the exciting when you combine it with diced tomatoes, cumin, paprika and jalapenos. Nomad Shepherd’s Pie is topped with creamy feta-infused mashed potatoes, a recipe I developed based on Pioneer Woman’s Creamy Mashed Potatoes. With the addition of feta, the potatoes take on a slight sharpness that works with the smooth, rich flavor of the buttery potatoes. The filling ingredients are all simmered together on the stove, before being baked in the oven with the potatoes. This lets the beef soak up all the different spices and flavors as it cooks, so every bite is consistent. There’s no digging around to make sure you got the right balance of flavors on your fork. Unless that’s just me? Do other people try to make sure every bite of their meal is just right?

I gathered my inspiration from a ton of Shakshuka recipes, cherry (tomato)-picking ingredients that I thought would work with Alton Brown’s Shepherd’s Pie, which I used as a base. He uses lamb; I used beef, because it’s less expensive and people (myself included) are more familiar with cooking it. I kept his seasonings and added a few of my own. I tested the recipe with Hungarian Sweet Paprika, which smells absolutely divine, but regular paprika would be fine to use. Whatever you put in it, it’s important to make sure all of your ingredients make it into the dish. Otherwise, you’ll set your beautiful Nomad Shepherd’s Pie in the oven, only to turn around and see the peas that were supposed to go into it… Sitting on the counter top. Sad that you’ve forgotten them.

I’ll just say I decided not to use them after all. That’s my story, and I’m sticking to it.

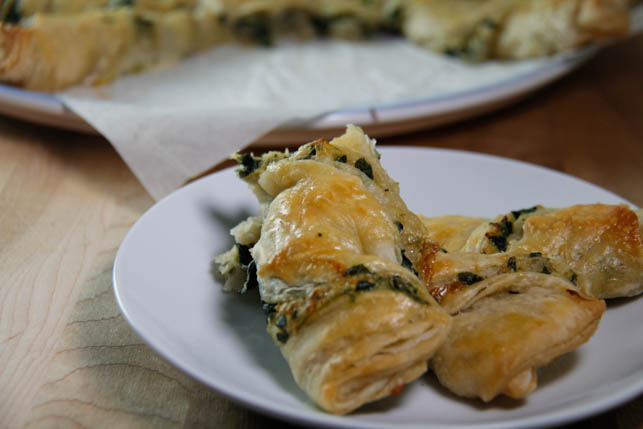
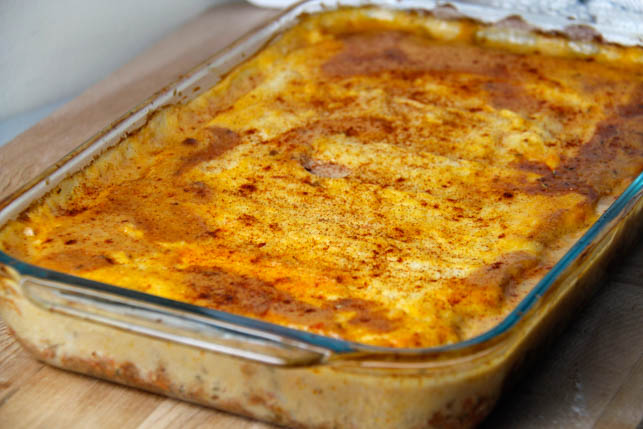
Putting together this dish is fairly straightforward, since it’s only two layers. You pour the filling into a glass 9×13 pan and smooth it out to an even layer. The mashed potatoes present a slight challenge, as they don’t spread very well on top of the wet filling. You can pipe the mashed potatoes on top to get a really nice layer. I wanted a little of my filling to run onto the top of my potatoes to give them some extra color when they baked. I piped about 6 thick lines of potatoes along the top of my dish, and then smoothed them into a single layer. The liquid from the filling seeps up over the edges of the potato while you’re smoothing it out. I think the added color on the top of the mashed potatoes actually makes the whole dish look more inviting, and the added moisture kept the top from drying out in the oven.

I tried a version of this dish with the mashed potatoes on the bottom, and the beef filling on top, and a few eggs cracked into the saucy filling on top and before baking. I found that the eggs didn’t add enough to the dish to bother with the careful timing they require. You could absolutely fry eggs and place them on top of an already-baked Nomad Shepherd’s Pie if you like the idea of taking it to full Shakshuka territory. If you do achieve a full Shakshuka Shepherd’s Pie, let me know how you did it, because I’d love to try it out!


Nomad Shepherd's Pie

Feta Mashed Potatoes are adapted from Pioneer Woman's Creamy Mashed Potatoes

Shepherd's Pie base is adapted from Alton Brown's Shepherd's Pie recipe 

Prep Time 15 minutes
Cook Time 1 hour 20 minutes
Total Time 1 hour 35 minutes

Ingredients

Filling

  • 2 Tbsp olive oil
  • 2 carrots
  • 1 medium yellow onion
  • 4 cloves garlic
  • tomato paste
  • 1 14.5 oz can petite diced tomatoes
  • 1 14.5 oz can crushed tomatoes
  • 2 jalapenos, seeded and chopped small
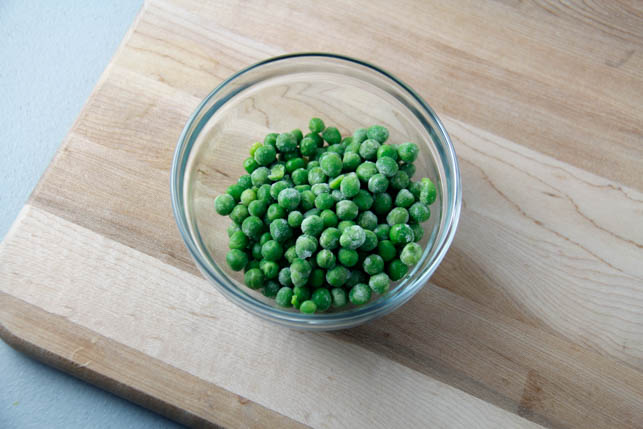
  • 3 oz frozen peas
  • 2 tsps worcestershire sauce
  • 2 tsps dried rosemary, crushed
  • 2 tsps dried leaf thyme
  • 1/8 tsp cayenne
  • 1 Tbsp + 1 tsp paprika (I used Hungarian sweet paprika)
  • 2 tsps cumin
  • 1 lb raw ground beef
  • 3/4 tsp salt

Feta Mashed Potatoes

  • 2.5 lbs peeled russet potatoes
  • 1/2 cup half and half
  • 6 Tbsps butter
  • 4 oz crumbled feta cheese
  • 4 oz cream cheese
  • 1/8 tsp onion powder
  • 1/8 tsp garlic powder
  • salt to taste

Instructions

  1. Start by making the mashed potatoes. Peel potatoes, slice into quarters, and place in a large pot. Add water to cover the potatoes, and cook with the lid on, over high heat. When the pot reaches a boil, lower the temperature to medium, and cook for 17-20 minutes, until potatoes are fork tender. 

    2. While potatoes are cooking, soften cream cheese in the microwave. When potatoes are done, drain them in a collander. Put cream cheese, butter, and feta into the warm pot. Return potatoes to the pot, on top of the cheeses and butter. Mash using a potato masher - You can also put the potatoes through a ricer before returning them to the pot, if you prefer a smoother texture. Add onion and garlic powder, and salt. Stir and mash until all ingredients are well combined. 

    3. Add salt and half and half to the potatoes and stir until combined. Set aside. 

    4. Dice carrots and add to a hot skillet with olive oil. Let cook about 12 minutes. Dice onions and add to the skillet until they start to get tender, about 5 minutes. Mince garlic and add to the skillet. Let cook for an additional 2 minutes. Add tomato paste, cans of tomatoes, jalapeno, peas, worcestershire, and spices and stir. Add raw ground beef and allow to cook through, stirring occasionally. Add salt - add more than the 3/4 tsp if needed. 

    5. When the ground beef has cooked, and pour the mixture into a 9x13 dish. Top with the mashed potatoes. You can spread them with a spoon or pipe them on. Piping looks neater, and makes it easier to get an even layer. 

    6. Bake at 350 degrees for 30 minutes. Garnish with a sprinkle of paprika over the top of the dish. 


Spinach and Artichoke Tarte Soleil

Spinach and Artichoke Tarte Soleil

I try really hard to look at the end of daylight savings as the beginning of those long, glorious, sunny summer days. When you’re losing an hour of precious sleep, it’s hard to remember the bright side. I decided that this year I would stop worrying about the sleep aspect, and celebrate the end of daylight savings with the most appropriate dish I could think of: a Tarte Soleil. It’s made of puff pastry, cut and shaped to look like the most beautiful sunburst, with endless possibilities for fillings – just the thing to help cheer up tired people like us.

Puff pastry works well with all sorts of flavors. I filled mine with creamy, slightly tangy and salty spinach and artichoke dip. I was a little worried that the spinach and artichoke dip would run out of the pastry in the oven and make a huge mess, but it held up quite well. I adapted a recipe from Once Upon a Chef, which uses a Mornay sauce in place of cream cheese/mayo. A Mornay sauce is essentially just a white sauce with shredded cheese, and also a term that I was unaware of until I made my spinach and artichoke dip. You learn something new every day (even a day that’s missing an hour).

A Tarte Soleil is a wonderful thing to know how to make. I’ll be the first to admit that while puff pastry with spinach and artichoke dip is undeniably delicious, it’s not exactly boundary-pushing. But formed into an intricately twisty sun-shape, and baked to perfect golden crispiness, the combination is not only classic, it becomes irresistible.

I made my puff pastry from scratch. I think people assume puff pastry is difficult to make, because you do have to be a little careful about the temperature of the dough. I find that it’s actually a fairly quick and easy process, if you focus on what you’re doing. I would encourage everyone to try making their own at some point, but store-bought crust will work just as well for this recipe. I actually meant to buy mine this time (I’ve read Pepperidge Farm makes a great version), forgot to get it, and then was too lazy to run to the store when it was time to get cooking. So I just made it instead. I’m nothing if not a problem solver. The fact that I also create my own problems may have something to do with that.

The key to a good Tarte Soleil is cutting the sections of filled pastry uniformly, and then twisting them evenly. This is always a challenge for me, because I’m not as meticulous as I might choose to be. It’s important to twist each section of pastry about three times, and make sure the twists are evenly spaced along the section. My other advice would be to stop twisting and pop the whole thing in the freezer for a few minutes if you find your puff pastry is getting too soft and warm to work with. This solves a lot of frustration when trying to get those perfect twists.

My Spinach and Artichoke Tarte Soleil is exactly what I’d like to snack on at a party, but your taste could be drastically different from mine. Luckily, the filling possibilities for Tarte Soleil are endless. You could do a different savory option, like this feta tapenade from Smitten Kitchen, or even choose a sweet filling – I’ve seen loads of versions stuffed with Nutella. Whatever direction you go, it’s sure to be a crowd-pleaser. Even if the crowd is mostly you and your family sitting in your kitchen, eating it straight from the oven. But then, that’s the best sort of crowd, isn’t it?


Spinach and Artichoke Tarte Soleil

Spinach and Artichoke Dip recipe is adapted from Once Upon a Chef's Baked Spinach and Artichoke Dip. I changed it to make it gluten-free. 

Puff Pastry is a basic puff pastry from All Recipes - I used a different method for making it. 

Prep Time 30 minutes
Cook Time 35 minutes
Total Time 1 hour 5 minutes

Ingredients

Puff Pastry

  • 5 cups bread flour
  • 2 1/2 tsps salt
  • 2 cups very cold water
  • 2 cups cold unsalted butter (do not soften)

Spinach and Artichoke Dip Filling

  • 1/4 cup sour cream
  • 4 Tbsps butter, divided use
  • 1/2 tsp corn starch
  • 1 cup heavy cream
  • 1 medium yellow onion, diced
  • 5 oz frozen spinach
  • 9 oz frozen artichoke hearts, chopped
  • 1/3 cup shredded parmesan cheese
  • 1/3 cup shredded Monterey Jack cheese
  • 2 cloves garlic, minced
  • 1 tsp dried thyme

Tarte Soleil

  • flour for rolling
  • 1 egg

Instructions

  1. Make puff pastry, if you are doing it from scratch. Stir together flour and salt in a large bowl. Cut butter into small pieces and add to the bowl. Pour in water gradually, while stirring the mixture - add just enough water to get everything combined into a rough dough. You don't want the butter creamed into the flour, you want it to stay in chunks - this is what causes the dough to form those beautiful, flaky layers in the oven.

    2. Turn the mixture out onto a floured surface. Form it into a rectangle, and gently roll out until it's about a half inch thick. Fold the bottom third up into the middle, and fold the top third down on top of that. Turn it 90 degrees, add more flour to prevent sticking, and roll it out again. Repeat this process three more times, adding flour as needed. Wrap the dough in plastic wrap and refrigerate while you prepare the filling. You can also freeze it for about 10 minutes before using, if your filling is already made.

    Note: While making this dough, you need to work quickly, with very cold water and butter, to prevent the butter from melting into the dough. 

    3. Make the spinach and artichoke dip. Start with the Mornay sauce. Stir together 3 Tbsps butter and sour cream in a sauce pan over medium heat. Stir together cream and corn starch in a small bowl and add to the pan. Let the sauce come to a boil, stirring constantly. When it reaches a boil, turn off the heat and gradually stir in the shredded cheese, until sauce is smooth. It should be fairly thick. 

    4. In a skillet, cook onion over medium heat in the remaining 1 Tbsp of butter until it starts to become translucent. Add spinach, garlic, artichokes, thyme, and salt. Let cook for roughly five minutes, stirring occasionally, until the artichokes start to soften. Pour cheese sauce over the vegetables and stir until well combined.

    5. Prepare your Tarte Soleil. Take half of your puff pastry (leave the other half in the fridge)  and roll out into a 12 inch round on a floured surface. Take a round plate slightly smaller in diameter than your baking tray (I used a pizza tray) and place it upside down on the dough. Trace around it with a knife to form a perfect circle for the base of your Tarte. Place the circle on your baking tray (lined with parchment paper).

    6. Top with a generous layer of filling, leaving about a half inch bare around the outer edge of the circle. You may have some extra filling - don't feel like you need to use all of it, you just want a nice thick, even layer - no gobs. Cover with plastic wrap and refrigerate while you work with the rest of the puff pastry.

    6. Roll the second half of your pastry dough into a 12 inch round and cut a perfect circle as you did with the first layer. Place this layer on top of the first layer with the filling, so that the filling is sandwiched between the two layers. Place a small bowl or glass in the center of the the dough. This will mark the center of your Tarte, the section that doesn't get cut and twisted. 

    7. Cut away from the glass with a knife, slicing the dough into quarter sections. Cut each quarter section in half, and each of those sections in half again, until you have 16 total sections. You can choose to go a step further, cutting each section in half one more time, to end with 32 total sections coming from the center circle. It mostly depends on how many servings you want to make/how much work you want to do. Be careful not to cut through the parchment paper. 

    8. Twist each section 3-4 times, twisting all of the sections in the same direction. Don't just hold the end of a section and twist, because the dough won't automatically twist the way you want it to. The best way to do this is to try to twist each section once near the center circle, once in the middle of the section, and once closer to the end, so they're evenly spaced. 

    9. When all of the sections are twisted, you should have a beautiful sunburst. Beat egg in a small bowl and brush over the pastry. Bake at 350 degrees for 30-35 minutes, until golden brown. Let cool before moving to a serving tray, to prevent Tarte from tearing. 


Salsa Bruschetta

Salsa Bruschetta

This recipe is one of my favorite creations thus far. It happened sort of by accident, ending up in a much different place than it started. The original inspiration was the concept of Pan a la Catalana, and then I started researching recipes, and went a completely different way. I was in the kitchen with my tomatoes and garlic and my baguette, and suddenly I was just adding things to a bowl and tasting and adding some more. I seem to do that a lot lately, which makes me both very excited about what I could create, and very concerned that I’m missing a lot of interesting things that might result from me ever following a recipe properly. But, what would be the fun in that?

The Salsa Bruschetta that has resulted from my impatience and possible over-confidence in the kitchen is fresh, bursting with flavor, and a perfect addition to your favorite tapas recipes – I served it alongside my Baked Patatas Bravas. I used tomato and onion as a base, and added garlic and a bit of balsamic vinaigrette, along with basil, lemon, brown sugar, and olive oil. It’s got a lot of the flavor that you would find in Pan a la Catalana, and in traditional bruschetta, with some sweetness and citrus that really lift the onion and the garlic to make them a little brighter. The lemon and onion are what really take this bruschetta recipe into salsa territory, because there isn’t a lot of  salsa-esque heat. I added a pinch of cayenne, but I didn’t want that to overshadow the freshness of the tomatoes and the lemon. If you’re in the mood for something a bit spicier, I’d recommend adding chopped jalapeno to this recipe.

There’s one more element to this particular version of Bruschetta: After I sliced my baguette, I topped the slices with a light drizzle of olive oil, and a sprinkle of Monterey Jack cheese. Next time I may experiment with mozzarella for a caprese-inspired version, but the Monterey Jack worked extraordinarily well with the Salsa Brushetta. It’s the right amount of salty and creamy to pair with the tangy, slightly sweet flavor of the bruschetta. Cheese isn’t typically a part of bruschetta, possibly because that can take it to pizza-bread territory very quickly. I assure you that very little about this Salsa Bruschetta reminds me of pizza. The flavors are much lighter, yet richer and more complex than something you’d find on a pizza. (Unless it’s a very good, very unusual pizza, of course)!

These are definitely best served fresh, when the cheese is still gooey and melted. They do keep in the fridge fairly well overnight, and I have it on good authority that husbands named Bobby find that leftover Salsa Bruschetta makes an excellent afternoon snack. Whether you’re snacking or having your Salsa Bruschetta as part of a meal – perhaps as an interesting starter – this recipe is one you’ll make again and again. It’s very quick to make, and as uncomplicated as something that looks this elegant can get. No one will believe that you knocked the whole thing together in 20 minutes. But they won’t have much time to worry about that, as they’ll be worried about getting another bite before it all disappears.


Salsa Bruschetta

Prep Time 15 minutes
Cook Time 5 minutes
Total Time 20 minutes

Ingredients

  • 2 medium tomatoes
  • 1/4 small/medium white onion
  • 1 french baguette
  • 1 clove garlic
  • 1/2 Tbsp olive oil + more for drizzling
  • 1/2 tsp balsamic vinegar
  • 3/4 tsp brown sugar
  • 3/4 tsp dried basil
  • 1 dash cracked black pepper
  • 1 1/2 tsps lemon juice
  • 1/2 tsp salt
  • 1 dash cayenne
  • 1/4 cup shredded Monterey Jack

Instructions

  1. Dice tomatoes and mince garlic, stir together. Chop onions in a smaller dice than the tomatoes and add to the bowl. 

    2. Slice baguette into thin slices, about 1/4 of an inch thick. Place in a single layer on a baking sheet lined with foil. Drizzle olive oil lightly over each. Bake in the oven at 350 degrees for 4 minutes. You want the bread crisp on the edges, but still a little soft.

    3. Add remaining ingredients to the salsa mixture, except the cheese. Stir until well combined. Salt to taste - add more cayenne for a spicier salsa. 

    4. When baguette slices are done, remove from oven, top each with a little less than 1/2 Tbsp of Monterey Jack, and return to the oven for 2 minutes, or until cheese is melted. 

    5. Top each baguette with the salsa mixture. Try not to eat the whole batch by yourself. 


Baked Patatas Bravas

Baked Patatas Bravas

I think it’s only appropriate to begin this post by saying that I’ve never been to Spain. If you’d like to take me there, I can be packed and ready in an hour, but until then, my experience with authentic Spanish tapas will remain limited. That said, I have plenty of experience with tapas restaurants in the states – they’re possibly my favorite kind of restaurant. Sitting down with friends to experience not just a dish or two, but instead a wide variety, is how all meals would be served in my ideal world.

One of the best and simplest tapas out there is Patatas Bravas. How could anyone not get excited about golden brown potatoes that are crispy on the outside and soft on the inside, drizzled with a spicy tomato sauce and a creamy garlic aioli? There are a million recipes out there for Patatas Bravas – my intention was to replicate the ones I like best. All the tapas restaurants in my area seem to serve an almost identical version, so hopefully I’ve done it justice!

The spicy tomato sauce is actually very similar to my Tomato Basil Bisque recipe, with a few key flavor alterations. The aioli is a fairly standard lemon garlic aioli. Patatas Bravas are typically fried potatoes, but I chose to bake mine to make them slightly healthier, and for general ease. Deep frying at home is quite a process, compared to throwing a tray in the oven.

Baked fries/chunks of potato are a little difficult to get perfectly crispy in the oven, but the technique I used cooked them just the way I wanted. You start by putting your chopped potatoes in a pot of cold water and bringing it to a boil. Once the pot reaches a boil, you remove your potatoes from the heat, toss them in a couple tablespoons of olive oil and flour, and bake them on a tray at very high heat in the oven. I haven’t tried this method for fries but you better believe I intend to. This technique could also be something that experienced chefs have known about for years, and here I am just discovering it. The more I learn about cooking, the more I find that I will never know enough about cooking.

I served my Patatas Bravas with a cheese board, some salsa bruschetta (a recipe that I will be posting here soon!), and of course some sangria. Can’t forget the sangria. Bobby (my husband) and I basically gobbled it down, sitting on the floor of our apartment (we do have furniture – we’re just weird). I prefer to imagine that we sat on a balcony in Spain, in the warm glow of the last of the day’s sunlight, glasses of cold, fizzy, white sangria in hand, reaching for another helping of everything. Food can transport me the same way a good book does – or maybe I’m just delusional? You be the judge. I’ll be busy eating Patatas Bravas on my “balcony.”


Baked Patatas Bravas

Prep Time 15 minutes
Cook Time 45 minutes
Total Time 1 hour

Ingredients

Potatas

  • 3 russet potatoes
  • 2 Tbsps olive oil
  • 2 Tbsps white flour

Spicy Tomato Sauce

  • 1/4 medium yellow onion
  • 1 Tbsp butter
  • 1 clove garlic
  • 2 Tbsp tomato paste
  • 1/4 cup diced canned tomatoes
  • 1/4 cup chicken broth
  • 1 1/2 tsp brown sugar
  • 1/2 tsp dried basil
  • 1/8 tsp cumin
  • 1/8 tsp chili powder
  • 1/8 tsp cayenne
  • 1/8 tsp dried oregano
  • 1/8 tsp dried thyme

Lemon Garlic Aioli

  • 1/4 cup mayonnaise
  • 1/2 tsp lemon juice
  • 1 tsp olive oil
  • 1/4 tsp garlic powder
  • 1/16 tsp salt

Instructions

  1. Peel and dice potatoes into bite-sized chunks. Place in a pot with enough cold water to submerge them completely. Cook over high heat, just until the water reaches a boil. Drain, keeping the potatoes in the same pot. Add olive oil and flour to the potatoes and shake the pot until they're well coated - this is much easier than stirring to get them evenly coated. 

    2. Line a baking sheet with foil and spray with non-stick cooking spray. Spread potatoes on the tray in a single layer, and cook in the oven at 400 degrees for 30 minutes. Remove from the oven after 15 minutes, and flip the potatoes to ensure they brown on all sides. When they're golden brown and the outsides are all crispy, they're done. 

    3. While the potatoes cook, make your sauces. For the aioli, add all five ingredients to a small bowl and stir until well combined. For the tomato sauce, chop onion and add to a small pot with 1 Tbsp of butter. Let cook until the onion is soft and starting to become transparent. 

    4. Mince 1 clove of garlic and add it to the pot, with the tomato paste, diced tomatoes, and chicken broth. Let it come to a boil, reduce heat, and simmer for 15 minutes. After lowering the heat, add the remaining ingredients, and stir frequently.

    5. Remove sauce from heat and pour into a blender (I used my NutriBullet, as always). Blend until smooth. 

    6. Remove potatoes from the oven, pour into your serving dish and drizzle with both sauces. Enjoy!


Pulled Pork and Cranberry Flatbread

Pulled Pork and Cranberry Flatbread

I was roaming the internet, looking for inspiration, when I came across this cranberry and goat cheese flatbread. It clearly has made the rounds on Pinterest, and for good reason – it’s quite pretty. Having posted a flatbread recipe recently, I figured this would be a great time to try out some interesting new toppings. Although to be fair, you could put just about anything on flatbread and I’d try it. Not to turn this post into an ode to flatbread or anything.

I love the goat cheese and cranberry combination, but I wanted to give the dish another dimension, and make it more filling. With the tart, yet sweet cranberry sauce already in mind, I knew spicy, smoky pulled pork would be the perfect addition. The cranberry sauce is reminiscent of a barbecue sauce on the pulled pork, but with a different, fruitier flavor profile. The goat cheese is a perfect element to mellow some of the spice from the pork, and keep the tang of the cranberry sauce from being overwhelming.

Cranberry sauce seems to get attention only around the holidays, and I think that’s kind of a tragedy. It’s delicious with so many other things besides turkey and stuffing. That said, finding fresh or even frozen cranberries after January 1st is like trying to find truly good gluten-free pizza crust: may exist, but hard to locate. My cranberry sauce calls for part dried cranberries and part canned whole cranberry sauce, so it can (and should!) be made between the months of January and October. My recipe for this is adapted from a Food Network version.

The pulled pork in this recipe is done in the slow cooker, with a rub from Kevin and Amanda. Their recipe has a lot more to it, brining, and cooking in the oven, etc., but I just took the rub, coated my pork, tossed it in the slow cooker with a little water, and let it go, and it’s some of the best pulled pork I’ve ever eaten. Every bite is extremely flavorful and a little spicy, without being overpowering. The goat cheese I used is “La Bonne Vie Garlic and Herb Goat Cheese”- I just got it from my local grocery store, but you could honestly use any decent herb goat cheese. Trader Joe’s has a great, inexpensive one.

Since I’ve essentially given you a rundown of how wonderful all the components of this dish are on their own, you can imagine how I reacted when I tried them together. There was a lot of swooning, and uncivilized devouring, and general elation.


Pulled Pork and Cranberry Flatbread

Pulled pork recipe is adapted from Kevin and Amanda's Perfect Pulled Pork.  

Cranberry sauce recipe is adapted from Gourmet Magazine's Savory Dried Cranberry Sauce - Recipe found through foodnetwork.com

Servings 3 flatbreads

Ingredients

Pulled Pork

  • 1 4-8 lb pork shoulder
  • 1 medium yellow onion
  • 1/2 cup water
  • 1 Tbsp ground cumin
  • 1 Tbsp garlic powder
  • 1 Tbsp onion powder
  • 1 Tbsp chili powder
  • 1 Tbsp cayenne pepper
  • 1 Tbsp salt
  • 1 Tbsp ground black pepper
  • 1 Tbsp paprika
  • 1/2 cup brown sugar

Cranberry Sauce

  • 1/4 cup brown sugar
  • 1/2 Tbsp cornstarch
  • 1/2 cup white wine
  • 3/4 cup chicken broth
  • 1 tsp balsamic vingar
  • 1/2 cup dried cranberries (I used Craisins)
  • 1/2 cup canned whole cranberry sauce
  • 1/8 tsp rosemary
  • 1/8 tsp cinnamon
  • 1/8 tsp tarragon

Other Ingredients

  • 3 large flatbreads
  • 8-12 oz herb goat cheese (2-3 small logs), depending on how much you like goat cheese - I used 12oz.
  • 2 Tbsp fresh thyme or parsley (optional)

Instructions

  1. Slow cook the pork: mix together all dry ingredients to create a rub. Roughly chop yellow onion, and place in slow cooker with the 1/2 cup of water. 

    2. Pat pork shoulder dry with paper towel, and coat generously with the dry rub on all sides. Massage it into the meat with your hands to make sure it really sticks. 

    3. Place pork in the slow cooker, on top of the onions. Cover and let cook on high 4-6 hours, or on low 8-10 hours, until pork is falling off the bone and tender. Remove bone from the pot, and shred the meat with two forks. 

    Note: this pulled pork recipe yields much more pork than you'll need to use for your flatbreads. Extra meat can be frozen to use later.

    4. If you're making your flatbread, do it when the pork is about an hour and a half from being done. You can easily use pre-made flatbread if you prefer. You can find my flatbread recipe linked in the post above.  Instead of splitting the dough into eight pieces like I typically do, I split it into three, to make larger flatbreads. The method for cooking them is the same. 

    5. When your pork is about a half hour from done, make the cranberry sauce. Stir together brown sugar and cornstarch in a small sauce pan. Add white wine and chicken broth and set over low heat. Stir until well combined. Add vinegar, dried cranberries and canned cranberry sauce, rosemary, tarragon, and cinnamon. Simmer for 15 minutes, stirring occasionally. Sauce should be quite thick. Remove from heat. Sauce can be stored in an airtight container in the refrigerator for at least a week. 

    6: Assemble Pulled Pork and Cranberry Flatbreads: spread each flatbread with a generous amount of goat cheese, saving 2-4 oz aside. Top with a layer of pulled pork- you can add as much or as little as you like here. Drizzle with cranberry sauce (again, quantities are up to you).  I used all of my sauce between three flatbreads. Top with small crumbles of the remaining goat cheese. Bake flatbreads in the oven at 350 degrees for about 8 minutes, until the cheese gets soft and the flatbreads are warm and a just little crispy on the bottoms. Garnish with fresh thyme or parsley. 


Warm Butternut and Bell Pepper Salad

Warm Butternut and Bell Pepper Salad

On Sunday, I woke up and realized that I’d barely eaten a single vegetable between Friday and Saturday. Please tell me that happens to you, too. This recipe was born out of a need to make something delicious and vegetable-based, with the ingredients already in my kitchen. It’s funny how sometimes the most wonderful dishes come together that way – and I can guarantee that this dish is indeed wonderful. It’s got soft, slightly sweet butternut squash, bell peppers, garlic, and onions as a base.  To flavor it, I created a cross between a light balsamic vinaigrette and Chinese take-out inspired sauce that works with the nutty squash flavor better than I could’ve dreamed.

I was cooking bacon before I started concocting my “stir-fry,” so I threw some torn, thick-cut bacon in with the mix. It added another dimension to the texture, and I don’t think I even need to remind you how adding the flavor of bacon to just about anything will immediately improve it. I wilted some spinach into it at the end to add a little more color and bulk. I don’t actually love cooked spinach all that much, but the flavor of it sort of disappeared in this dish, so I got more nutrition without that bitter wilted spinach flavor. This is yet another addition to my “make vegetables taste good” file.

I was truly just throwing things in the pan for this one. Chop up the vegetables, saute them, and add your sauce. Then throw in a big handful of fresh spinach, let it cook down, and the result is a perfect alternative to a regular cold salad. The prep and cooking processes take maybe 30 minutes, and you don’t have to stand at the stove the whole time the food is cooking. Since starting this blog, I’ve become very aware of how much I like being able to multitask. If I can make lunch and clean up the kitchen at the same time, (and maybe text and dance and dream up other blog ideas as well), I am a much happier person.

I invented this recipe to be my lunch, but it would make a fabulous side dish for beef or chicken, or even a vegetarian entree if you forgo the bacon (just make sure to taste it and see if it needs an extra dash of salt in that case!). That said, the recipe makes a fairly small portion. Even as a side dish, you may need to double or triple the measurements depending on who you’re feeding. It’s a quick, healthy lunch or dinner for when you want something warm and comforting, but still light and fresh. If you’re doing any kind of low carb diet, then this recipe is definitely for you.

I always mention how recipes are incredibly versatile, but I suppose that as a person who can’t ever follow a recipe without tweaking it, I just think everything is open to interpretation. You could try this dish with other kinds of squash, any greens you like, beets, or mushrooms – the possibilities are endless when you’ve got some onion, garlic, and a great sauce to start.


Warm Butternut and Bell Pepper Salad

Ingredients

  • 2 cloves garlic, minced
  • 1/3 medium white onion
  • 1/2 red bell pepper
  • 2 cups diced butternut squash
  • 2-3 strips of bacon
  • 3 tsps olive oil, divided use
  • 1 tsps balsamic vinegar
  • 2 tsps sesame chili oil
  • 2 tsps soy sauce
  • 2 tsps honey
  • 2 tsps rice wine vinegar
  • 2 tsps brown sugar
  • 1/8 tsp ground ginger
  • 1/2 tsp salt
  • 1 big handful of fresh spinach

Instructions

  1. Chop red bell pepper, onion, bacon, and butternut squash, and mince garlic. Add to skillet on high heat with a tsp of olive oil. Give them a quick stir once every minute or so.

    2. In a small bowl, stir together all remaining ingredients including 2 tsps of olive oil to make the sauce. When the vegetables in the skillet just start to brown, pour half of the sauce over them and stir.

    3. Keep an eye on the skillet, stirring frequently (but not constantly). When the vegetables look like they're almost done (squash and peppers are tender, onions are browned), pour the other half of the sauce into the skillet and stir.

    4. Let cook for 3-4 more minutes, and lower heat. Add fresh spinach to the skillet and stir in. Let it cook just long enough for the spinach to wilt. Remove from heat and serve.

    Note: I place a large pot lid over my skillet after adding the spinach to help it wilt a little faster.


King Cake Cinnamon Rolls

King Cake Cinnamon Rolls

If there’s any food more ubiquitous for celebrating Mardi Gras than King Cake, I’m not certain what it is. I suppose pancakes would be a reasonable answer, but I wasn’t really in the mood for pancakes. I wanted to create something a little more interesting than an ordinary King Cake, and lot more delicious than any version that involves cinnamon rolls from a can. They’re okay in a pinch, but no substitute for the real thing.

This recipe is essentially the most delicious homemade cinnamon roll you’ve ever had, braided, baked, and topped with cream cheese frosting and festive sprinkles. Cinnamon rolls are a perfect choice for a sort of imposter King Cake, because King Cake is typically a yeast dough with cinnamon – the biggest difference between the two is the texture. If you’re a stickler for tradition, maybe check out a different King Cake recipe. If you want to make a batch of perfect, soft, gooey, “personal King Cakes,” then this recipe is for you.

King Cake Cinnamon Rolls are far superior to regular cinnamon rolls because of the way the cinnamon mixture is folded into the dough. The even distribution of gooey, buttery cinnamon-sugar throughout each roll makes every bite perfectly balanced. To achieve this, you start by splitting the dough into three sections. The sections are rolled out, one at a time, into roughly 12×10 inch rectangles. The rectangles of dough are covered with a thin layer of butter, then the cinnamon-sugar mixture, and then sliced into eight equal pieces, as shown in the photo below:

At this point, you stack the strips in layers of two, so you have four piles. Then you twist two of the piles together, and repeat with the other two piles, to get this:

Then you curl each twist into a circle, pinch the ends together, and place it in a greased 9×13 pan. They look a lot more elaborate than they are, but since you’re braiding just two sections together, it’s really just criss-crossing the pieces over each other. When you get them all in the pan and bake them, the result looks so impressive you may decide to skip frosting and sprinkles entirely – I mean, look at them:

But everyone knows that cream cheese frosting is half the reason you eat cinnamon rolls in the first place, and not adding sprinkles on Mardi Gras would be silly, so I don’t know if skipping them is really in your best interest. The cinnamon rolls do bake up sort of square-shaped, since they’re nestled in the pan that way. I cut the corners off of mine (after baking) to give them that nice, round, King Cake shape. This is a great way to go, because then you can eat all those extra corners. It’s not gluttony, it’s Fat Tuesday. It’s important not to waste food, after all.

If you want to make the experience more authentic, you can hide a little plastic baby inside one of the cakes. A popular alternative is to use a bean –  or in my case, a gold jelly bean (champagne flavored!).  In either case, remember to warn people to watch for it. Finding the baby or the bean in your cake symbolizes luck and prosperity, and means you’re the king for the day. Which, of course, means automatic permission to snag another cinnamon roll!


King Cake Cinnamon Rolls

Cinnamon roll dough adapted by Homemade With An Upgrade from "Master Formula: Multipurpose Sweet Dough," from Crust & Crumb, by Peter Reinhart.

Filling and cream cheese frosting recipes are from "Glazed Cinnamon Rolls", from The New Best Recipe, by the editors of Cook's Illustrated.

Servings 6 King Cakes

Ingredients

Cinnamon Roll Dough

  • 3 1/2 cups unbleached all-purpose flour, plus extra for kneading and rolling 420g
  • 1/4 cup granulated sugar 50g
  • 1 Tbsp instant yeast .33oz
  • 1/2 tsp salt
  • 1/4 tsp baking soda
  • 1/4 cup unsalted butter, softend
  • 1 1/4 cup buttermilk, room temperature 9.75oz
  • 1 1/2 Tbsp butter for spreading on rolled dough

Cinnamon Filling

  • 3/4 cup packed, light brown sugar 144g
  • 3 Tbsp cinnamon
  • 1/8 tsp salt

Cream Cheese Frosting

  • 4 oz cream cheese, softened
  • 1/2 cup powdered sugar 60g
  • pinch of salt
  • 1 Tbsp light corn syrup
  • 1 Tbsp heavy cream
  • 1/2 tsp vanilla extract
  • yellow, green, and purple sprinkles for decorating

Instructions

  1. Combine all the ingredients, except the cinnamon sugar, in the bowl of an electric mixer with a dough hook or in a mixing bowl. Mix on slow speed for 1 minute, then on medium speed for about 8 minutes.

    2. If mixing by hand, stir the ingredients together till they form a ball, and turn onto a floured surface (at this point, I let the dough rest while I quickly wash, dry, and spray the bowl). Knead for 10 to 12 minutes. The dough should be soft, smooth, and a little bit sticky, and should pass the windowpane test: after kneading for 6 to 8 minutes, or when the dough feels supple and stretchy, pinch off a small piece and stretch it slowly apart, gently pulling and rotating it. You are trying to stretch the dough into a thin, translucent membrane or windowpane. If it tears easily before reaching this state, knead for a few more minutes and try the test again. If the dough has not set up within 15 minutes, it may be too wet or too dry, in which case you will have to add more flour or water, as needed.

    3. Place the dough in the clean bowl lightly oiled with cooking spray, mist the dough with cooking spray, cover it with plastic wrap, and allow it to rise for 45 minutes. The dough will double in size. Then put it in the refrigerator for 1 hour. It will firm up as it cools. It can stay in the refrigerator longer, if necessary, but I have not tested it past 3 hours.

    4. Prepare a 9x13 pan. If baking immediately, generously butter the bottom and lightly butter the sides, and sprinkle the bottom with cinnamon or cinnamon-sugar (1 part cinnamon, 4 parts sugar, stirred together). If freezing for future use, line pan with parchment or parchment-lined foil, butter the bottom lightly, and sprinkle the bottom with cinnamon or cinnamon-sugar. Set aside.

    5. Prepare filling: stir brown sugar, cinnamon, and salt together in a small bowl, and set aside.

    6. Separate chilled dough into three equal pieces, cover and let rest for 15 minutes. Lightly dust the work surface with flour and roll out one ball of dough into a rectangle about ¼” thick, 12” along one side and about 10” on the other. Use the back of a spoon to gently spread the dough with a ½ Tbsp very soft butter. Evenly sprinkle the butter with 1/3rd of the filling.

    7. Slice dough into eight equal strips. Working with two strips at a time, stack one on top of the other so you have four sets of two stacked strips. Take two of the sets, pinch the top ends together, and braid them together. Each stack is treated like a single unit, so really you're just criss-crossing the two stacks back and forth over one another. Curl the criss-crossed dough into a circle, pinching the ends together to close the circle, and place in the greased baking pan. Repeat this process with the other two balls of dough until you have six round braided rolls in the pan.

    8. Mist the rolls with cooking spray, and cover loosely with plastic wrap. Set the pan aside to rise at room temperature for about 45 minutes. Position the baking rack in the center of the oven. Preheat the oven to 350 degrees.

    If you need to hold the rolls longer than 45 minutes before baking, pop them in the fridge after the rise. If freezing for future use, cover tightly with plastic wrap, then wrap securely with aluminum foil (pan and all), and use a Sharpie to write gently on the foil to label it: “Thaw in fridge overnight, then let rise 1 hour on counter. Bake at 350 degrees about 55 minutes.”

    9. Remove the plastic wrap and bake the swirls at 350 degrees for about 15 minutes.

    10. Prepare the icing/glaze: Beat the cream cheese until it is perfectly smooth. Beat in the powdered sugar and salt until completely mixed. Beat in the corn syrup, cream, vanilla extract, and almond extract, if using, until the icing is smooth.

    11. When the spiral rolls have baked 15 minutes and look just barely golden brown, gently break a center swirl open to check that the middle is done (not still doughy-looking). Do not overbake. Drizzle and spread the glaze over the finished rolls. Top with yellow, green, and purple sprinkles. Add a gold jelly bean or little plastic baby, pushed into the underside of one of the rolls.


Dark Chocolate Caramel Raspberry Popcorn

Dark Chocolate Caramel Raspberry Popcorn

I’m one of those people who loves awards season. I love all the beautiful people in their gorgeous clothes on the red carpet, and I love when someone funny does a great job hosting. The atmosphere at awards shows seems somehow both laid back and also buzzing with excitement, and I like feeling like I’m a part of it, even though I’m just sitting on my couch. As the Academy Awards are coming up this weekend, I thought it would be fun to create a very fancy snack to eat while watching, since I can’t go be a very fancy person at a huge, televised event.

I looked up the menu for this year’s official Oscars after-party, always catered by Wolfgang Puck. Among other things, he’s planned gold-dusted truffle popcorn. A decadent popcorn seems like just the thing to snack on while watching the Oscars, but I do not have access to gold dust. I mean, I probably could if I tried hard enough, but who really wants to eat gold dust on popcorn, when you can just coat it with beautiful, golden caramel instead? So I started thinking about what would go nicely with caramel, and chocolate came to mind, as it is the most obvious answer in the world. I wanted to add a little something extra, a little more glamour. I’d seen freeze-dried berries in a recipe from my name is yeh recently, and thought they might be the perfect addition. (You have to click on that link, by the way – her photos are gorgeous).

I went with freeze-dried raspberries, and I was so right about adding them to my popcorn. The combination of the slightly salty caramel, the sweet, almost bitter chocolate, and the tart raspberries is completely amazing – and addicting. The tartness of the berries really diffuses the bitterness in the chocolate, so every bite is perfect. This is the kind of recipe you can’t make too often because it’s very rich, but the compelling flavors make it easy to eat the whole batch. The recipe makes a good amount, so there’s plenty to share – if you have the self-control for that.

It starts with whipping up a basic caramel popcorn (only takes 20 minutes, and I highly recommend you eat some of it right away), and then you add a dark chocolate drizzle, followed by chocolate chunks, and crushed, freeze-dried raspberries. You can play with quantities, depending on what you like, but I promise the raspberries give this popcorn some serious star quality. This might be the Meryl Streep of popcorn.

It’ll keep for a couple days in an airtight container, if you have it around that long. Dark Chocolate Caramel Raspberry Popcorn is like a fantastic Oscars dress: custom made for the occasion, but talked about for years to come!


Dark Chocolate Caramel Raspberry Popcorn

Prep Time 5 minutes
Cook Time 20 minutes
Total Time 25 minutes
Servings 8 cups of popcorn

Ingredients

  • 8 cups air-popped popcorn
  • 1 cup brown sugar
  • 1 cup unsalted butter 2 sticks of butter
  • 1/8 tsp salt
  • 1 cup chopped dark chocolate; I just used dark chocolate chips divided use
  • 1 cup whole freeze-dried raspberries

Instructions

  1. Start by popping your popcorn with an air popper - you can also do this in a brown paper bag in the microwave. Place popcorn in a large bowl.

    2. Melt brown sugar, butter, and salt together over high heat. Bring just to a boil - (right when you start to see tiny bubbles), and then reduce heat and let simmer, stirring constantly, for 5 minutes. 

    3. Pour caramel over top of popcorn and stir until the popcorn is all coated. Line a baking sheet with foil and spray with non-stick cooking spray. Pour popcorn out onto the baking sheet, and spread into an even layer. Bake at 350 degrees for 8 minutes. 

    4. While the popcorn is in the oven, melt half of the chopped dark chocolate in a piping bag - you can also use a sandwich baggie. Be sure to melt it in 10 second bursts in the microwave to keep the chocolate from seizing. Crush the freeze-dried raspberries into small pieces.

    5. When the popcorn comes out of the oven, let cool until you can handle it without burning yourself. Eat some, and then drizzle half of the melted dark chocolate over the whole tray. Sprinkle on a 1/4 cup of the chopped dark chocolate bits and half of the raspberries. 

    6. Place the tray in the freezer for 5-10 minutes. Remove from freezer and check that the melted chocolate has mostly firmed up. Stir popcorn around on the tray. Drizzle on the rest of the melted chocolate, and top with the rest of the chopped dark chocolate and raspberries. Freeze for 5-10 more minutes, and then pour into a bowl and enjoy. 


Tomato Basil Bisque

Tomato Basil Bisque

I should really save myself some time and just re-name this blog “Stuff I Like to Eat.” If you were wondering how I decide what I’m going to post next, it’s generally a combination of what I’ve been craving, and what recipes I’ve already done some work and testing on. This Tomato Basil Bisque is exactly what I’ve been wanting lately, despite the fact that I live on the east coast and we’re currently experiencing some full-on early spring. It’s not exactly creamy tomato soup weather, but who says it really has to be? It’s February, and that’s good enough for me!

This Tomato Basil Bisque is, like most of my recipes, a conglomeration of several others, with some of my own additions. The main inspirations for this soup were this recipe, and this one. I took my favorite parts of those, and went from there. My version of Tomato Basil Bisque is thick and creamy, deeply flavorful, and it’s got a little kick that’s balanced by the cream in the recipe. It’s not too spicy in any sense of the word, but it’s most certainly not bland.

This recipe calls for butternut squash, which I think adds a lot of body and a nice, almost nutty flavor that blends really well with the tomato. I wish I could say that was my own idea, but I got it from the second recipe linked above. The first time I worked with this soup, I tried it with sweet potato instead, to see if I could cut the (already small) amount of added sugar, but it was mostly a failure. Recipe testing is so fun – until it doesn’t turn out the way you’d hoped, and then you’re left with half a gallon of weird failure soup.

I paired my Tomato Basil Bisque with an upgraded grilled cheese, made on sourdough with cheddar and mozzarella, and a thin layer of mayo (try it, it’s a game changer). I’m sitting here writing this and wondering what else people serve with tomato soup – will begin that research soon!

The process for making this soup is pretty easy, and not too time-consuming. The whole thing spends roughly an hour on the stove, but you don’t have to watch it constantly. The only prep work is chopping some garlic and onion and measuring out spices, so it doesn’t become too tedious, either. You could get a batch of Stuffed Corn Bubbles filled with cheese rising/baking in the oven while making this soup, and then die of happiness when you eat them together. The southwestern flavors in both recipes would make them a brilliant pairing! I guess I just answered my own question about what else you serve with tomato soup!


Creamy Tomato Basil Bisque

Prep Time 10 minutes
Cook Time 1 hour
Total Time 1 hour 10 minutes
Servings 5

Ingredients

  • 2 Tbsp butter
  • 1 medium yellow onion
  • 3 cloves of garlic
  • 2 14.5 oz cans Hunt's fire roasted diced tomatoes
  • 2 oz tomato paste
  • 2 cups chicken stock
  • 2 cups butternut squash, chopped
  • 1/2 tsp black pepper
  • 1 1/2 tsp salt
  • 2 Tbsps dried basil
  • 1/2 tsp dried oregano
  • 1/2 tsp dried thyme
  • 1 1/2 Tbsp brown sugar
  • 1/8 tsp cayenne
  • 1/8 tsp chili powder
  • 3/4 cup heavy cream
  • 1/2 cup milk
  • 1 tsp onion powder

Instructions

  1. Roughly chop onions and mince garlic. Add to a large pot with 2 Tbsps of butter. Let cook until onions and garlic begin to brown.

    2. Add chicken stock, tomatoes, butternut squash (make sure the squash chunks aren't too large, so they won't take forever to cook), salt, pepper, basil, oregano, thyme, brown sugar, cayenne, and chili powder to the pot. Bring to a boil, stirring occasionally. Reduce heat and simmer, uncovered, for 15 minutes. Cover and simmer for an additional 15 minutes. Continue to stir occasionally while soup is simmering.

    3. Test butternut squash to see if it's fork-tender. When it is, remove soup from heat, and blend until smooth. I used my NutriBullet, but any blender would do.

    4. Return soup to the pot over low heat and stir in cream, milk, and onion powder, Add salt and pepper to taste. Enjoy with a grilled cheese, or by itself! 


Apple, Feta, and Turmeric Stuffed Chicken

Apple, Feta, and Turmeric Stuffed Chicken

I was raised by a couple of serious foodies. My mom is known among family and friends as an enthusiastic baker, who is happiest playing in the kitchen. My dad’s secret dream is to be on one of the amateur episodes of Chopped, and I’m certain he’d be a strong contender – he’s got some kind of innate flavor-mixing sixth sense that continually amazes me.

We all owe my dad an enormous debt of gratitude for this recipe, because it’s all his creation, and it’s unbelievably good. Thinking about it makes me immediately hungry. It’s the kind of impressive, crowd-pleasing dish that people take a bite of and swoon over. At least, that is, if they’re anything like me. It’s a little unusual for a stuffed chicken recipe, and you definitely need to have some specific ingredients for this one, but it’s beyond worth that extra trip to the grocery store. They’re not weird ingredients that you’ll only use once and then lose in the back of the refrigerator or pantry. If you don’t use them up by making this dish over and over – it’s that good – you’ll find lots of other recipes for them. If you don’t cook with them already, prepare to have feta, sun-dried tomatoes, and turmeric become your new best friends.

This dish starts with garlic, onion, and sun-dried tomatoes, stewing in olive oil. Then you add apples, ginger, and turmeric, and let them cook until everything is soft and the flavor has started to develop. The filling is finished with a good helping of feta cheese, stirred in until it gets all melted and the whole mixture thickens. Tell me you’re not thinking about that filling and wondering if you’ve got time to stop at the grocery store to get sun-dried tomatoes and feta! The chicken breasts get seared in a pan, sliced open to create a pocket, stuffed with the filling, and then cooked in the oven. After baking, they’re topped with mozzarella cheese, and then go back in the oven just until the cheese melts.

I generally prefer food that has some kind of spicy heat, but this dish is an exception. The sweetness of the apple with the salty feta and mozzarella, mixed with the tart sun-dried tomatoes, and flavored with the turmeric, onion, garlic, and ginger, make this stuffed chicken an absolute standout. With so many flavors involved, it’s important that they’re balanced just right, and in this recipe they go together perfectly.

The turmeric in this dish turns everything a bright yellow color, so I definitely recommend serving it with some colorful veggies. I went with a simple spinach salad, topped with feta, apple, and a balsamic vinaigrette. The flavors in the stuffed chicken would go well with just about anything, so you could serve it with asparagus, roasted sweet potato, or brussels sprouts. Or you could just forgo worrying about aesthetics because you’re more concerned with eating your stuffed chicken than posting it on the internet. Sometimes I barely get my blog photos taken before I dive into the food!

The nice part about this recipe is that it can be done from start to finish in about 45 minutes. Once you’ve seared the chicken and made the filling, you’re only 25 minutes away from eating. Make a quick salad or steam some veggies, and dinner is served. This dish is a great choice if you want to really impress someone with your cooking skills, because it looks and tastes complex, but it’s so easy to put together. I’m excited to try variations of this filling, with different fruit and seasonings – let me know in the comments if you try it out, and how you put your own spin on it!


Apple, Feta, and Turmeric Stuffed Chicken

Servings 4 servings

Ingredients

  • 4 chicken breasts
  • 1/3 cup olive oil + 2 Tbsps, divided use
  • 3/4 cup feta cheese
  • 1 small Gala apple
  • 1 small yellow onion
  • 2 tsps ground turmeric
  • 1 tsp ground ginger
  • 4 garlic cloves
  • 5 oz shredded mozzarella cheese
  • 5 oz sun-dried tomatoes
  • dash of salt - add to taste

Instructions

  1. Dice onion and mince garlic. Add all to a small saucepan with 1/3 cup of olive oil. Begin cooking over medium heat. Dice apple with skin still on, slice sun-dried tomatoes into thin strips, and add both to the sauce pan. Let cook until the apples and onions become tender.

    2. While the filling is cooking, get a skillet hot. Add 2 Tbsps of olive oil, and place chicken breasts in the skillet. Sear chicken on each side for two minutes, and remove from heat. Chicken should still be raw on the inside. Searing it on the stove just makes it easier to stuff, and helps it cook in the oven faster.

    3. Add turmeric, ginger, and feta to the sauce pan. Stir gently until cheese melts and the filling is well-mixed. Remove from heat.

    4. Cut a pocket into each chicken breast along the long side - be careful not to cut all the way through. Fill each with a fourth of the filling.

    5. Place stuffed chicken breasts on a baking sheet lined with foil. Bake in the oven at 350 degrees for 20 minutes. Check to make sure chicken is cooked through.

    6. Remove from oven, top with mozzarella cheese, and cook in the oven for an additional 4-5 minutes. Serve and enjoy!