Mom’s Chocolate Chip Cookies

Mom’s Chocolate Chip Cookies

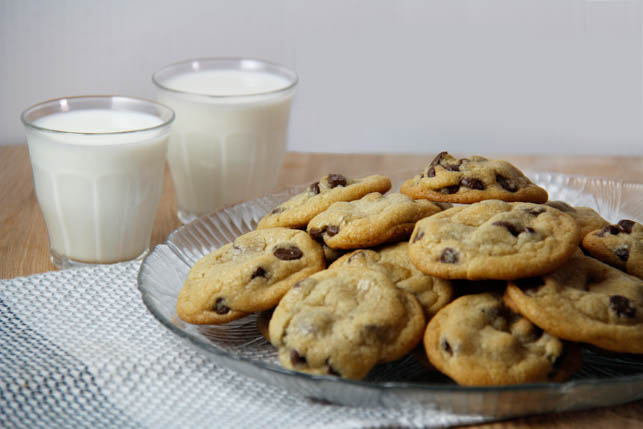
Chocolate chip cookie recipes are a dime a dozen, but this is the one that always breaks my diet when I’m trying to eat clean. This is the one that I return to over and over, because it’s just that good. These Chocolate Chip Cookies have achieved something like cult-status in my family. My mom has been making this recipe, which is a Betty Crocker original, since she was eight years old. It’s gone through minor adaptations over the years, and is essentially the cookie that every single person in my family loves, without fail.

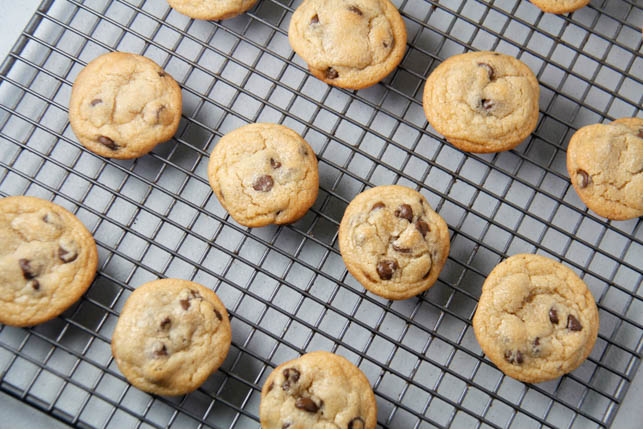
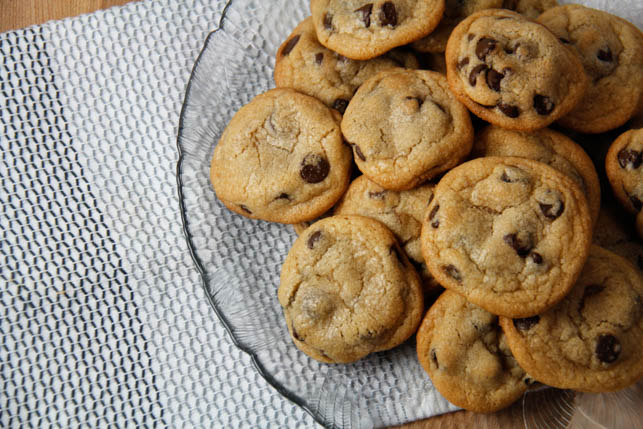
The texture of these Chocolate Chip Cookies is nothing short of perfection. They have those crispy edges and soft middles that I can’t get enough of. If you like over-done, crunchy cookies, leave these cookies in the oven a minute or two longer – they’ll develop more flavor while they’re in there too. They’re made with butter and shortening, so they taste rich without feeling too dense, something I’ve found that break-and-bake type cookies seriously lack.

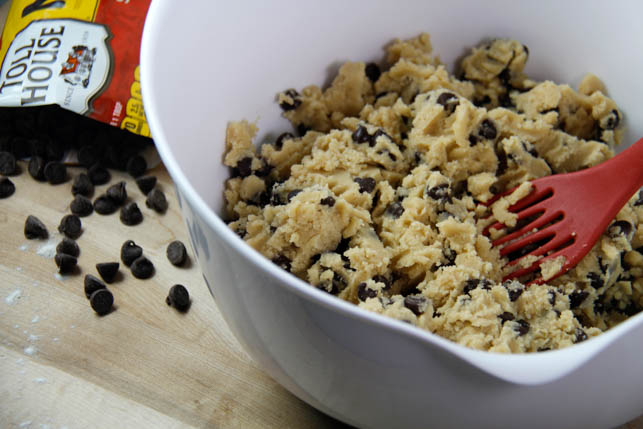
The texture is wonderful, but I think the flavor is what really keeps me coming back to these. They have a slight hint of salt, so there’s no overwhelming sweetness, and it amplifies the chocolate hit in each cookie. The butter and sugars are balanced exactly right, and there’s just enough vanilla to complement the chocolate, so these taste like the Chocolate Chip Cookies of your dreams. If we’re being honest here, I could eat the whole bowlful of cookie dough before any of it makes it to the oven. Apparently that’s bad for you or whatever, but I’ve never gotten sick. I think someone is just trying to keep me from living my best life.

The thing about this cookie recipe is that it took me 26 years to master it. I’ve tried making it several times over the course of my adolescence and early 20’s, and for some reason, I could never get it exactly right. This recipe is a perfect example of why precision matters in baking. Even a little extra flour can throw off the dough and leave you with sub-par cookies. Fortunately, I found a way to solve my problem a while ago: with a food scale.

I’ve given the measurements for the ingredients in grams (I try to do it with most of my baking recipes,) and it’s pretty important that you actually weigh them on a food scale to get the cookies exactly right. I promise it’s worth it. Baking with a food scale instead of measuring cups means way less clean-up, and no more trying to measure things like shortening or peanut butter by squishing them into a cup. If you haven’t already invested in a food scale, this is me begging you to do so. Your entire life will be better for it.

I sort of view this recipe as my mom’s family legacy. That’s completely ridiculous, as she has six children (I know, it was like growing up in a zoo), but baking is something I’ve always done with my mom and learned from her, so her beloved cookie recipe stands out to me as particularly important. I love the idea of a family recipe that gets passed through generations, and I plan to keep this one going forever.

This dough unfortunately isn’t the type that will do best if you mix it up and pop it right in the oven. It generally needs at least three hours to chill to achieve good results, and you’ll get even better results if you let it chill overnight. My mom mentioned that she discovered this years ago while running her zoo, as she had to work during toddler nap times and do things in stages to get anything done! The wait time for this dough lets it develop the proper flavor and texture. You can chill the dough for up to two days if you want to make it ahead, but the quality will start to decline after that.

Both the cookies and the dough freeze well. If you bake more cookies than you can eat, they keep okay for a day in an airtight container – but nobody has ever found out if they keep well longer than that.


Chocolate Chip Cookies

Recipe adapted by Laura Landi from Betty Crocker Chocolate Chip Cookies.

Servings 72 cookies

Ingredients

  • 2/3 cup butter, softened 150g
  • 2/3 cup shortening (I use Crisco) 128g
  • 1 cup granulated sugar 200g
  • 1 cup brown sugar, firmly packed 215g
  • 2 eggs
  • 1 tsp vanilla
  • 3 cups plus one Tbsp flour 385g
  • 1 tsp salt
  • 1 tsp baking soda
  • 2 cup semi-sweet chocolate chips 340g

Instructions

  1. 1. Cream together butter, shortening, and both sugars. Stir in eggs and vanilla until well combined.

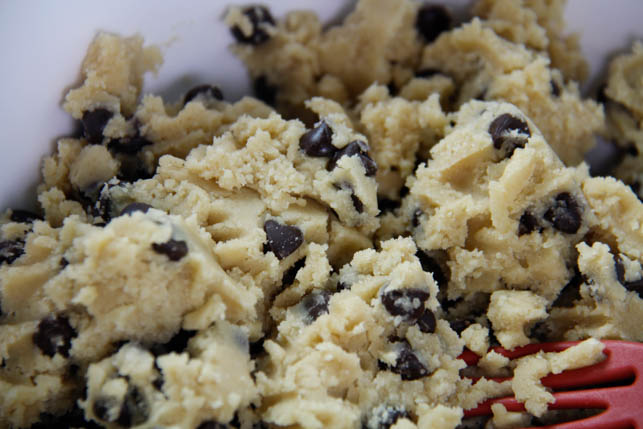
    2. In a separate bowl, stir together flour, baking soda, and salt. Mix thoroughly, and add to the sugar mixture. Stir gently just until everything is combined. Don't over-mix. Fold chocolate chips into the dough until evenly dispersed. 

    3. Place dough in an airtight container and refrigerate for at least three hours, up to two days. 

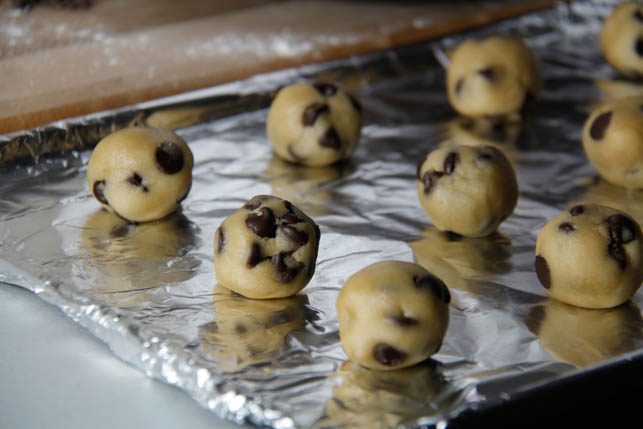
    4. Roll cookies into 1 inch balls and bake at 375 degrees for 7 minutes. Turn the tray in the oven and bake for an additional 1 to 1 1/2 minutes, depending on how they look. The bottom edges should look golden and baked through, the tops should look pale, but not doughy. Remove tray from oven and set on a cooling rack. Allow the cookies to remain on the tray for an additional 3 minutes before transferring to the cooling rack. If cookies look brown all over, skip this step and transfer to a cooling rack immediately. 

    Note: Freeze dough by rolling it into balls first. You can bake them directly from the freezer like this, increasing baking time by 30 seconds to 1 minute.

    This recipe makes quite a lot, as it's technically a double batch. It can be halved if you don't need 72 cookies, although I don't know anyone who has ever experienced that!


King Cake Cinnamon Rolls

King Cake Cinnamon Rolls

If there’s any food more ubiquitous for celebrating Mardi Gras than King Cake, I’m not certain what it is. I suppose pancakes would be a reasonable answer, but I wasn’t really in the mood for pancakes. I wanted to create something a little more interesting than an ordinary King Cake, and lot more delicious than any version that involves cinnamon rolls from a can. They’re okay in a pinch, but no substitute for the real thing.

This recipe is essentially the most delicious homemade cinnamon roll you’ve ever had, braided, baked, and topped with cream cheese frosting and festive sprinkles. Cinnamon rolls are a perfect choice for a sort of imposter King Cake, because King Cake is typically a yeast dough with cinnamon – the biggest difference between the two is the texture. If you’re a stickler for tradition, maybe check out a different King Cake recipe. If you want to make a batch of perfect, soft, gooey, “personal King Cakes,” then this recipe is for you.

King Cake Cinnamon Rolls are far superior to regular cinnamon rolls because of the way the cinnamon mixture is folded into the dough. The even distribution of gooey, buttery cinnamon-sugar throughout each roll makes every bite perfectly balanced. To achieve this, you start by splitting the dough into three sections. The sections are rolled out, one at a time, into roughly 12×10 inch rectangles. The rectangles of dough are covered with a thin layer of butter, then the cinnamon-sugar mixture, and then sliced into eight equal pieces, as shown in the photo below:

At this point, you stack the strips in layers of two, so you have four piles. Then you twist two of the piles together, and repeat with the other two piles, to get this:

Then you curl each twist into a circle, pinch the ends together, and place it in a greased 9×13 pan. They look a lot more elaborate than they are, but since you’re braiding just two sections together, it’s really just criss-crossing the pieces over each other. When you get them all in the pan and bake them, the result looks so impressive you may decide to skip frosting and sprinkles entirely – I mean, look at them:

But everyone knows that cream cheese frosting is half the reason you eat cinnamon rolls in the first place, and not adding sprinkles on Mardi Gras would be silly, so I don’t know if skipping them is really in your best interest. The cinnamon rolls do bake up sort of square-shaped, since they’re nestled in the pan that way. I cut the corners off of mine (after baking) to give them that nice, round, King Cake shape. This is a great way to go, because then you can eat all those extra corners. It’s not gluttony, it’s Fat Tuesday. It’s important not to waste food, after all.

If you want to make the experience more authentic, you can hide a little plastic baby inside one of the cakes. A popular alternative is to use a bean –  or in my case, a gold jelly bean (champagne flavored!).  In either case, remember to warn people to watch for it. Finding the baby or the bean in your cake symbolizes luck and prosperity, and means you’re the king for the day. Which, of course, means automatic permission to snag another cinnamon roll!


King Cake Cinnamon Rolls

Cinnamon roll dough adapted by Homemade With An Upgrade from "Master Formula: Multipurpose Sweet Dough," from Crust & Crumb, by Peter Reinhart.

Filling and cream cheese frosting recipes are from "Glazed Cinnamon Rolls", from The New Best Recipe, by the editors of Cook's Illustrated.

Servings 6 King Cakes

Ingredients

Cinnamon Roll Dough

  • 3 1/2 cups unbleached all-purpose flour, plus extra for kneading and rolling 420g
  • 1/4 cup granulated sugar 50g
  • 1 Tbsp instant yeast .33oz
  • 1/2 tsp salt
  • 1/4 tsp baking soda
  • 1/4 cup unsalted butter, softend
  • 1 1/4 cup buttermilk, room temperature 9.75oz
  • 1 1/2 Tbsp butter for spreading on rolled dough

Cinnamon Filling

  • 3/4 cup packed, light brown sugar 144g
  • 3 Tbsp cinnamon
  • 1/8 tsp salt

Cream Cheese Frosting

  • 4 oz cream cheese, softened
  • 1/2 cup powdered sugar 60g
  • pinch of salt
  • 1 Tbsp light corn syrup
  • 1 Tbsp heavy cream
  • 1/2 tsp vanilla extract
  • yellow, green, and purple sprinkles for decorating

Instructions

  1. Combine all the ingredients, except the cinnamon sugar, in the bowl of an electric mixer with a dough hook or in a mixing bowl. Mix on slow speed for 1 minute, then on medium speed for about 8 minutes.

    2. If mixing by hand, stir the ingredients together till they form a ball, and turn onto a floured surface (at this point, I let the dough rest while I quickly wash, dry, and spray the bowl). Knead for 10 to 12 minutes. The dough should be soft, smooth, and a little bit sticky, and should pass the windowpane test: after kneading for 6 to 8 minutes, or when the dough feels supple and stretchy, pinch off a small piece and stretch it slowly apart, gently pulling and rotating it. You are trying to stretch the dough into a thin, translucent membrane or windowpane. If it tears easily before reaching this state, knead for a few more minutes and try the test again. If the dough has not set up within 15 minutes, it may be too wet or too dry, in which case you will have to add more flour or water, as needed.

    3. Place the dough in the clean bowl lightly oiled with cooking spray, mist the dough with cooking spray, cover it with plastic wrap, and allow it to rise for 45 minutes. The dough will double in size. Then put it in the refrigerator for 1 hour. It will firm up as it cools. It can stay in the refrigerator longer, if necessary, but I have not tested it past 3 hours.

    4. Prepare a 9x13 pan. If baking immediately, generously butter the bottom and lightly butter the sides, and sprinkle the bottom with cinnamon or cinnamon-sugar (1 part cinnamon, 4 parts sugar, stirred together). If freezing for future use, line pan with parchment or parchment-lined foil, butter the bottom lightly, and sprinkle the bottom with cinnamon or cinnamon-sugar. Set aside.

    5. Prepare filling: stir brown sugar, cinnamon, and salt together in a small bowl, and set aside.

    6. Separate chilled dough into three equal pieces, cover and let rest for 15 minutes. Lightly dust the work surface with flour and roll out one ball of dough into a rectangle about ¼” thick, 12” along one side and about 10” on the other. Use the back of a spoon to gently spread the dough with a ½ Tbsp very soft butter. Evenly sprinkle the butter with 1/3rd of the filling.

    7. Slice dough into eight equal strips. Working with two strips at a time, stack one on top of the other so you have four sets of two stacked strips. Take two of the sets, pinch the top ends together, and braid them together. Each stack is treated like a single unit, so really you're just criss-crossing the two stacks back and forth over one another. Curl the criss-crossed dough into a circle, pinching the ends together to close the circle, and place in the greased baking pan. Repeat this process with the other two balls of dough until you have six round braided rolls in the pan.

    8. Mist the rolls with cooking spray, and cover loosely with plastic wrap. Set the pan aside to rise at room temperature for about 45 minutes. Position the baking rack in the center of the oven. Preheat the oven to 350 degrees.

    If you need to hold the rolls longer than 45 minutes before baking, pop them in the fridge after the rise. If freezing for future use, cover tightly with plastic wrap, then wrap securely with aluminum foil (pan and all), and use a Sharpie to write gently on the foil to label it: “Thaw in fridge overnight, then let rise 1 hour on counter. Bake at 350 degrees about 55 minutes.”

    9. Remove the plastic wrap and bake the swirls at 350 degrees for about 15 minutes.

    10. Prepare the icing/glaze: Beat the cream cheese until it is perfectly smooth. Beat in the powdered sugar and salt until completely mixed. Beat in the corn syrup, cream, vanilla extract, and almond extract, if using, until the icing is smooth.

    11. When the spiral rolls have baked 15 minutes and look just barely golden brown, gently break a center swirl open to check that the middle is done (not still doughy-looking). Do not overbake. Drizzle and spread the glaze over the finished rolls. Top with yellow, green, and purple sprinkles. Add a gold jelly bean or little plastic baby, pushed into the underside of one of the rolls.


Dark Chocolate Caramel Raspberry Popcorn

Dark Chocolate Caramel Raspberry Popcorn

I’m one of those people who loves awards season. I love all the beautiful people in their gorgeous clothes on the red carpet, and I love when someone funny does a great job hosting. The atmosphere at awards shows seems somehow both laid back and also buzzing with excitement, and I like feeling like I’m a part of it, even though I’m just sitting on my couch. As the Academy Awards are coming up this weekend, I thought it would be fun to create a very fancy snack to eat while watching, since I can’t go be a very fancy person at a huge, televised event.

I looked up the menu for this year’s official Oscars after-party, always catered by Wolfgang Puck. Among other things, he’s planned gold-dusted truffle popcorn. A decadent popcorn seems like just the thing to snack on while watching the Oscars, but I do not have access to gold dust. I mean, I probably could if I tried hard enough, but who really wants to eat gold dust on popcorn, when you can just coat it with beautiful, golden caramel instead? So I started thinking about what would go nicely with caramel, and chocolate came to mind, as it is the most obvious answer in the world. I wanted to add a little something extra, a little more glamour. I’d seen freeze-dried berries in a recipe from my name is yeh recently, and thought they might be the perfect addition. (You have to click on that link, by the way – her photos are gorgeous).

I went with freeze-dried raspberries, and I was so right about adding them to my popcorn. The combination of the slightly salty caramel, the sweet, almost bitter chocolate, and the tart raspberries is completely amazing – and addicting. The tartness of the berries really diffuses the bitterness in the chocolate, so every bite is perfect. This is the kind of recipe you can’t make too often because it’s very rich, but the compelling flavors make it easy to eat the whole batch. The recipe makes a good amount, so there’s plenty to share – if you have the self-control for that.

It starts with whipping up a basic caramel popcorn (only takes 20 minutes, and I highly recommend you eat some of it right away), and then you add a dark chocolate drizzle, followed by chocolate chunks, and crushed, freeze-dried raspberries. You can play with quantities, depending on what you like, but I promise the raspberries give this popcorn some serious star quality. This might be the Meryl Streep of popcorn.

It’ll keep for a couple days in an airtight container, if you have it around that long. Dark Chocolate Caramel Raspberry Popcorn is like a fantastic Oscars dress: custom made for the occasion, but talked about for years to come!


Dark Chocolate Caramel Raspberry Popcorn

Prep Time 5 minutes
Cook Time 20 minutes
Total Time 25 minutes
Servings 8 cups of popcorn

Ingredients

  • 8 cups air-popped popcorn
  • 1 cup brown sugar
  • 1 cup unsalted butter 2 sticks of butter
  • 1/8 tsp salt
  • 1 cup chopped dark chocolate; I just used dark chocolate chips divided use
  • 1 cup whole freeze-dried raspberries

Instructions

  1. Start by popping your popcorn with an air popper - you can also do this in a brown paper bag in the microwave. Place popcorn in a large bowl.

    2. Melt brown sugar, butter, and salt together over high heat. Bring just to a boil - (right when you start to see tiny bubbles), and then reduce heat and let simmer, stirring constantly, for 5 minutes. 

    3. Pour caramel over top of popcorn and stir until the popcorn is all coated. Line a baking sheet with foil and spray with non-stick cooking spray. Pour popcorn out onto the baking sheet, and spread into an even layer. Bake at 350 degrees for 8 minutes. 

    4. While the popcorn is in the oven, melt half of the chopped dark chocolate in a piping bag - you can also use a sandwich baggie. Be sure to melt it in 10 second bursts in the microwave to keep the chocolate from seizing. Crush the freeze-dried raspberries into small pieces.

    5. When the popcorn comes out of the oven, let cool until you can handle it without burning yourself. Eat some, and then drizzle half of the melted dark chocolate over the whole tray. Sprinkle on a 1/4 cup of the chopped dark chocolate bits and half of the raspberries. 

    6. Place the tray in the freezer for 5-10 minutes. Remove from freezer and check that the melted chocolate has mostly firmed up. Stir popcorn around on the tray. Drizzle on the rest of the melted chocolate, and top with the rest of the chopped dark chocolate and raspberries. Freeze for 5-10 more minutes, and then pour into a bowl and enjoy. 


Triple Chocolate Hearts

Triple Chocolate Hearts

This recipe really counts as four recipes, because there are four homemade components that go into it. Triple Chocolate Hearts begin with a gooey brownie base. Next is a layer of smooth, pink, vanilla buttercream, followed by a layer of fluffy, moist, chocolate cake. The whole thing is topped with rich chocolate ganache, dripping down the sides of the cake. I wanted to create individual desserts of a similar size and cuteness as cupcakes, but in a more interesting form. I think these fit the bill perfectly.

Before you go running away because there are way too many parts to this recipe, let me make it easier. You can use a box brownie mix, a box cake mix, and a can of frosting if you so desire/don’t happen to have some extra time on your hands. Your treats will still be adorable and delicious, and you’ll only need to make a quick ganache from scratch. That said, baking is clearly my favorite hobby, so if I can find the time, I like to do it all from scratch. If you do have a little extra time, a quick way to improve canned frosting is to whip it with your mixer. This gives it a lot more volume, so you can put a nice thick – yet light and fluffy – layer between the brownie and the cake.

Triple Chocolate Hearts are extraordinarily rich, but I feel that Valentine’s Day calls for it. What is Valentine’s Day, if not an excuse to eat a lot of decadent chocolate-y desserts? Yeah, yeah it’s about love and all that, but the rest of the year can be about love if you make it, and wouldn’t that be a wonderful thing? Letting yourself indulge in desserts like this all year is definitely not going to work out as well. Love all year, eat extraordinary treats on Valentine’s Day.

These fit perfectly in little individual cupcake boxes, so you can package them with a pretty ribbon and hand them out to your favorite people. Be careful who you give them to, though – as soon as they take the first bite, I pretty much guarantee they’ll fall in love with you all over again.

You’ll be left with scraps of brownie and cake, and maybe extra frosting and ganache. I think it would be an absolute crime to waste all of this. Instead of just eating all the leftovers the very same day, I like to work them into other recipes. You can make mini triple chocolate parfaits, cake pops, or use the extra bits to top off yogurt or an acai bowl if that’s your thing. Of course, I’m not always the best at following my own re-purposing advice. I ate basically all of the scraps myself when I made these for co-workers last year. I was in the thick of planning my wedding; I promise I needed to eat the extras to keep from losing my mind. You can easily freeze the leftover cake and brownie pieces for self-medication purposes down the road, if you don’t want feel like turning them into something else.

You can change the concept here, and make adorable non-heart-shaped cakes with different sprinkles and white or chocolate frosting in the middle instead. These would make perfect birthday treats if you’re looking for something to make besides cupcakes. The only thing that won’t change is how delicious they are.

Every layer of Triple Chocolate Hearts has a different level of sweetness, so they aren’t overwhelmingly sugary. The varying textures of the layers make them much more interesting than a typical cake,  so you’ll keep coming back for another bite, and another. Just, do yourself a favor and have some milk on hand – anything this chocolatey requires milk.

Triple Chocolate Hearts

I use the standard Hershey's Collector's Chocolate Cake recipe for Triple Chocolate Hearts.  I didn't invent this one, but I wish I had!

The brownies and frosting are just typical recipes for brownies and buttercream - nothing super special or innovative (but extremely delicious).

The ganache is an original recipe. 

Ingredients

Hershey's Collector's Chocolate Cake

  • 3/4 cup butter
  • 1 3/4 cup sugar
  • 2 eggs
  • 1 tsp vanilla
  • 2 cups flour
  • 3/4 cups cocoa
  • 1 1/4 tsp baking soda
  • 1/2 tsp salt
  • 1 1/3 cup water

Brownies

  • 2 oz unsweetened chocolate (I used Baker's)
  • 1/2 cup butter
  • 1 cup sugar
  • 2 eggs
  • 1/2 tsp vanilla
  • 1/2 cup semi-sweet chocolate chips
  • 1/4 cup flour
  • 1/4 tsp salt

Fluffy Pink Buttercream

  • 1/2 cup unsalted butter
  • 1 1/2 cups powdered sugar - divided use
  • 1/4 tsp vanilla
  • 2 dashes salt
  • 1/2 Tbsp milk
  • 4 drops red food coloring

Chocolate Ganache

  • 4 Tbsp melted, unsalted butter 56.5g
  • 6 Tbsp cocoa 30g
  • 1/2 cup semi-sweet chocolate chips 85g
  • 1/4 cup heavy cream

Instructions

Hershey's Collector's Chocolate Cake

  1. Cream butter and sugar in large mixer bowl. Add eggs and vanilla; beat 1 minute at medium speed. 

    2. Combine flour, cocoa, baking soda, and salt; add alternately with water to creamed mixture (quickly, with the mixer running - takes about 3 minutes).

    3. Pour batter into two greased and floured 8-inch or 9-inch layer pans, or 13x9 pan. Bake at 350 degrees for 35 - 40 mins for 8-inch; 30 - 35 mins for 9-inch; 37 mins for 13x9. 

Brownies

  1. Melt together butter and unsweetened chocolate, stir until smooth. Add sugar, eggs, vanilla, and chocolate chips. 

    2. Stir in salt and flour. Pour batter into a greased and floured 8x8 pan. Bake at 325 degrees for 35-40 minutes. Do not over-bake. 

Fluffy Pink Buttercream

  1. Cream together butter and 1 cup of the powdered sugar. Stir in vanilla, salt, and milk.

    2: Stir in remaining powdered sugar. When sugar is completely incorporated, add food coloring and stir until frosting is uniform. 

    3: Optional, but highly recommended: Whip frosting in a mixer on high until very fluffy, about five minutes. 

    - Keeps well in the refrigerator for several weeks. 

Chocolate Ganache

  1. Combine melted butter and cocoa in a small bowl. 

    2. Pour chocolate chips into another bowl. Heat heavy cream for about 25 seconds in the microwave - you can also do this over the stove. You just want it hot enough to come barely to a boil. Pour cream over chocolate chips and let sit for one minute. Stir until chocolate has melted and the mixture is completely smooth. 

    3. Combine the two bowls of chocolatey essence into one bowl of nirvana.

Tripe Chocolate Hearts

  1. Make Cake (I did a 9x13) and Brownies. While these are baking, make frosting and ganache. When cake and brownies are cool, use a cookie cutter to cut heart shapes from each. Cut off the excess cake/brownie that sticks out over the top edge of the cookie cutter so that both sides of your heart shapes are even and flat. 

    2. Use the brownie hearts as the base. Frost with a generous layer of the pink buttercream. Top with a cake heart, bottom side-up, to give you a smoother surface for the ganache. 

    3. Spread a thick layer of ganache across the top of the cake, allowing some to drip down the sides. Decorate the hearts with sprinkles, and try not to eat all of them immediately!


Chocolate Chip Crater Cake

Chocolate Chip Crater Cake

I’m going to tell you a secret that I hold close to my heart. I don’t always tell people, because they often react in shock and horror, but I think it’s time to proclaim it to the world. Click away now if you’re easily distressed. Ready?

I don’t like coffee.

I know you’re staring at your screen right now, mouth agape, wondering how this could possibly have come to pass. Who doesn’t like coffee? Most people practically live on the stuff! I don’t have anything specific against it, I’ve just never enjoyed drinking it enough to make it a part of my life.

You know what I do like? Coffee cake – all versions of it. Chocolate Chip Crater Cake makes an absolutely delightful coffee cake. You can also choose to enjoy it sans coffee, perhaps with a scoop of vanilla ice cream, as I do. It’s versatile that way.

Chocolate Chip Crater Cake is a long-standing favorite from my childhood. My mom couldn’t tell me exactly where we got this recipe, although she suspects that it came from Betty Crocker. This isn’t exactly a new recipe, but I haven’t seen it around at all lately, so I figured it was time to start bringing it back.

This cake is a different creature from a lot of typical go-to desserts. It’s got a fluffy, cake-ybase, a layer of gooey, melted chocolate chips, another layer of cake, and a buttery, cinnamon crumble topping that ties the whole thing together. It’s baked in an 8×8 pan, so the recipe doesn’t make a huge amount. I tend to prefer that in dessert recipes I know I love. If I don’t bake too much of it, I won’t eat too much of it. Seems pretty rudimentary, but portion control has never quite been my strong suit. Especially when we’re talking about something this delicious.

Chocolate Chip Crater Cake is the dessert equivalent of those tiny restaurants that don’t look like much, but serve amazing food. It’s not the prettiest or the most intricate, but the balance of flavors and textures really makes up for what it lacks in appearance.

This recipe originally calls for Bisquick, which you are perfectly welcome to use – your results will be perfectly fine. I use a homemade version of Bisquick that I like to keep on hand – it keeps well for a long time in the refrigerator. I’ve included it below the recipe for the cake, in case you decide to make it from scratch as well. I know a lot of people like to know exactly what ingredients go into their food, and commercial mixes can make that more difficult.

Whether you enjoy it by itself, with ice cream, coffee, or coffee flavored ice cream, Chocolate Chip Crater Cake is a dessert you’ll want to make again and again. It’s simple yet rich, and about as comforting as a dessert can be. Try it hot out of the oven, and I promise you won’t even remember that it’s winter.

Chocolate Chip Crater Cake

Course Dessert
Prep Time 15 minutes
Cook Time 30 minutes
Total Time 45 minutes

Ingredients

Cake

  • 2 cups Bisquick 216g
  • 1/4 cup sugar
  • 2/3 cup milk
  • 1 egg
  • 1/4 tsp cinnamon
  • 1 tsp vanilla
  • 1 cup chocolate chips

Topping

  • 1/4 cup sugar
  • 1/4 cup packed brown sugar
  • 1/4 cup Bisquick
  • 2 Tbsp butter
  • 1 tsp cinnamon

Instructions

  1. Step 1: Stir together Bisquick, sugar, and cinnamon. Add egg, vanilla, and milk, and stir until well combined. It's alright if there are some lumps; these won't matter once it's baked. 

    Step 2: Pour half the batter into a greased 8x8 pan. Top with chocolate chips in an even layer. Pour remaining batter over the chocolate chips and spread to cover them.

    Step 3: Use a fork to stir together topping ingredients, and sprinkle evenly over batter. 

    Step 4: Bake at 350 degrees for 25-30 minutes until the topping is golden brown and crispy. Cool completely and cut into squares.


Homemade Bisquick

Prep Time 5 minutes
Total Time 5 minutes
Servings 3 cups

Ingredients

  • 2 cups flour 240g
  • 1 Tbsp baking powder
  • 1/2 tsp salt
  • 2 Tbsp buttermilk powder
  • 1/2 cup cold butter, unsalted

Instructions

  1. Step 1: Sift dry ingredients together in a large bowl. 

    Step 2: Cut in butter to the size of small peas. Refrigerate if not using right away - may also be stored in the freezer. 


Gluten Free Fudge Brownie Bites

Gluten Free Fudge Brownie Bites

When I first started learning the ins and outs of gluten-free baking, I was not impressed. You have to mix roughly a billion different types of flours in order to create a product that hopefully, maybe, resembles the real, gluten-filled thing (okay, slight exaggeration, but not by much). It’s easier to adapt some recipes than others, but all of it involves a certain amount of trial and error. The more I do it, the more gluten-free baking appeals to me, in spite of its difficulties. I’m not celiac, but I do believe that we’re generally better off eating fewer refined carbs, in this case wheat flour, bearer of gluten (says the woman who recently devoured her weight in macaroni and cheese – it’s about balance). Anything that makes a recipe healthier without sacrificing the flavor or texture means that I get to enjoy more of the foods I love and still fit into my jeans. That’s everyone’s dream come true – right? If someone offered me a million dollars or the ability to eat anything I want without gaining weight, I think everyone knows which I’d choose.

Read More