Salsa Verde Chicken Enchiladas

Salsa Verde Chicken Enchiladas

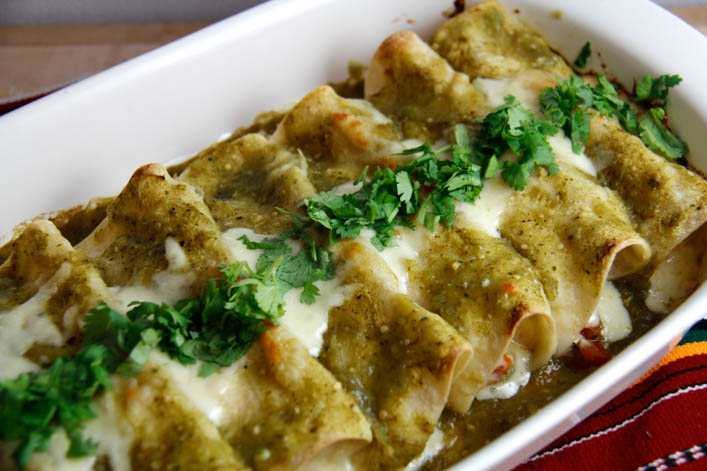
Most of the time when I’m dreaming up blog posts, I try to be inventive and give recipes delicious new twists. Other times, I’m just hungry for something really specific, and I get inspired to test recipes until I make my dream version of a classic. Salsa Verde Chicken Enchiladas is one such classic that I didn’t want to change too much. Why mess with perfection? These enchiladas are bursting with flavor, the chicken is moist and perfectly seasoned, and they aren’t hard to make at all. As a person who eats at a lot of Mexican restaurants, I can say that these are absolutely restaurant quality. All they need are some rice and beans on the side, and maybe a margarita or two.

Before testing this recipe, the only experience I had with salsa verde was eating a lot of it. I have found a wonderful version that is so much simpler to make than I ever would have imagined. Don’t you just love it when your favorite foods are actually so easy to throw together? I combined recipes for salsa verde from Tyler Florence and The Flavor Blender and I think I may have made the sauce of my dreams. I have been putting it on everything I eat and I’m not sure I’ll ever stop. I love the tangy, spicy flavor, and it can be made as hot or mild as you like, in case spicy food isn’t your favorite. Spicy food is definitely my favorite. But I actually prefer it toned down in a salsa like this, because there are so many interesting flavors at play, and I really want to be able to taste all of them.

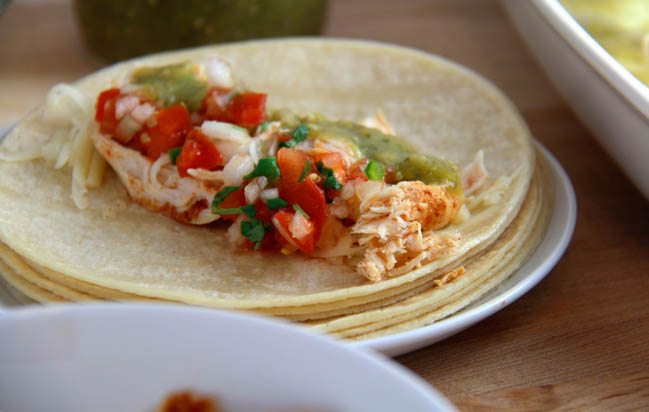
Making enchiladas can seem like kind of an arduous process, because you have to prepare all of the ingredients and then fill and roll them. It definitely takes some time, but a lot of that is really just letting things cook in the oven. You start by roasting the tomatillos, peppers, and onions for the salsa verde. Then you roast a couple of chicken breasts with some olive oil and seasonings. You blend your salsa together, whip up a quick fresh tomato salsa while the chicken is cooking, shred the chicken after it’s done, and then you’re ready to assemble the enchiladas. I do recommend doing all of this before you start on the margaritas, but everyone has her own method!

Can we talk for a second about how Mexican food is the best food? My husband and I went to Mexico for our honeymoon and I’m dying to go back purely for the food. (That’s a lie, I also want to go back to lay out at a beautiful resort in Playa Del Carmen while someone brings me a cocktail, and relax all day). Anyway, even when we went off of the resort to eat, it seemed like the food wasn’t all that different from what you can get in a really good Mexican restaurant in D.C. I don’t know if this makes me really excited about D.C. or confused about Mexico, but I do know that it means Mexican food is consistently wonderful, if you know what to look for. And if all else fails, you now have a seriously amazing Salsa Verde Chicken Enchilada recipe up your sleeve!

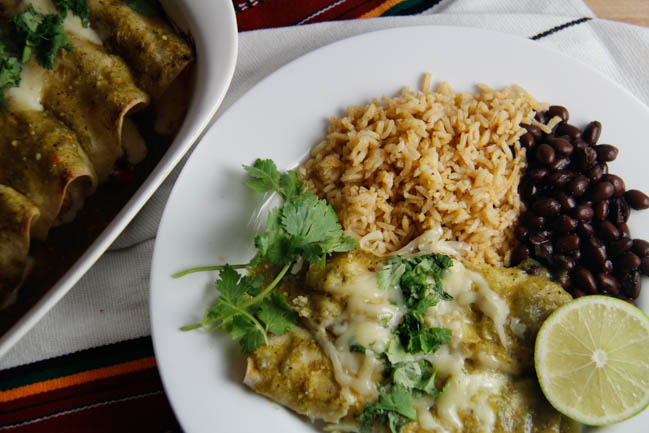
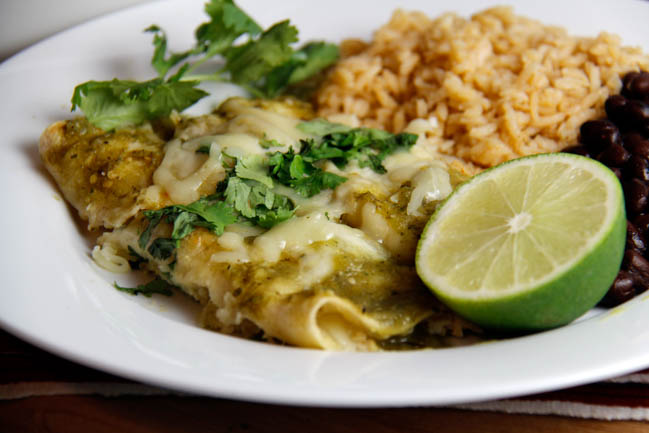
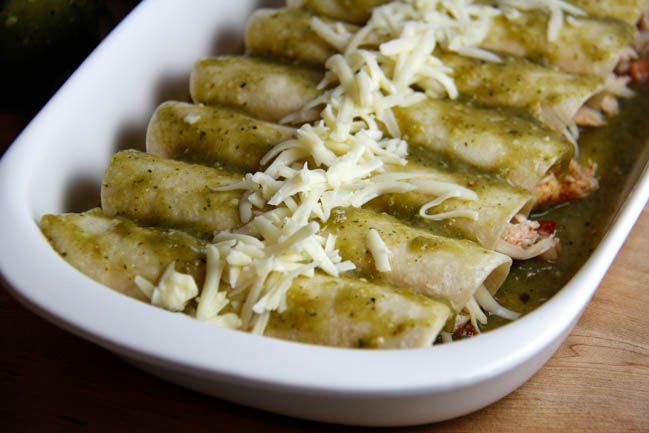
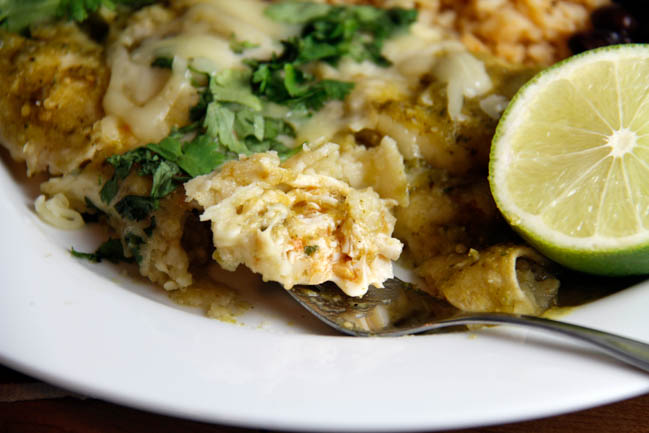
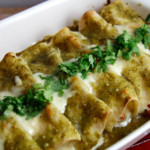
These Enchiladas are probably one of my favorite things I’ve ever made. They’re stuffed with chicken, plenty of cheese, and fresh tomato salsa to brighten up the filling a little. Add a squeeze of lime, an extra dollop of salsa verde, and some cilantro on top, and you won’t even know what hit you. These are perfect to serve to a bigger group, because you can make a couple large trays at a time, and even pre-bake them, and then just heat them up in the oven when you want to serve. If you somehow end up with extra salsa verde, or want to prepare it ahead of time, it can be stored in an airtight container in the fridge for a week. I’m so excited to try variations on the filling with these, but every time I start considering that, I think about how much I really just want the perfect chicken version. It’s like I said before, some things just don’t need to be changed, because they’re exactly right the way they are.


Salsa Verde Chicken Enchiladas

Salsa Verde recipe adapted from Tyler Florence and The Flavor Blender.

Servings 16 enchiladas

Ingredients

Salsa Verde

  • 1 lb tomatillos, de-husked and washed
  • 1 poblano pepper
  • 2 jalapeno peppers
  • 4 cloves garlic, wrapped in foil
  • 1 medium white onion
  • 3/4 cup chicken broth
  • 1/2 cup cilantro
  • 2 tsps cumin
  • 3 Tbsp lime juice
  • 1 tsp salt

Chicken Filling

  • 2 lbs chicken breasts
  • 4 Tbsp olive oil, divided use
  • 1 Tbsp paprika
  • 1 Tbsp cumin
  • 1 Tbsp garlic powder
  • 1 tsp salt
  • 16 soft corn tortillas
  • 2 cups shredded Monterey Jack cheese
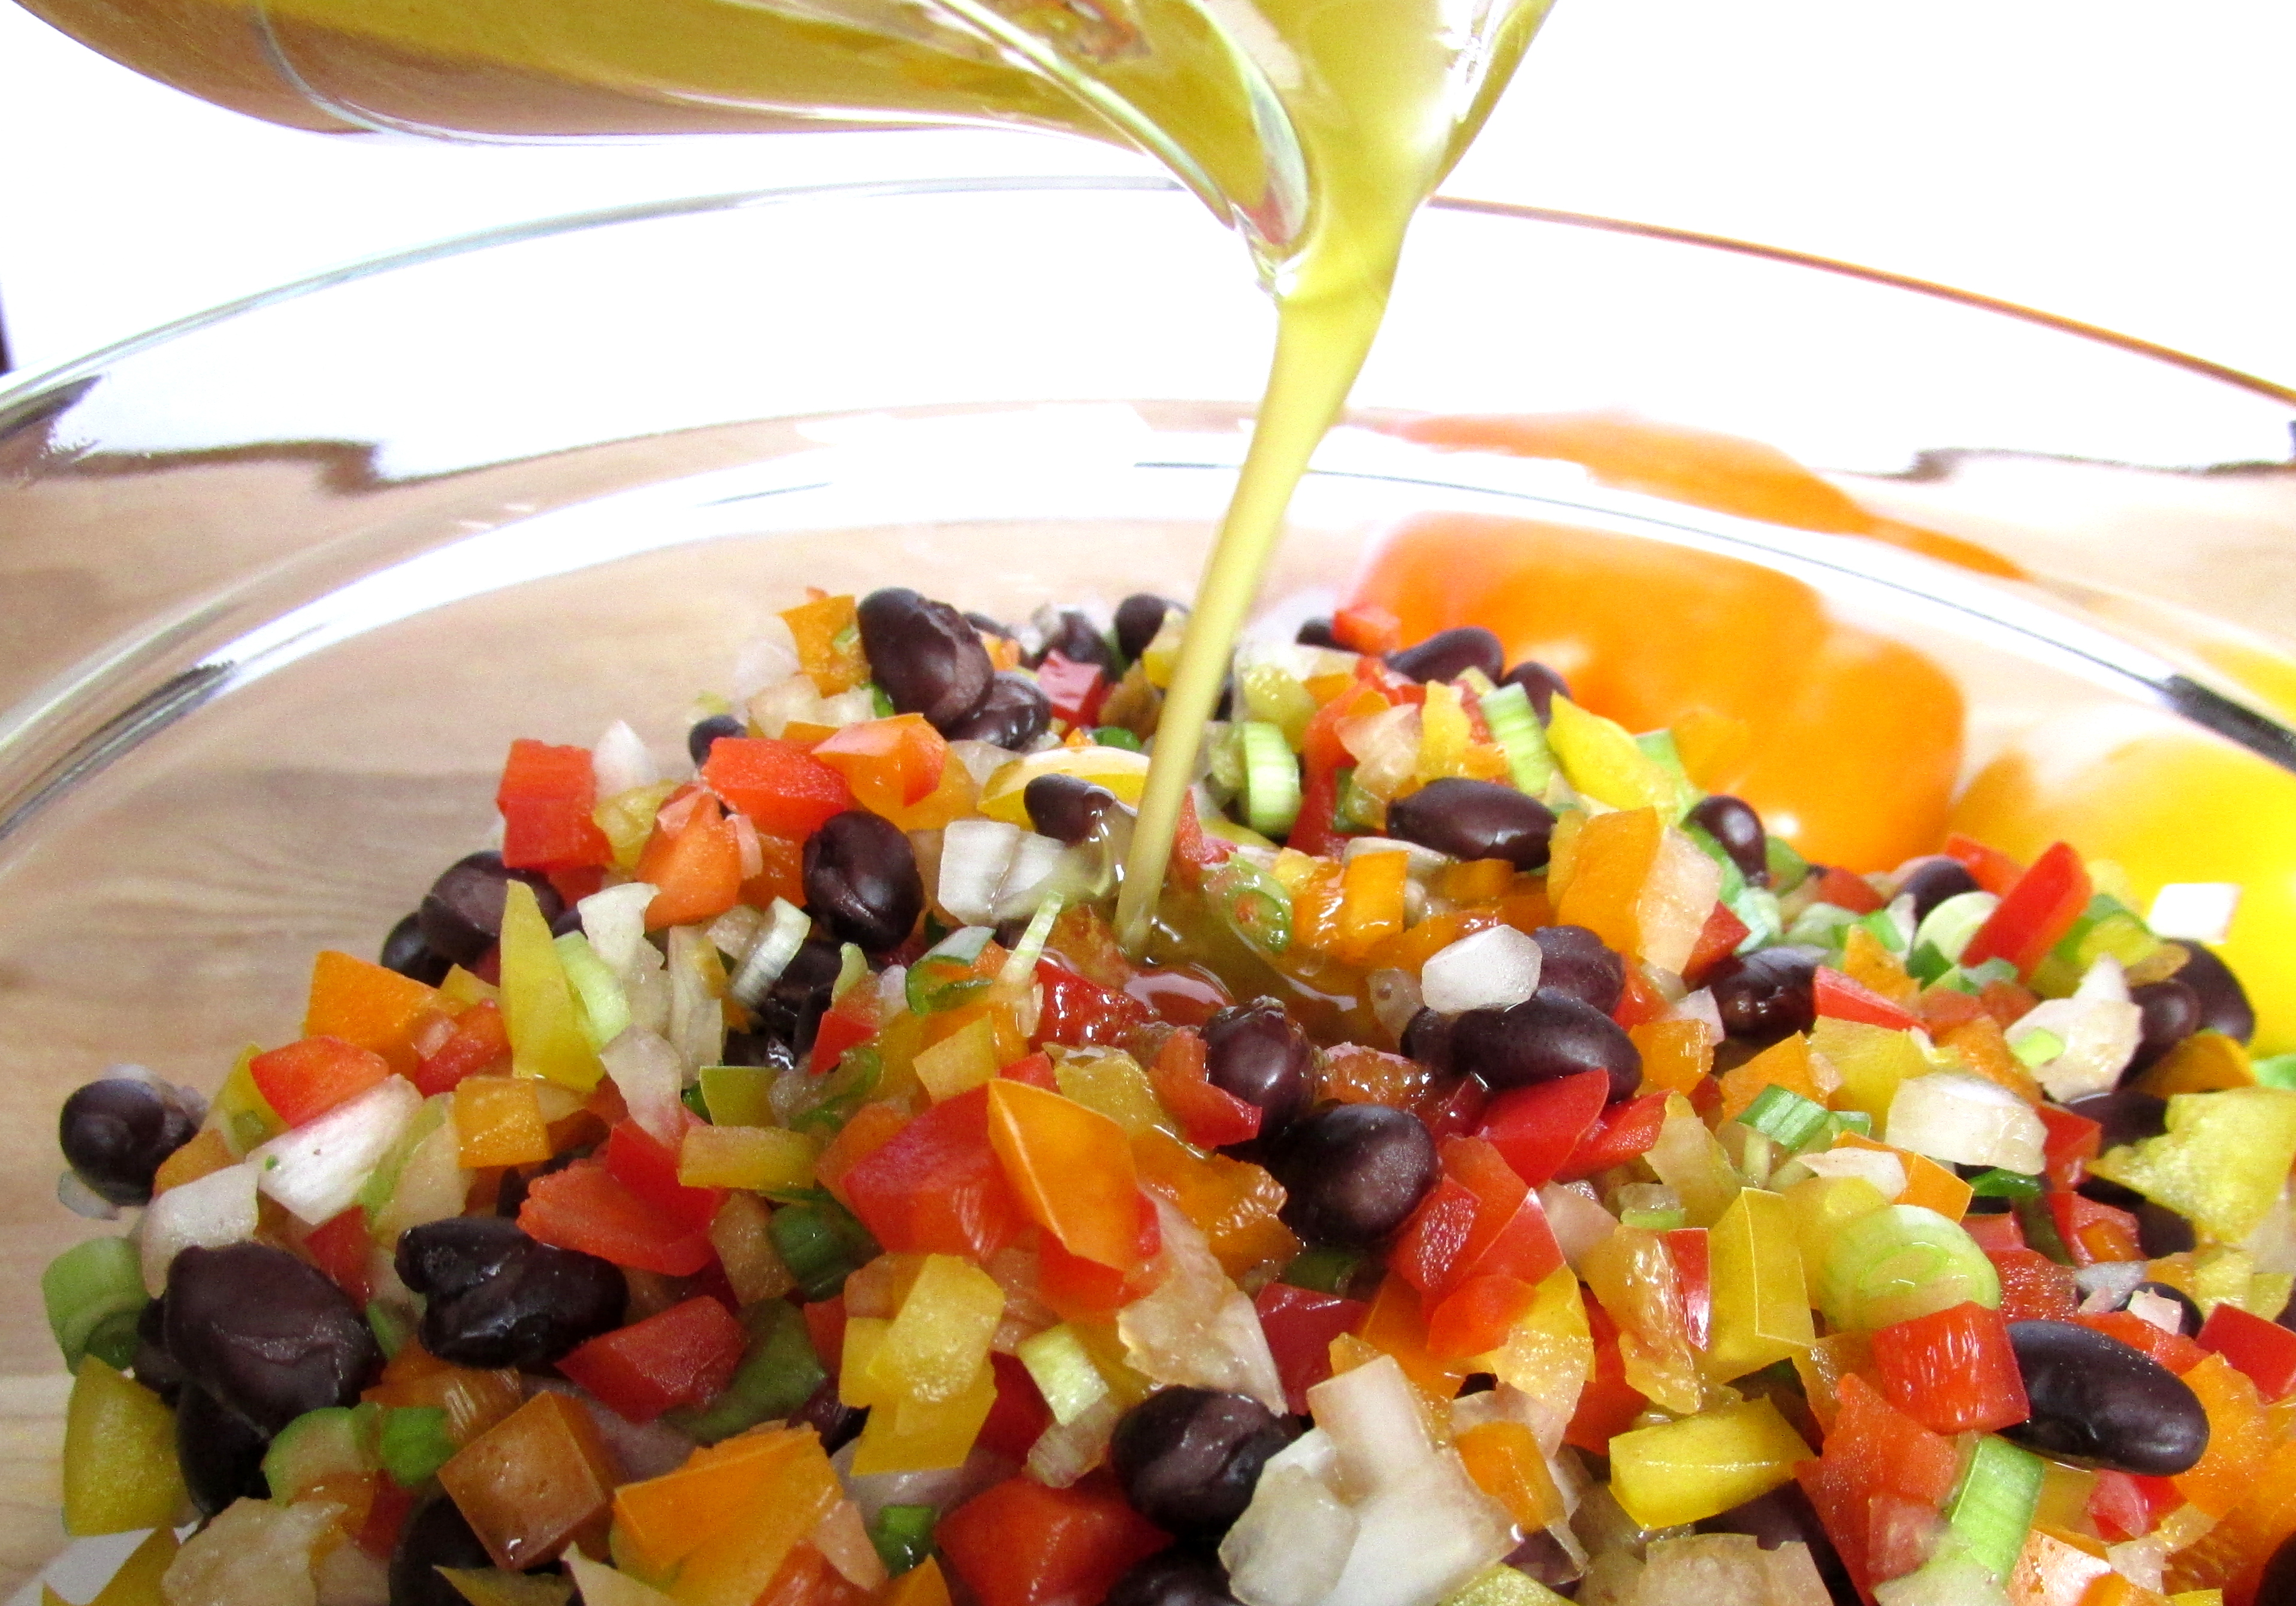
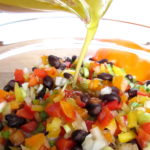
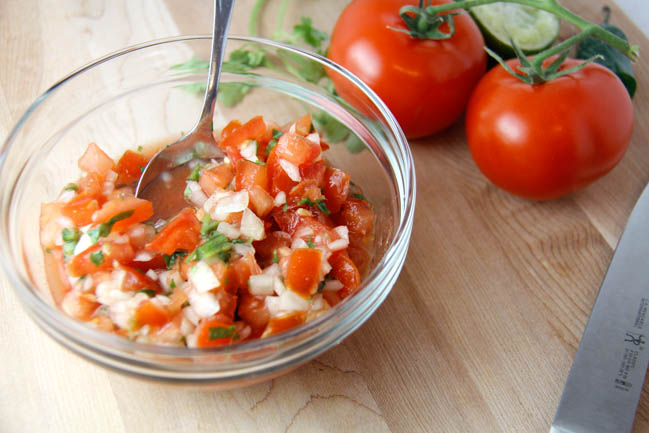
Fresh Tomato Salsa

  • 2 tomatoes
  • 1/2 medium white onion
  • 1/2 jalapeno
  • 1 Tbsp lime juice
  • 1/2 tsp salt
  • 3 Tbsps cilantro, chopped

Instructions

  1. Make the salsa verde. Place de-husked tomatillos, poblano, jalapeno, and garlic cloves (wrap the garlic cloves in foil to prevent burning) on a baking tray lined with foil. Broil in the oven for 7 minutes. Cut a white onion into quarters. Remove the tray from the oven, add the onions to it, and bake for an additional 7 minutes. 

    2. Place two chicken breasts on a baking sheet and pour two Tbsps of olive oil over top. Stir together spices and sprinkle evenly over top. After the salsa verde ingredients are out of the oven, reduce oven temperature to 350 degrees, and bake chicken for 35-40 minutes. 

    3. Allow tray of broiled tomatillos and peppers to cool, and then de-stem the tomatillos, poblano, and jalapenos, and cut into quarters. For the jalapenos, de-seed them if you want a milder salsa. Leave in the seeds of one jalapeno if you want the salsa to have a kick without being extremely hot. Add all of the ingredients from the tray to a food processor (my NutriBullet was perfect for this), and run until everything is broken down and mixed. Add the remaining ingredients to the food processor and pulse until well-blended.

    4. Make the fresh tomato salsa. Dice tomatoes and onion, and de-seed and finely chop jalapeno. Stir together all ingredients, adding more salt to taste. 

    5. When the chicken is done, allow to cool slightly, and place on a plate. Shred each chicken breast with two forks. 

    6. Spread salsa verde in the bottoms of 2 9x13 baking pans, about 1/4 cup for each. Assemble your enchiladas: Heat the tortillas in the microwave, and then brush them on each side with olive oil. This keeps them from breaking when you roll them. Fill each with a sprinkle of shredded cheese, chicken, and about a Tbsp of each kind of salsa. Roll, and place in the baking pan. When the pans are full, spread more salsa verde over the tops of the enchiladas, and sprinkle generously with cheese. Bake pans at 350 degrees for about 25-30 minutes, until the cheese just starts to lightly brown on top. Top each enchilada off with a little more salsa verde before serving. 


Salsa Bruschetta

Salsa Bruschetta

This recipe is one of my favorite creations thus far. It happened sort of by accident, ending up in a much different place than it started. The original inspiration was the concept of Pan a la Catalana, and then I started researching recipes, and went a completely different way. I was in the kitchen with my tomatoes and garlic and my baguette, and suddenly I was just adding things to a bowl and tasting and adding some more. I seem to do that a lot lately, which makes me both very excited about what I could create, and very concerned that I’m missing a lot of interesting things that might result from me ever following a recipe properly. But, what would be the fun in that?

The Salsa Bruschetta that has resulted from my impatience and possible over-confidence in the kitchen is fresh, bursting with flavor, and a perfect addition to your favorite tapas recipes – I served it alongside my Baked Patatas Bravas. I used tomato and onion as a base, and added garlic and a bit of balsamic vinaigrette, along with basil, lemon, brown sugar, and olive oil. It’s got a lot of the flavor that you would find in Pan a la Catalana, and in traditional bruschetta, with some sweetness and citrus that really lift the onion and the garlic to make them a little brighter. The lemon and onion are what really take this bruschetta recipe into salsa territory, because there isn’t a lot of  salsa-esque heat. I added a pinch of cayenne, but I didn’t want that to overshadow the freshness of the tomatoes and the lemon. If you’re in the mood for something a bit spicier, I’d recommend adding chopped jalapeno to this recipe.

There’s one more element to this particular version of Bruschetta: After I sliced my baguette, I topped the slices with a light drizzle of olive oil, and a sprinkle of Monterey Jack cheese. Next time I may experiment with mozzarella for a caprese-inspired version, but the Monterey Jack worked extraordinarily well with the Salsa Brushetta. It’s the right amount of salty and creamy to pair with the tangy, slightly sweet flavor of the bruschetta. Cheese isn’t typically a part of bruschetta, possibly because that can take it to pizza-bread territory very quickly. I assure you that very little about this Salsa Bruschetta reminds me of pizza. The flavors are much lighter, yet richer and more complex than something you’d find on a pizza. (Unless it’s a very good, very unusual pizza, of course)!

These are definitely best served fresh, when the cheese is still gooey and melted. They do keep in the fridge fairly well overnight, and I have it on good authority that husbands named Bobby find that leftover Salsa Bruschetta makes an excellent afternoon snack. Whether you’re snacking or having your Salsa Bruschetta as part of a meal – perhaps as an interesting starter – this recipe is one you’ll make again and again. It’s very quick to make, and as uncomplicated as something that looks this elegant can get. No one will believe that you knocked the whole thing together in 20 minutes. But they won’t have much time to worry about that, as they’ll be worried about getting another bite before it all disappears.


Salsa Bruschetta

Prep Time 15 minutes
Cook Time 5 minutes
Total Time 20 minutes

Ingredients

  • 2 medium tomatoes
  • 1/4 small/medium white onion
  • 1 french baguette
  • 1 clove garlic
  • 1/2 Tbsp olive oil + more for drizzling
  • 1/2 tsp balsamic vinegar
  • 3/4 tsp brown sugar
  • 3/4 tsp dried basil
  • 1 dash cracked black pepper
  • 1 1/2 tsps lemon juice
  • 1/2 tsp salt
  • 1 dash cayenne
  • 1/4 cup shredded Monterey Jack

Instructions

  1. Dice tomatoes and mince garlic, stir together. Chop onions in a smaller dice than the tomatoes and add to the bowl. 

    2. Slice baguette into thin slices, about 1/4 of an inch thick. Place in a single layer on a baking sheet lined with foil. Drizzle olive oil lightly over each. Bake in the oven at 350 degrees for 4 minutes. You want the bread crisp on the edges, but still a little soft.

    3. Add remaining ingredients to the salsa mixture, except the cheese. Stir until well combined. Salt to taste - add more cayenne for a spicier salsa. 

    4. When baguette slices are done, remove from oven, top each with a little less than 1/2 Tbsp of Monterey Jack, and return to the oven for 2 minutes, or until cheese is melted. 

    5. Top each baguette with the salsa mixture. Try not to eat the whole batch by yourself. 


Black Bean Confetti Salad

Black Bean Confetti Salad

Black Bean Confetti Salad is possibly my favorite recipe of all time. The original is from Smitten Kitchen, and it honestly changed the way I thought about bell peppers. When I started learning to cook, a lot of the motivation was (and still is) to find delicious ways of preparing vegetables so I’d want to eat more of them. I used to be very bell-pepper-ambivalent. They were too sweet and too crunchy, which is generally not a combination I enjoy in my produce. Putting them in this recipe has really helped me re-think bell peppers. I’ve found that you can learn to like almost any food if you prepare it with flavors you already love.

I became obsessed with food way before I discovered this recipe, but making and eating this stuff over the years is largely responsible for me finally sitting down and creating the food blog I’ve always dreamed of. This isn’t my own recipe, but I’ve tweaked it, adding green onion, and honey and cayenne to the dressing. I think the changes really enhance this recipe. Playing with recipes like this is so satisfying, especially when my experiments work out.

I just desperately want everyone to know about this salad, because not only does it taste like a dream, it’s also extremely healthy. Black Bean Confetti Salad is a big bowl of fresh vegetables, fiber, protein, and healthy fats – what could be better for keeping your New Year’s resolution going?

It might seem like more of a salsa than a salad, and I absolutely invite you to enjoy it with chips (and a margarita), but it also makes a fabulous side dish. I served it with Cajun-seasoned tilapia and rice recently, and they went together beautifully – that sort of meal is also inexpensive, which I love. Proof you don’t need to spend a ton of money to eat well.

This recipe makes a fairly large amount, so you could halve it, although I don’t know why you would. I personally have to force myself not to eat the whole bowlful by itself as soon as I’ve finished making it. This is partially because it’s actually better the next day, when the flavors have had time to meld, and because I think eating an entire can of black beans in one sitting would destroy me.

I’ve made a number of changes to the original recipe, including the addition of scallions. This is definitely the kind of recipe where you can play around with the spices and ingredients to really make it fit your taste. The Smitten Kitchen original suggests adding cilantro if that’s something you really love.

Black Bean Confetti Salad

Adapted, with slight changes, from Smitten Kitchen's Black Bean Confetti Salad.

Servings 5 cups

Ingredients

  • 2 15oz cans black beans, drained and rinsed
  • 1 small white onion
  • 2-3 scallions
  • 1 red bell pepper
  • 1 yellow bell pepper
  • 1 orange bell pepper

Dressing

  • 3 Tbsp olive oil
  • 1 tsp cumin
  • 1/2 tsp honey
  • 3/4 tsp salt
  • 1/8 tsp cayenne
  • 1 large lime

Instructions

  1. Step 1: Dice onions, scallions, and bell peppers - small is better; you want the pieces to be about the same size as the beans.

    Step 2: Drain and rinse black beans. Stir together with onions, scallions and peppers.

    Step 3: Pour olive oil into a liquid measuring cup, and add salt, honey, cayenne, cumin. Add lime juice until the amount in the measuring cup reaches 1/3 cup. Whisk until the salt is completely dissolved. 

    Step 4: Pour over salad and stir. This salad can be stored and served the next day, and will stay good for up to five days in the refrigerator. It's actually better the next day because the flavors meld overnight!