Perfect French Toast

Perfect French Toast

It’s no secret that I’m kind of particular about what I eat. I physically don’t want to waste time and calories on something that doesn’t taste wonderful. French Toast is one of my favorite foods, but I find that it’s very hit or miss at restaurants. I know that sounds crazy, like how much can you really mess it up? Hear me out. A lot of restaurants make it with thick brioche or challah bread, which sounds great in theory. In practice it leaves you with French Toast that looks fine on the outside, but then you start eating and realize the inside is dry and flavorless, and you have to use twice as much syrup. Not that I’m knocking syrup – syrup is a gift to humanity.

There are two problems at work with sub-par French Toast: The bread, and the batter. The issue with the bread is that unless it’s stuffed with some delicious filling, you have to soak it long enough for the batter to penetrate beyond the outer layer, but you can’t soak it too long without it getting soggy. I find that the thicker the bread, the harder it is to control this, and bread that’s too thin just doesn’t stand up to the batter to begin with. The issue with the batter is that it needs to have more than egg and milk and a little cinnamon to yield really star quality results. It’s like the bread – you don’t want it to be too thin or too thick. Fortunately for all of us, I have the solution: the perfect French Toast bread, and the perfect batter to go along with it.

Not sponsored – I just love the bread for this recipe.

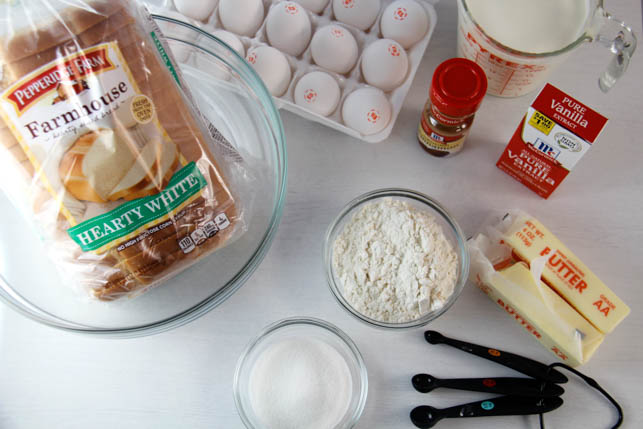
The bread I’m referring to is Pepperidge Farm’s Farmhouse Hearty White Bread. It lives up to its name, being much more substantial than a regular white bread, but it’s not the extra-thick bread many people seem to prefer for French Toast. It stands up to batter beautifully, absorbing it quickly without getting too soft. Since loads of French Toast is never a bad thing, I tripled the batter recipe to make enough to cook the whole loaf. It makes a ton, so it’s perfect for a big family brunch – or a small family brunch, if you know lots of perpetually hungry people like I do!  To keep everything fresh and hot before serving time, transfer the cooked pieces to a tray/platter in a pre-warmed oven held at its lowest temperature while you finish working your way through the loaf.

The batter I use is from The New Best Recipe, and I haven’t changed the recipe except to add cinnamon. What I have changed is the method for preparing the batter. I’ll admit that it takes a bit of nerve to look at a recipe developed by America’s Test Kitchen and declare, “I can do better.” The first time I tried it, I followed it to the letter. And I spent 10 frustrating minutes trying to conquer lumps and clumps of flour that refused to whisk in. The flour is what sets this recipe apart, giving it a beautiful, crispy outside that keeps the inside tender.

To get a silky-smooth batter consistency, it’s important to begin by stirring the melted butter into the combined dry ingredients. A thick mess will form, and you’ll think I’m nuts. But stir in all the butter, and then add the milk and egg mixture very gradually until everything is combined and smooths to a paste-like consistency. Then, when you add the rest of the milk, it’ll combine with the paste, sans lumps. It’s amazing to me how such a simple alteration in the steps can yield highly improved results. The rest of the technique is straight-forward.  The bread is soaked in the batter and then fried in butter to a deep golden brown. It’s not any harder than making a grilled cheese sandwich. The only trick is keeping an eye on multiple pieces as they brown.

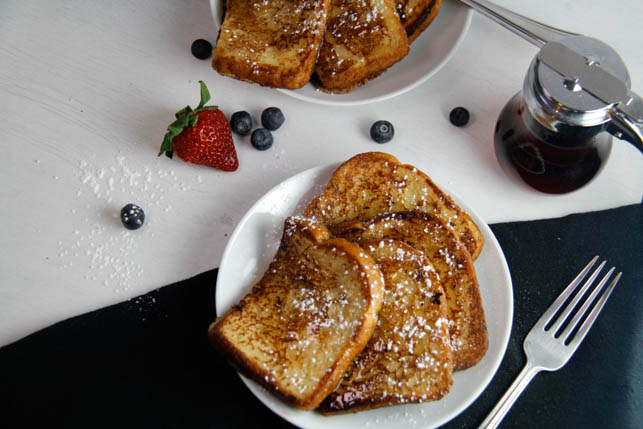
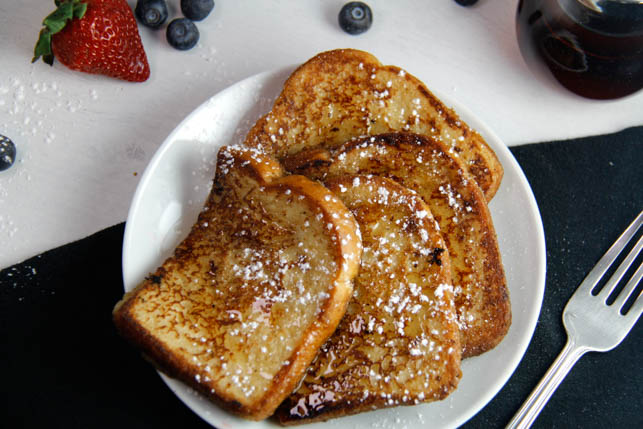
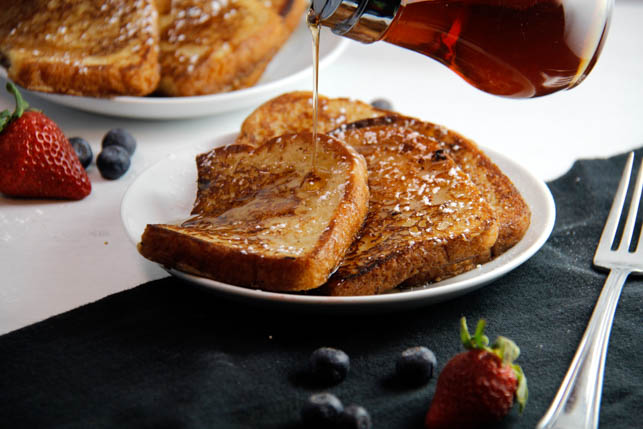
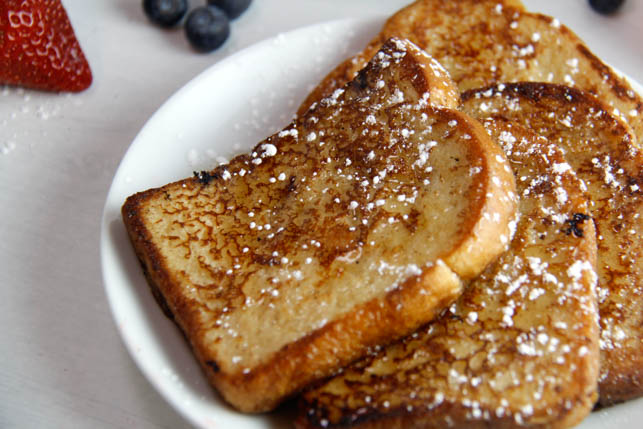
This French Toast recipe gives you those lovely golden-brown edges, and it tastes as good as it looks. There’s a little sugar and cinnamon in the batter, along with a healthy dose of vanilla, so you get loads of flavor. Add a little drizzle of syrup, and make sure you get a second helping before it’s all gone, because this French Toast does not stick around long.


Perfect French Toast

Recipe adapted from "The New Best Recipe" by America's Test Kitchen

Ingredients

  • 3 large eggs
  • 6 Tbsps unsalted butter, melted
  • 2 1/4 cups whole milk, divided use
  • 2 Tbsp vanilla
  • 6 Tbsp sugar
  • 1 cup flour
  • 3/4 tsp salt
  • 1 tsp cinnamon
  • 1 loaf Pepperidge Farm "Farm House White" Bread
  • unsalted butter for frying

Instructions

  1. Combine eggs, ¼ cup milk, and vanilla in a small bowl; set aside. Combine dry ingredients in a medium bowl. Melt the butter and stir into the dry ingredients thoroughly. Stir the egg mixture into the butter/flour mixture very gradually, and whisk until smooth. Add the remaining 2 cups of milk.

    2. Preheat the oven to warm (about 200 degrees), and have a large platter ready.

    3. Cut the bread slices in half (do the whole loaf at once – just open the wrapper down the top). Heat a 10 or 12” cast-iron skillet over medium heat. Add about 1 Tbsp butter for each of first few frying rounds, then add as needed. When the butter has melted, soak each bread slice in turn without saturating, about 20 seconds per side. Lift out and allow excess to drip off, and then immediately place in the hot pan.  

    4. Cook until golden brown, about 2 minutes per side. Flip or rotate half-slices as needed, to ensure even browning. Remove to a large platter in the warm oven until all slices are cooked and you are ready to serve.

Nomad Shepherd’s Pie

Nomad Shepherd’s Pie

I wanted to take a classic Irish dish and give it an interesting new twist, in honor of St. Patrick’s day this week. Shepherd’s pie has been done in every form you can think of: loaded baked potato versions and mini versions and hand-pie versions are plentiful. I thought about doing a breakfast concept, which led me to want to cross Shepherd’s Pie with the wildly different Shakshuka. Shakshuka has been fairly trendy in the last couple of years, but in case you just think it just sounds like a sneeze, it’s a dish of cooked, seasoned tomatoes/tomato sauce, with fried eggs on top, sometimes involving cheese and/or meat.

Experimenting with Shakshuka Shepherd’s Pie, or “Shak-shepherd,” as I’ve been referring to it, led to what I’ve decided to call my Nomad Shepherd’s Pie. It’s got inspiration and flavors from all over the place. The filling starts like a normal Shepherd’s Pie filling does, with ground beef, carrots, onions, garlic, and peas, but it takes a turn for the exciting when you combine it with diced tomatoes, cumin, paprika and jalapenos. Nomad Shepherd’s Pie is topped with creamy feta-infused mashed potatoes, a recipe I developed based on Pioneer Woman’s Creamy Mashed Potatoes. With the addition of feta, the potatoes take on a slight sharpness that works with the smooth, rich flavor of the buttery potatoes. The filling ingredients are all simmered together on the stove, before being baked in the oven with the potatoes. This lets the beef soak up all the different spices and flavors as it cooks, so every bite is consistent. There’s no digging around to make sure you got the right balance of flavors on your fork. Unless that’s just me? Do other people try to make sure every bite of their meal is just right?

I gathered my inspiration from a ton of Shakshuka recipes, cherry (tomato)-picking ingredients that I thought would work with Alton Brown’s Shepherd’s Pie, which I used as a base. He uses lamb; I used beef, because it’s less expensive and people (myself included) are more familiar with cooking it. I kept his seasonings and added a few of my own. I tested the recipe with Hungarian Sweet Paprika, which smells absolutely divine, but regular paprika would be fine to use. Whatever you put in it, it’s important to make sure all of your ingredients make it into the dish. Otherwise, you’ll set your beautiful Nomad Shepherd’s Pie in the oven, only to turn around and see the peas that were supposed to go into it… Sitting on the counter top. Sad that you’ve forgotten them.

I’ll just say I decided not to use them after all. That’s my story, and I’m sticking to it.

Putting together this dish is fairly straightforward, since it’s only two layers. You pour the filling into a glass 9×13 pan and smooth it out to an even layer. The mashed potatoes present a slight challenge, as they don’t spread very well on top of the wet filling. You can pipe the mashed potatoes on top to get a really nice layer. I wanted a little of my filling to run onto the top of my potatoes to give them some extra color when they baked. I piped about 6 thick lines of potatoes along the top of my dish, and then smoothed them into a single layer. The liquid from the filling seeps up over the edges of the potato while you’re smoothing it out. I think the added color on the top of the mashed potatoes actually makes the whole dish look more inviting, and the added moisture kept the top from drying out in the oven.

I tried a version of this dish with the mashed potatoes on the bottom, and the beef filling on top, and a few eggs cracked into the saucy filling on top and before baking. I found that the eggs didn’t add enough to the dish to bother with the careful timing they require. You could absolutely fry eggs and place them on top of an already-baked Nomad Shepherd’s Pie if you like the idea of taking it to full Shakshuka territory. If you do achieve a full Shakshuka Shepherd’s Pie, let me know how you did it, because I’d love to try it out!


Nomad Shepherd's Pie

Feta Mashed Potatoes are adapted from Pioneer Woman's Creamy Mashed Potatoes

Shepherd's Pie base is adapted from Alton Brown's Shepherd's Pie recipe 

Prep Time 15 minutes
Cook Time 1 hour 20 minutes
Total Time 1 hour 35 minutes

Ingredients

Filling

  • 2 Tbsp olive oil
  • 2 carrots
  • 1 medium yellow onion
  • 4 cloves garlic
  • tomato paste
  • 1 14.5 oz can petite diced tomatoes
  • 1 14.5 oz can crushed tomatoes
  • 2 jalapenos, seeded and chopped small
  • 3 oz frozen peas
  • 2 tsps worcestershire sauce
  • 2 tsps dried rosemary, crushed
  • 2 tsps dried leaf thyme
  • 1/8 tsp cayenne
  • 1 Tbsp + 1 tsp paprika (I used Hungarian sweet paprika)
  • 2 tsps cumin
  • 1 lb raw ground beef
  • 3/4 tsp salt

Feta Mashed Potatoes

  • 2.5 lbs peeled russet potatoes
  • 1/2 cup half and half
  • 6 Tbsps butter
  • 4 oz crumbled feta cheese
  • 4 oz cream cheese
  • 1/8 tsp onion powder
  • 1/8 tsp garlic powder
  • salt to taste

Instructions

  1. Start by making the mashed potatoes. Peel potatoes, slice into quarters, and place in a large pot. Add water to cover the potatoes, and cook with the lid on, over high heat. When the pot reaches a boil, lower the temperature to medium, and cook for 17-20 minutes, until potatoes are fork tender. 

    2. While potatoes are cooking, soften cream cheese in the microwave. When potatoes are done, drain them in a collander. Put cream cheese, butter, and feta into the warm pot. Return potatoes to the pot, on top of the cheeses and butter. Mash using a potato masher - You can also put the potatoes through a ricer before returning them to the pot, if you prefer a smoother texture. Add onion and garlic powder, and salt. Stir and mash until all ingredients are well combined. 

    3. Add salt and half and half to the potatoes and stir until combined. Set aside. 

    4. Dice carrots and add to a hot skillet with olive oil. Let cook about 12 minutes. Dice onions and add to the skillet until they start to get tender, about 5 minutes. Mince garlic and add to the skillet. Let cook for an additional 2 minutes. Add tomato paste, cans of tomatoes, jalapeno, peas, worcestershire, and spices and stir. Add raw ground beef and allow to cook through, stirring occasionally. Add salt - add more than the 3/4 tsp if needed. 

    5. When the ground beef has cooked, and pour the mixture into a 9x13 dish. Top with the mashed potatoes. You can spread them with a spoon or pipe them on. Piping looks neater, and makes it easier to get an even layer. 

    6. Bake at 350 degrees for 30 minutes. Garnish with a sprinkle of paprika over the top of the dish. 


Pulled Pork and Cranberry Flatbread

Pulled Pork and Cranberry Flatbread

I was roaming the internet, looking for inspiration, when I came across this cranberry and goat cheese flatbread. It clearly has made the rounds on Pinterest, and for good reason – it’s quite pretty. Having posted a flatbread recipe recently, I figured this would be a great time to try out some interesting new toppings. Although to be fair, you could put just about anything on flatbread and I’d try it. Not to turn this post into an ode to flatbread or anything.

I love the goat cheese and cranberry combination, but I wanted to give the dish another dimension, and make it more filling. With the tart, yet sweet cranberry sauce already in mind, I knew spicy, smoky pulled pork would be the perfect addition. The cranberry sauce is reminiscent of a barbecue sauce on the pulled pork, but with a different, fruitier flavor profile. The goat cheese is a perfect element to mellow some of the spice from the pork, and keep the tang of the cranberry sauce from being overwhelming.

Cranberry sauce seems to get attention only around the holidays, and I think that’s kind of a tragedy. It’s delicious with so many other things besides turkey and stuffing. That said, finding fresh or even frozen cranberries after January 1st is like trying to find truly good gluten-free pizza crust: may exist, but hard to locate. My cranberry sauce calls for part dried cranberries and part canned whole cranberry sauce, so it can (and should!) be made between the months of January and October. My recipe for this is adapted from a Food Network version.

The pulled pork in this recipe is done in the slow cooker, with a rub from Kevin and Amanda. Their recipe has a lot more to it, brining, and cooking in the oven, etc., but I just took the rub, coated my pork, tossed it in the slow cooker with a little water, and let it go, and it’s some of the best pulled pork I’ve ever eaten. Every bite is extremely flavorful and a little spicy, without being overpowering. The goat cheese I used is “La Bonne Vie Garlic and Herb Goat Cheese”- I just got it from my local grocery store, but you could honestly use any decent herb goat cheese. Trader Joe’s has a great, inexpensive one.

Since I’ve essentially given you a rundown of how wonderful all the components of this dish are on their own, you can imagine how I reacted when I tried them together. There was a lot of swooning, and uncivilized devouring, and general elation.


Pulled Pork and Cranberry Flatbread

Pulled pork recipe is adapted from Kevin and Amanda's Perfect Pulled Pork.  

Cranberry sauce recipe is adapted from Gourmet Magazine's Savory Dried Cranberry Sauce - Recipe found through foodnetwork.com

Servings 3 flatbreads

Ingredients

Pulled Pork

  • 1 4-8 lb pork shoulder
  • 1 medium yellow onion
  • 1/2 cup water
  • 1 Tbsp ground cumin
  • 1 Tbsp garlic powder
  • 1 Tbsp onion powder
  • 1 Tbsp chili powder
  • 1 Tbsp cayenne pepper
  • 1 Tbsp salt
  • 1 Tbsp ground black pepper
  • 1 Tbsp paprika
  • 1/2 cup brown sugar

Cranberry Sauce

  • 1/4 cup brown sugar
  • 1/2 Tbsp cornstarch
  • 1/2 cup white wine
  • 3/4 cup chicken broth
  • 1 tsp balsamic vingar
  • 1/2 cup dried cranberries (I used Craisins)
  • 1/2 cup canned whole cranberry sauce
  • 1/8 tsp rosemary
  • 1/8 tsp cinnamon
  • 1/8 tsp tarragon

Other Ingredients

  • 3 large flatbreads
  • 8-12 oz herb goat cheese (2-3 small logs), depending on how much you like goat cheese - I used 12oz.
  • 2 Tbsp fresh thyme or parsley (optional)

Instructions

  1. Slow cook the pork: mix together all dry ingredients to create a rub. Roughly chop yellow onion, and place in slow cooker with the 1/2 cup of water. 

    2. Pat pork shoulder dry with paper towel, and coat generously with the dry rub on all sides. Massage it into the meat with your hands to make sure it really sticks. 

    3. Place pork in the slow cooker, on top of the onions. Cover and let cook on high 4-6 hours, or on low 8-10 hours, until pork is falling off the bone and tender. Remove bone from the pot, and shred the meat with two forks. 

    Note: this pulled pork recipe yields much more pork than you'll need to use for your flatbreads. Extra meat can be frozen to use later.

    4. If you're making your flatbread, do it when the pork is about an hour and a half from being done. You can easily use pre-made flatbread if you prefer. You can find my flatbread recipe linked in the post above.  Instead of splitting the dough into eight pieces like I typically do, I split it into three, to make larger flatbreads. The method for cooking them is the same. 

    5. When your pork is about a half hour from done, make the cranberry sauce. Stir together brown sugar and cornstarch in a small sauce pan. Add white wine and chicken broth and set over low heat. Stir until well combined. Add vinegar, dried cranberries and canned cranberry sauce, rosemary, tarragon, and cinnamon. Simmer for 15 minutes, stirring occasionally. Sauce should be quite thick. Remove from heat. Sauce can be stored in an airtight container in the refrigerator for at least a week. 

    6: Assemble Pulled Pork and Cranberry Flatbreads: spread each flatbread with a generous amount of goat cheese, saving 2-4 oz aside. Top with a layer of pulled pork- you can add as much or as little as you like here. Drizzle with cranberry sauce (again, quantities are up to you).  I used all of my sauce between three flatbreads. Top with small crumbles of the remaining goat cheese. Bake flatbreads in the oven at 350 degrees for about 8 minutes, until the cheese gets soft and the flatbreads are warm and a just little crispy on the bottoms. Garnish with fresh thyme or parsley. 


Apple, Feta, and Turmeric Stuffed Chicken

Apple, Feta, and Turmeric Stuffed Chicken

I was raised by a couple of serious foodies. My mom is known among family and friends as an enthusiastic baker, who is happiest playing in the kitchen. My dad’s secret dream is to be on one of the amateur episodes of Chopped, and I’m certain he’d be a strong contender – he’s got some kind of innate flavor-mixing sixth sense that continually amazes me.

We all owe my dad an enormous debt of gratitude for this recipe, because it’s all his creation, and it’s unbelievably good. Thinking about it makes me immediately hungry. It’s the kind of impressive, crowd-pleasing dish that people take a bite of and swoon over. At least, that is, if they’re anything like me. It’s a little unusual for a stuffed chicken recipe, and you definitely need to have some specific ingredients for this one, but it’s beyond worth that extra trip to the grocery store. They’re not weird ingredients that you’ll only use once and then lose in the back of the refrigerator or pantry. If you don’t use them up by making this dish over and over – it’s that good – you’ll find lots of other recipes for them. If you don’t cook with them already, prepare to have feta, sun-dried tomatoes, and turmeric become your new best friends.

This dish starts with garlic, onion, and sun-dried tomatoes, stewing in olive oil. Then you add apples, ginger, and turmeric, and let them cook until everything is soft and the flavor has started to develop. The filling is finished with a good helping of feta cheese, stirred in until it gets all melted and the whole mixture thickens. Tell me you’re not thinking about that filling and wondering if you’ve got time to stop at the grocery store to get sun-dried tomatoes and feta! The chicken breasts get seared in a pan, sliced open to create a pocket, stuffed with the filling, and then cooked in the oven. After baking, they’re topped with mozzarella cheese, and then go back in the oven just until the cheese melts.

I generally prefer food that has some kind of spicy heat, but this dish is an exception. The sweetness of the apple with the salty feta and mozzarella, mixed with the tart sun-dried tomatoes, and flavored with the turmeric, onion, garlic, and ginger, make this stuffed chicken an absolute standout. With so many flavors involved, it’s important that they’re balanced just right, and in this recipe they go together perfectly.

The turmeric in this dish turns everything a bright yellow color, so I definitely recommend serving it with some colorful veggies. I went with a simple spinach salad, topped with feta, apple, and a balsamic vinaigrette. The flavors in the stuffed chicken would go well with just about anything, so you could serve it with asparagus, roasted sweet potato, or brussels sprouts. Or you could just forgo worrying about aesthetics because you’re more concerned with eating your stuffed chicken than posting it on the internet. Sometimes I barely get my blog photos taken before I dive into the food!

The nice part about this recipe is that it can be done from start to finish in about 45 minutes. Once you’ve seared the chicken and made the filling, you’re only 25 minutes away from eating. Make a quick salad or steam some veggies, and dinner is served. This dish is a great choice if you want to really impress someone with your cooking skills, because it looks and tastes complex, but it’s so easy to put together. I’m excited to try variations of this filling, with different fruit and seasonings – let me know in the comments if you try it out, and how you put your own spin on it!


Apple, Feta, and Turmeric Stuffed Chicken

Servings 4 servings

Ingredients

  • 4 chicken breasts
  • 1/3 cup olive oil + 2 Tbsps, divided use
  • 3/4 cup feta cheese
  • 1 small Gala apple
  • 1 small yellow onion
  • 2 tsps ground turmeric
  • 1 tsp ground ginger
  • 4 garlic cloves
  • 5 oz shredded mozzarella cheese
  • 5 oz sun-dried tomatoes
  • dash of salt - add to taste

Instructions

  1. Dice onion and mince garlic. Add all to a small saucepan with 1/3 cup of olive oil. Begin cooking over medium heat. Dice apple with skin still on, slice sun-dried tomatoes into thin strips, and add both to the sauce pan. Let cook until the apples and onions become tender.

    2. While the filling is cooking, get a skillet hot. Add 2 Tbsps of olive oil, and place chicken breasts in the skillet. Sear chicken on each side for two minutes, and remove from heat. Chicken should still be raw on the inside. Searing it on the stove just makes it easier to stuff, and helps it cook in the oven faster.

    3. Add turmeric, ginger, and feta to the sauce pan. Stir gently until cheese melts and the filling is well-mixed. Remove from heat.

    4. Cut a pocket into each chicken breast along the long side - be careful not to cut all the way through. Fill each with a fourth of the filling.

    5. Place stuffed chicken breasts on a baking sheet lined with foil. Bake in the oven at 350 degrees for 20 minutes. Check to make sure chicken is cooked through.

    6. Remove from oven, top with mozzarella cheese, and cook in the oven for an additional 4-5 minutes. Serve and enjoy!


Jambalaya Zoodles

Jambalaya Zoodles

I mentioned in my last post that one of my prime reasons for learning to cook was to be able to make vegetables taste wonderful. This recipe is the epitome of delicious vegetables, as far as I’m concerned. It’s a take on about a million versions of jambalaya, turned into an unbelievably flavorful plate of meat and vegetables. Healthy eating should never boil down to boring, flavorless dishes.

If you’re unfamiliar with cooking dishes like jambalaya, then this is a good place to start. There’s a lot of prep work involved, but no tricky techniques, and the actual cooking is quick and easy.

My Jambalaya Zoodles start as all good Cajun and Cajun-inspired cooking does: with the holy trinity: onion, bell peppers, and celery, along with some diced tomatoes and garlic. The vegetables are coated in a blend of spices and sauteed in butter. They’re taken off the heat while shrimp and andouille sausage are cooked with more seasoning. After that, everything is combined in the pan with chicken stock, and reduced until the meat and vegetables have soaked up all the flavor. The zucchini is added last, cooked in with everything else until barely tender, and then it’s time to serve!

The zucchini is a fabulous base for this combination of meat and sauce. I find that zoodle recipes are often either underwhelming in texture, or drenched in a cream sauce that leaves them feeling heavy in your stomach. These Jambalaya Zoodles have loads of interesting textures going on, between the crunch of the zucchini, the soft peppers and onions, and the hearty shrimp and sausage. This dish is a little spicy, but not so hot that you can’t truly appreciate the flavor. You can always reduce or increase the cayenne and pepper to adjust to your liking – just remember that a little cayenne goes a very long way. I’ve learned this the hard way!

If shrimp and andouille sausage aren’t your thing, you can use chicken instead and still end up with an amazing dinner. Beef or pork would probably be delicious as well, although I haven’t tried them in this recipe. It would be a wonderful meatless dish as well, perhaps with pasta mixed in with the zoodles, or mushrooms in place of the meat.

Since this isn’t a recipe for a true jambalaya, there’s no need to worry that what you end up with isn’t technically right. This recipe doesn’t pretend to be Cajun jambalaya like you’ll find in New Orleans. This is a take on the deep, spicy flavors of jambalaya, with a healthy twist. Once you taste this dish, you’ll never want to flavor anything else differently. And you’ll probably spend a few hours casually planning a dream trip to New Orleans to try some truly authentic jambalaya. In my head, I’m headed to Louisiana tomorrow. In real life, I’m making this for dinner tonight to dull the pain of an existence that doesn’t support snap-decision excursions to interesting places.

Jambalaya Zoodles

Servings 3 people

Ingredients

  • 1/2 green bell pepper
  • 1/2 red bell pepper
  • 1/2 yellow onion
  • 2 celery stalks
  • 1 16 oz can diced tomatoes
  • 2 cloves garlic
  • 2 Tbsps butter
  • 1/4 tsp cayenne
  • 1/2 tsp fresh ground black pepper
  • 1 1/2 tsp salt
  • 1/2 tsp paprika
  • 1/2 tsp dried oregano
  • 1/2 tsp thyme
  • 1/2 tsp dried basil
  • 1/4 tsp onion powder
  • 1 lb shrimp
  • 1 lb andouille sausage (about 5 links)
  • 2 Tbsp white wine
  • 1/2 tsp cornstarch
  • 1 1/2 cups chicken stock
  • 3 medium zucchinis - about 9 cups of zoodles when spiralized

Instructions

  1. Note: This recipe requires a fairly sizeable skillet - I used a 12 inch skillet.  A wok would also do a great job.

    Step 1: Stir together cayenne, pepper, salt, paprika, onion powder, oregano, thyme, and basil. Spiralize three zucchinis. Roughly chop the spirals so you don't end up with very long zoodles.

    Step 2: Thinly slice peppers, onion, and celery. Mince garlic. Add peppers, onion, celery, garlic, tomatoes, and butter to a large skillet. Stir in half the blend of seasonings. Cook on high heat until vegetables are soft and starting to brown. 

    Step 3: Prick sausages all over with a fork and place in another skillet over medium heat. Pour in just enough water to come about a quarter of the way up the sides of the sausages. Cover and cook for 10 minutes. Uncover and cook until any remaining water in the skillet has evaporated and sausages are golden brown. Remove sausages from heat, cut into pieces, and set aside. 

    Step 4: When vegetables have started to brown, remove from skillet and set aside. Do not clean the skillet.  Add the shrimp to the same skillet and sprinkle the remaining spice blend over top. Cook shrimp on high heat just until they turn uniformly pink. 

    Step 5: Reduce heat to medium, and return sausage and cooked vegetables to the skillet with the shrimp. Pour about a cup of chicken stock into the skillet, and let cook, stirring occasionally. 

    Step 6: Stir together corn starch and wine. When chicken stock has reduced by half, pour corn starch and wine mixture into the skillet and stir. Continue cooking until the sauce begins to thicken. 

    Step 7: Pour remaining chicken stock into the skillet, let cook for three more minutes. Add zucchini to the skillet and cook just until it becomes tender. Remove from heat and serve! 


Kung Pao Chicken: DIY Takeout

Kung Pao Chicken: DIY Takeout

For a person who loves to cook, I certainly eat a lot of Chinese take-out. My go-to is almost always Kung Pao Chicken. I refuse to order from a restaurant that serves an inferior version of the stuff. My ideal Kung Pao Chicken has a generous amount of heat, a thick, slightly sweet and tangy sauce, more chicken than peanuts, and not too much vegetation. Sometimes you need lighter fare, like my Vegan Cashew Cream Spinach Dip, and sometimes you just need to focus on something a little heartier, like chicken and rice in a perfectly-flavored sauce.

When you look at the list of ingredients required to cook Chinese food at home, it can seem a little intimidating. You will almost definitely need to purchase some new sauce or oil in order to get your flavors the way you want them. I’ve found, however, that those new ingredients become an investment, as a lot of Chinese food isn’t nearly as difficult to prepare as you expect. Having the ingredients on hand will make future cooking experiments that much easier, and a lot of them are shelf-stable products that will keep for a long time.
Read More