Grain-Free Stuffed Peppers

There are a lot of things that I don’t understand, like how calculus works, and why dad shoes were ever a popular fashion trend. Something that has often confused me is the presence of rice in a stuffed pepper. Rice has its place, but of all the filling and delicious things you could put in a bell pepper, rice seems like a bland choice. Bell peppers are already kind of bland by themselves, and if you’re making them the star of the show, the filling really needs to burst with interesting flavors. 

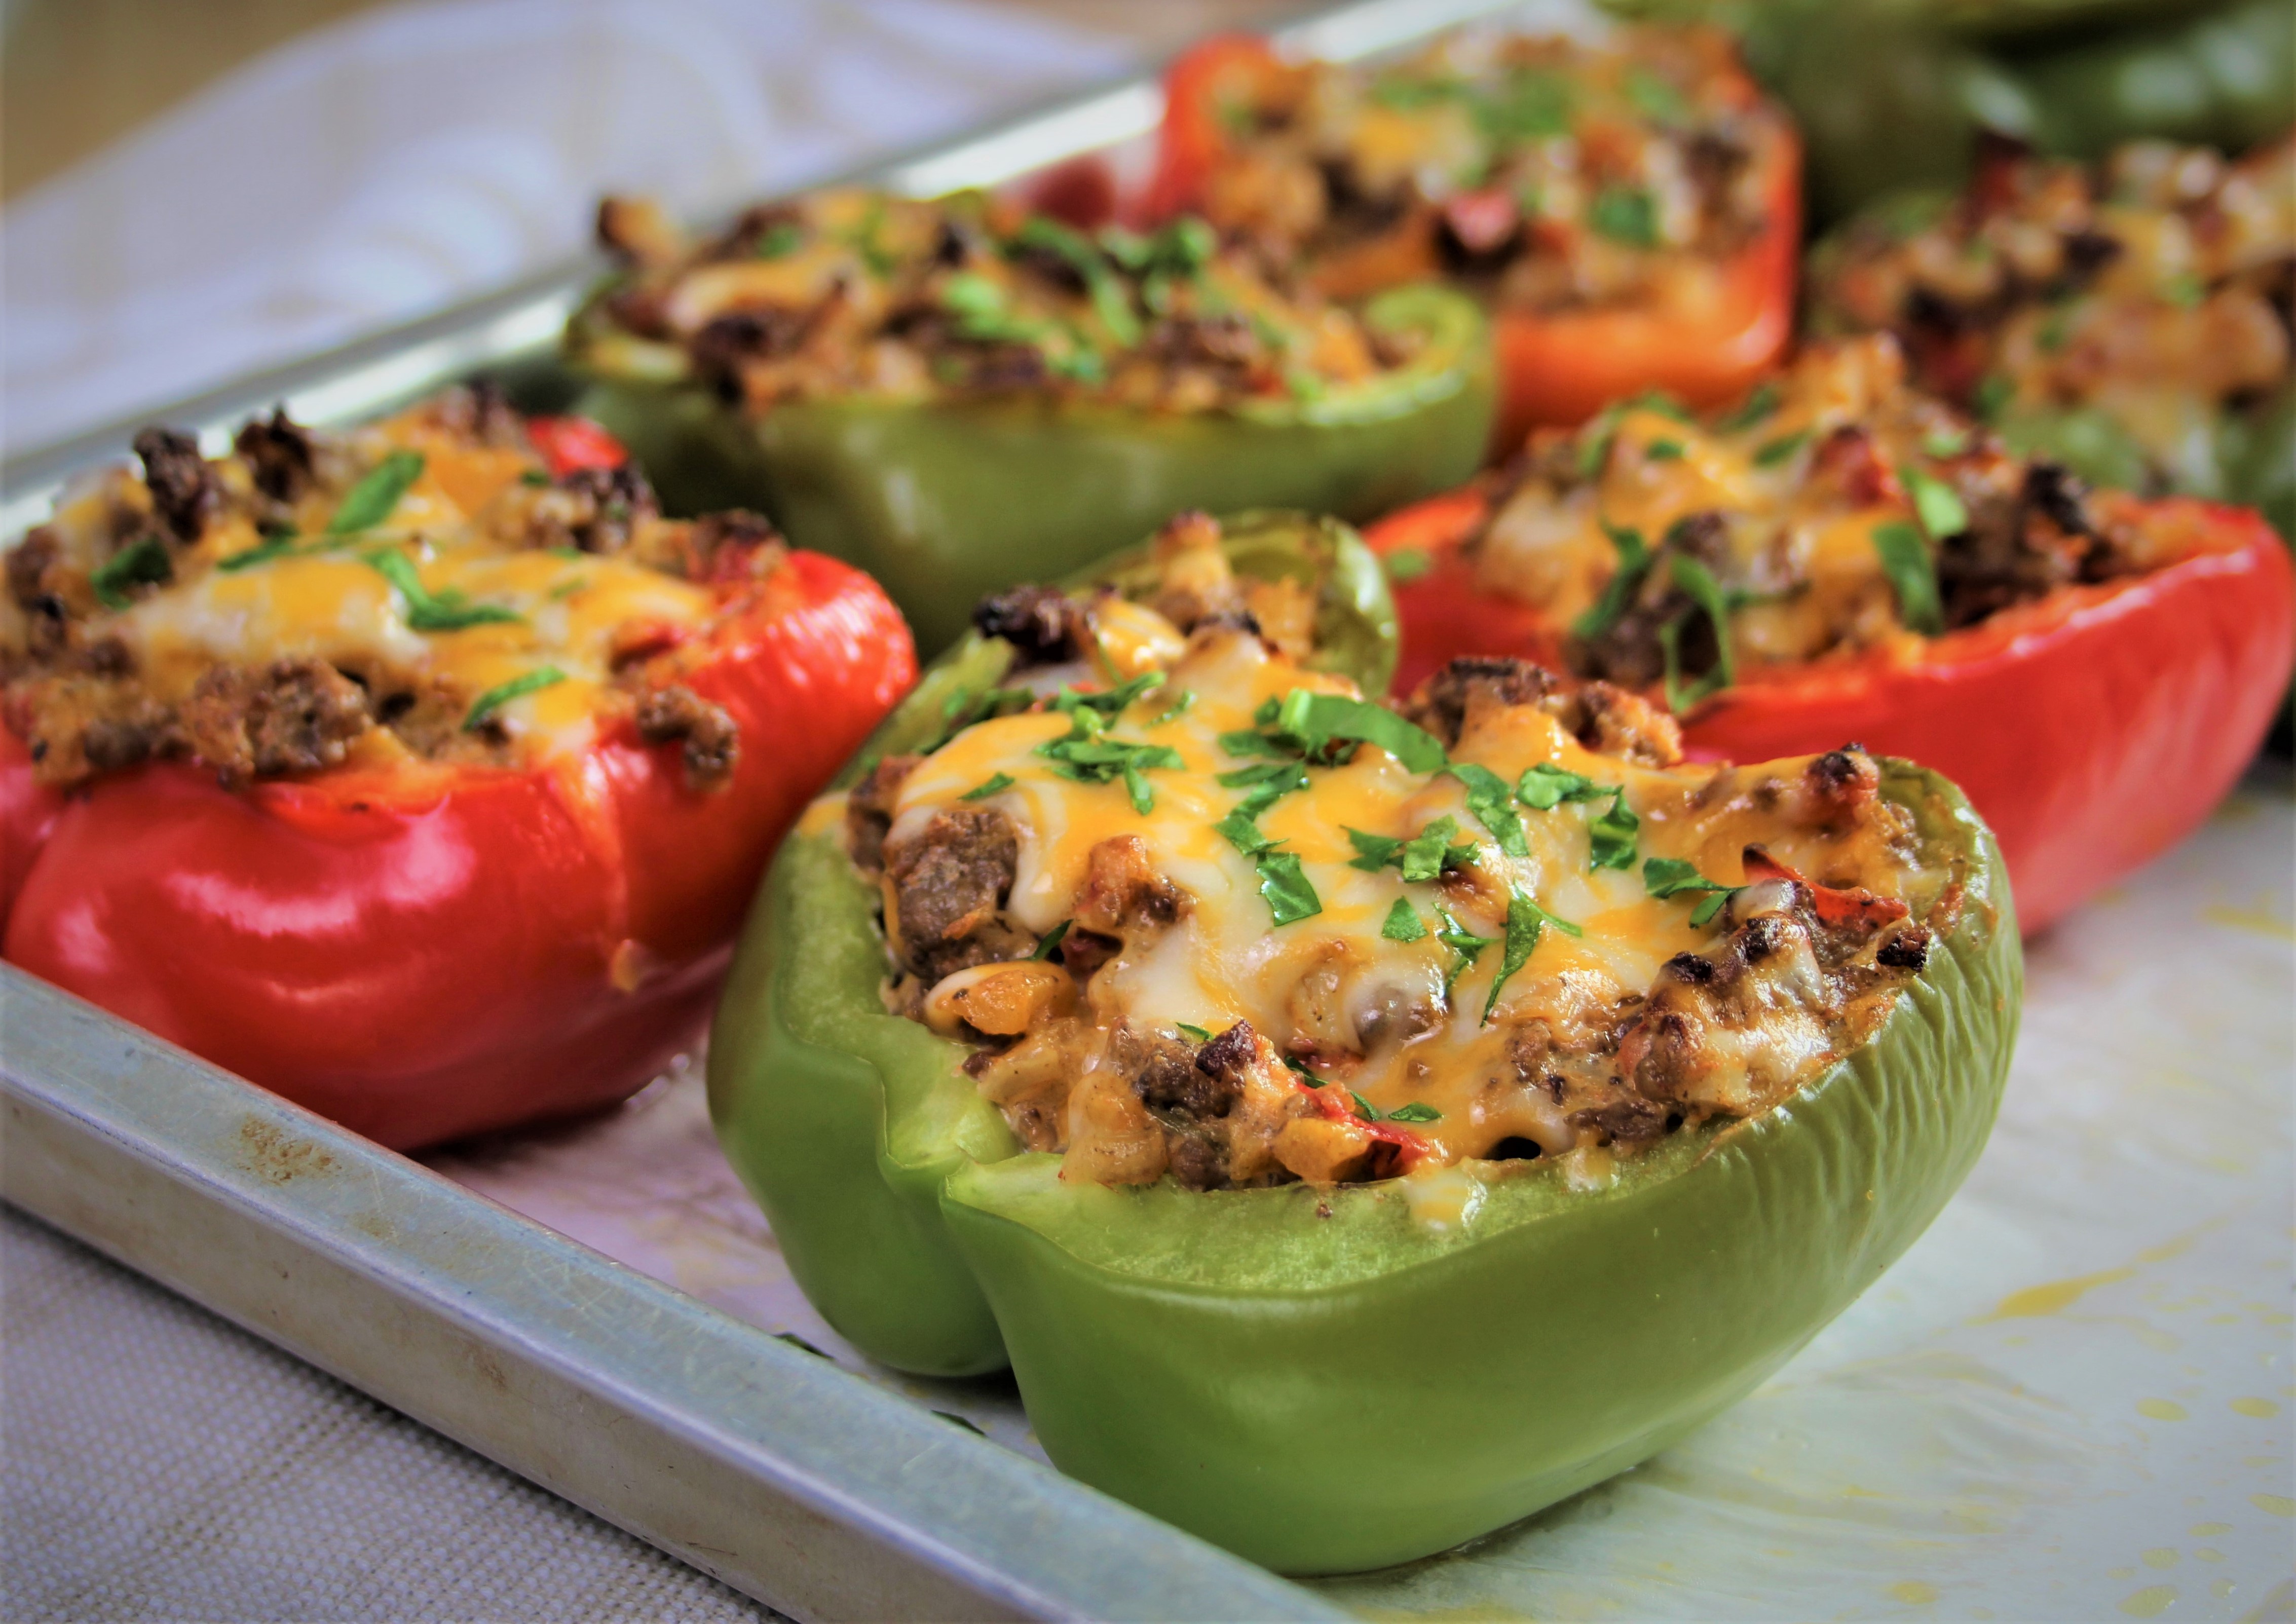
This version of a stuffed pepper was inspired both by the leftovers in my fridge, and my craving for something that would really satisfy me, without being absurdly bad for me. (What else is new?) I started with some cooked ground beef and leftover crumbled breakfast sausage. The sausage is one of the things that makes the dish, because it’s very flavorful and fatty, without being overpowering. The fat content is important because it helps make these peppers an extremely satiating dinner choice, even though they’re heavy on the veggies.

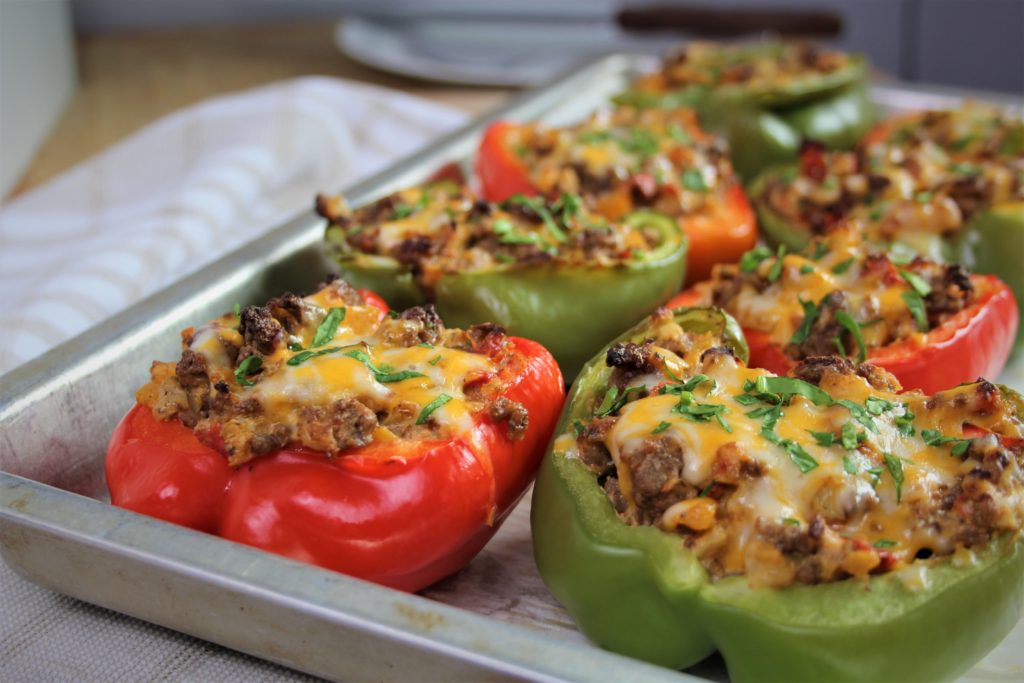
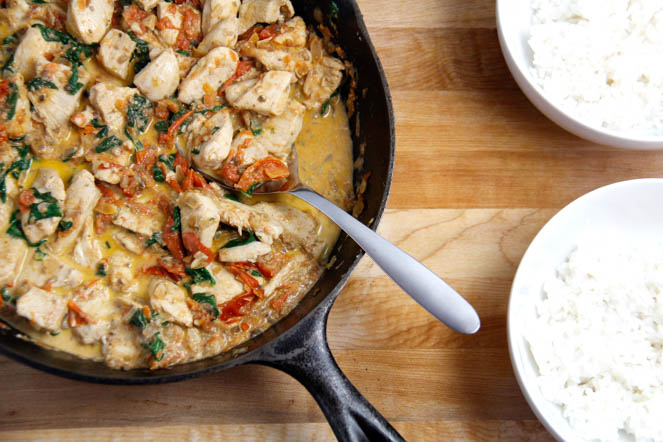
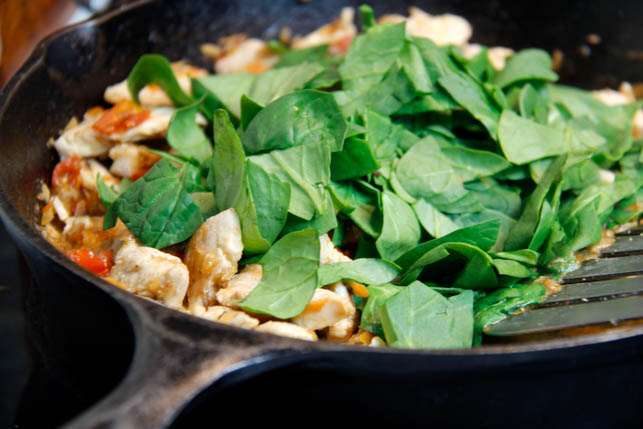
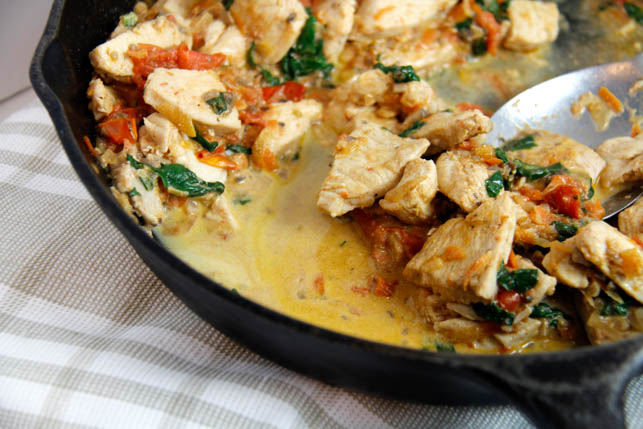
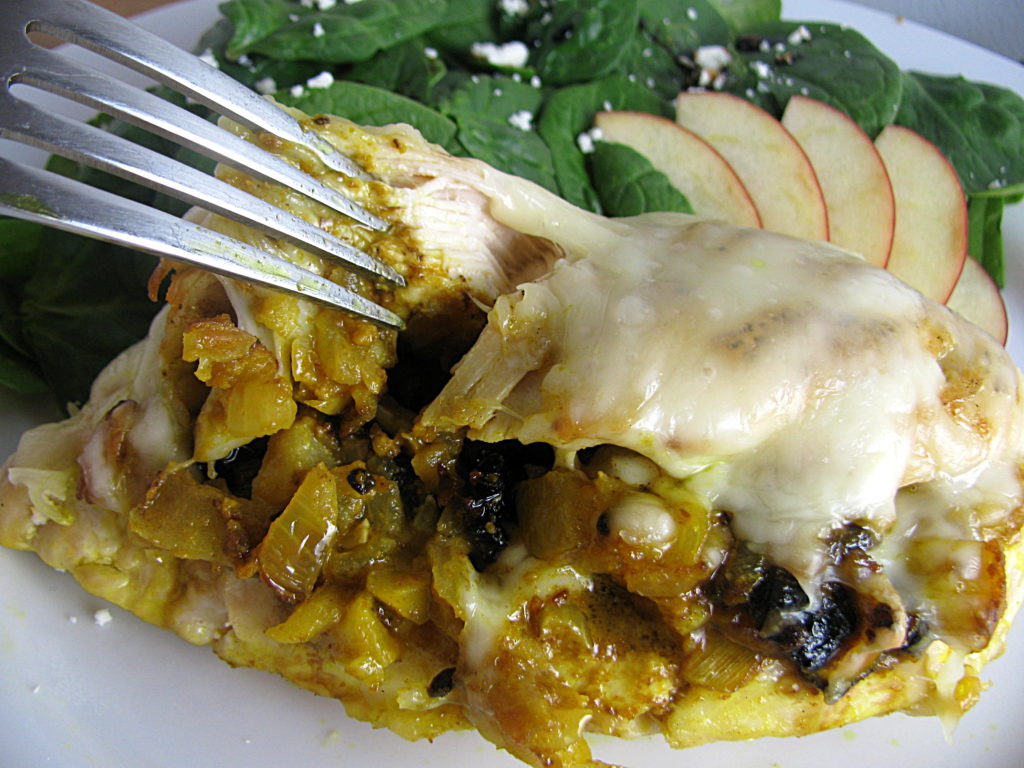
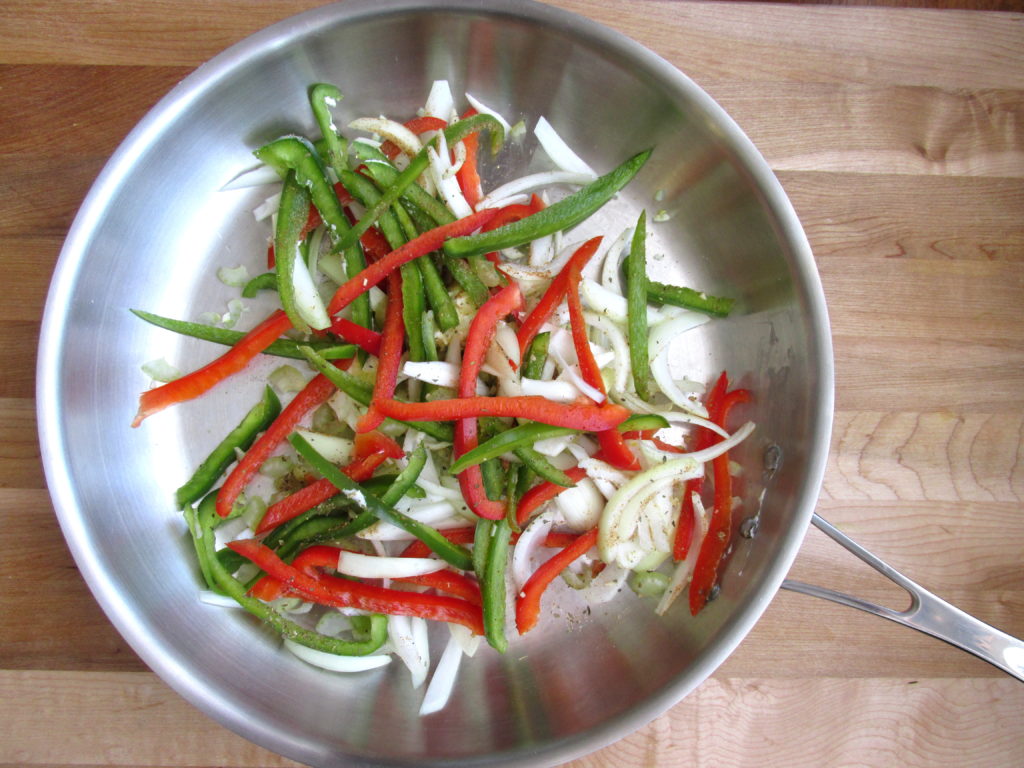
This is one of those recipes that’s endlessly adaptable, which could be why there are a million versions already in existence. For these, I sautéed diced onions, garlic, butternut squash, and chopped cherry tomatoes in olive oil, added the cooked meat and a few tablespoons of cream cheese, and it kind of tasted like a miracle. A gooey, cheesey, fragrant miracle. A little cumin and salt, along with some scallions, go in at the end to make the flavor really pop – honestly you don’t even need the peppers, you could just eat the filling straight from the pan. The finished product is something like healthier queso fundido-stuffed peppers, because in all honesty, I’d eat the filling straight from the pan with a bag of chips.

The filling can be made completely ahead, and then just heated up when you’re ready to stuff the peppers. They only take about 25 minutes in the oven, so if you prep ahead this is a pretty quick dinner. Bobby and I typically have a pepper each, and are truly groaning about how full we are by the time we’re done eating. I’m about to make them to take photographs for this post and I’m practically drooling over my keyboard as I type! 


4 from 1 vote
Print

Grain-Free Stuffed Peppers

Servings 4

Ingredients

  • 4 bell peppers, halved, seeds removed
  • 4 slices provolone cheese
  • 1 Tbsp olive oil
  • 1 medium onion, diced small
  • 1/2 cup butternut squash, diced small
  • 4-6 cloves garlic, minced
  • 1 cup cherry tomatoes, quartered
  • 16 oz ground beef, cooked and drained
  • 4 oz crumbled breakfast sausage, cooked and drained
  • 8 oz cream cheese, softened
  • 2 scallions, chopped
  • 1 tsp salt
  • 2 tsps cumin
  • 1/2 tsp cayenne pepper, optional
  • 1/2 cup cheddar jack, shredded, optional

Instructions

  1. Place half a slice of provolone into each pepper half. Set peppers on a baking sheet lined with foil, sprayed with non-stick cooking spray, or parchment paper. Preheat oven to 400 degrees.

    2. Sautee onions, butternut squash, and cherry tomatoes in olive oil until soft. Add garlic and cook for an additional 2-3 minutes.

    3. Stir in cooked ground beef and cooked sausage, softened cream cheese, and remaining ingredients. When everything is evenly mixed, spoon mixture into the peppers – you may have some leftover. Top each pepper with a sprinkle of cheddar jack or any cheese you have on hand – this is more for appearance than flavor, so skip if you like.

    4. Bake peppers for 25-30 minutes. They're done when the peppers are soft enough to pierce easily with a fork.

    * I've used ground turkey in these before, and while still tasty, I've found that the results are decidedly better with beef.


Slow Cooker Spicy Shredded Beef

Wow, it’s been a minute since I’ve put up a recipe! In my time off, I’ve honed my cooking skills some more, tested loads of new recipes, traveled to Thailand and found all kinds of new flavor inspiration (more on that in future posts), and did lots of things not related to cooking that I also enjoy! I’m learning to play the guitar, and bullet journaling, and playing old video games that I only ever have time for in January when the world majorly slows down. January also makes me excited to spend a lot of time on snowy days cooking rich, hearty meals that are essentially coziness in food form. Braised beef fits that bill for me, especially when it’s loaded with flavors and spices that make it perfect for any version of a burrito bowl or taco that you could dream up.

Developing this recipe took a while because I fell into what I now think of as the slow-cooker trap. By this, I mean the problem with a lot of slow cooker-centric meals is that we assume we can just dump anything in the mix and it will magically become delicious as it cooks for eight hours. Cue me spending years trying out pre-made sauces and testing several ultimately disappointing recipes for shredded beef, chicken, etc. (I’ve already found my dream come true pulled pork – check it out here!)

This version was the result of me swearing that I would no longer make bland shredded beef. I wanted to season the hell out of it, and make sure every bite had the kick I expect when I bite into something that is promised as having some Mexican inspired flavors. I went through a few tests for this recipe, adding more lime, more jalapenos, more…everything. The more I cook, the more I discover just how easy it is to under-season food and prevent it from reaching its highest potential.

The flavor profile for this shredded beef is reminiscent of Chipotle barbacoa, except that this is arguably better. The lime and jalapeno flavors are more prominent, and the added onion and green pepper give each bite more dimension in flavor and texture. My favorite way to eat it is piled into a homemade burrito bowl, with loads of avocado, salsa, crema, and shredded cabbage for crunch. By the time the beef is finished cooking, it will have a good amount of (absurdly delicious) drippings/fat in with it, and rice in a burrito bowl soaks it up beautifully. If you prefer to use the meat for tacos, which I highly recommend, make sure you drain some of the liquid off before using it. Unless you love extremely messy tacos – I’m not here to judge your taco preferences.


Slow Cooker Spicy Shredded Beef

A 3lb roast yields approximately 8 cups of shredded beef. Honestly more than it sounds like. 

Ingredients

  • 1 3-4lb chuck roast
  • 1 medium onion, cut into strips
  • 1 green bell pepper, de-seeded and cut into strips
  • 1/2 cup beef broth
  • 1/2 cup Mt. Olive diced jalapeno peppers – include some of the liquid from the jar in this measurement
  • 1 4.5oz can mild diced green chiles
  • 1/4 cup lime juice (approx. 2 limes)
  • 2 Tbsps tomato paste
  • 3 tsps onion powder
  • 2 1/2 tsps chili powder
  • 2 tsps paprika
  • 2 tsps garlic powder
  • 2 tsps cumin
  • 1 tsp oregano
  • 1 tsp salt
  • 1 tsp sugar
  • 1/2 tsp freshly ground black pepper

Instructions

  1. Slice the roast into 4-6 chunks and sear in a hot skillet, until all sides of each piece are browned.

    While the meat is cooking, add all other ingredients to the slow cooker, and give them a stir to combine. They don’t need to be completely mixed. Top with the cooked meat and set the slow cooker to low for 8 hours. 

    If you are leaving the slow cooker for the whole eight hours, pull some of the seasonings and vegetables from the bottom of the slow cooker on top of the beef, so that it’s surrounded by the other flavors. If you’ll be able to check the beef periodically, give it a stir every hour or so. 

    After the cooking time is up, shred the beef right in the slow cooker with two forks – it should fall apart very easily. 

    If using for tacos, drain some of the liquid off the meat before serving. 


Sriracha Shrimp Skewers with Pineapple

Sriracha Shrimp Skewers with Pineapple

Since I’m in “do summer things” mode, I’ve been super excited to experiment with some grilling recipes. Now that we’ve been getting the occasional cool-but-not-too-cold summer evening, I’ve been obsessed with eating outdoors. Dinner straight from the grill is one of those magical things that you can only do when the weather permits, so it’s important to take advantage of those clear, golden evening hours whenever possible.

My favorite grilled foods are shrimp and pineapple, so figuring out what to make was a no-brainer. But I wanted to create a marinade for the shrimp that would knock anyone’s socks off. Recently, I bought a bottle of Sriracha for the first time in about a year. It was one of those things where I ate too much of it, and then couldn’t stand it for a long time. Now that it’s back in my life and I remember how wonderful it is, it only made sense to put it in my marinade. I added it to some pineapple juice, garlic, salt, ginger, and coconut milk. I can’t explain why – please tell me if you know what crazy science is at work here – but coconut milk and pineapple juice make the shrimp take on a tender, buttery texture. I’d never realized that I wanted shrimp to melt in my mouth until I cooked them in this marinade, and now I don’t know how I went without it for this long. Don’t worry if you, like me, abhor the flavor of coconut. I promise – cross my heart, hope to die – that you cannot taste it on the shrimp. Coconut milk doesn’t even smell like coconut.

I let my shrimp marinate for maybe 30 minutes before cooking it, and it picked up amazing flavor. It’s mildly sweet and salty, with just a tiny kick from the Sriracha and ginger. The pineapple juice gives it a citrus-y flavor that works beautifully with the ginger, and of course makes it pair perfectly with the grilled pineapple. I like this recipe because it doesn’t take a million years to prepare, and you can cook for a lot of people at once, since you’re doing it on the grill.  You can make rice and a big pitcher of lemonade/sangria to go with dinner while the shrimp is getting all delicious in the marinade, and let the grill heat up while you prepare the skewers.

I discovered throughout the process of testing this recipe that skewers are a million times easier to cook if you only put one kind of food on them. Trying to cook skewers with shrimp, pineapple, and zucchini chunks – and making sure that everything cooked evenly and properly – was just annoying. Maybe there’s a secret I don’t know about the art of the kebob, but threading meat and produce on separate skewers just makes sense. You don’t have to worry about uncooked shrimp touching pineapple where it won’t get enough heat (my main concern), and you don’t have to cut your pineapple and zucchini to precise shrimp-sized pieces so they’ll cook evenly with the shrimp.

If you don’t like grilling or you don’t like shrimp, don’t worry – you can cook the shrimp on the stove with similar results, or you can use the marinade on chicken. I marinated some chicken in it, and then used the cooked chicken to make delicious bowls for dinner a few days ago, with rice, Sriracha yogurt, sauteed zucchini, and crushed pita chips. However you use it, this marinade will make your food taste like summer – especially if you have dinner outside on the patio, with a cold drink and your favorite people. And if you really want to take it over the top, you can always have Balsamic Cherry Chocolate Ice Cream for dessert. Just a suggestion.


Sriracha Shrimp Marinade

Servings 4 servings

Ingredients

Shrimp Skewers

  • 1 1/2 lbs raw shrimp, peeled and de-veined
  • 1/4 cup pineapple juice
  • 2 Tbsps sriracha
  • 2 Tbsps coconut milk (I used canned coconut milk)
  • 1/4 tsp salt
  • 1 tsp garlic powder
  • 1/4 tsp ground ginger

Pineapple and Zucchini Skewers

  • 1 medium zucchini
  • 2 cups pineapple chunks - about 1/2 a fresh pineapple
  • 1/2 Tbsp olive oil
  • 1/8 tsp salt
  • 1/8 tsp fresh black pepper

Instructions

  1. Note: Soak wooden skewers in water for at least 30 minutes before use.

    Combine all marinade ingredients in a shallow bowl. Place shrimp in the marinade and stir until all of it it well coated. Cover and let rest in the refrigerator for 30 minutes to 1 hour. 

    2. Slice pineapple and zucchini into bite-sized chunks. Season the zucchini with olive oil, salt and pepper. Thread onto skewers, leaving a little space between each piece. 

    3. Pre-heat the grill. Thread shrimp onto skewers (keep separate from those with the pineapple and zucchini).

    4. Cook skewers over medium-high heat on grill until shrimp curl and turn pink/lose transparency. Pineapple and zucchini should cook until tender - about 4-6 minutes on direct heat, and then move to indirect heat to continue getting soft. Sprinkle the cooked shrimp with dried parsley, if you're feeling fancy. 


Asparagus Pancetta Gnocchi with Ricotta Sauce

Asparagus Pancetta Gnocchi with Ricotta Sauce

I was searching for asparagus inspiration, because it’s a major spring vegetable, and I almost sort of like it. I’m trying to transition that ambivalence to full-on like. This recipe sort of hides the asparagus, but it does still have it, so that’s sort of a step in the right direction, yes? I was originally looking at Smitten Kitchen’s Spring Asparagus Pancetta Hash – can you tell I’m a fangirl? I only mention her like every 5th blog post. I was all set to just make the recipe to see if I liked it, but then I started tumbling into the depths of Google and found Gnocchi with Asparagus and Pancetta from My Recipes. And then I started thinking about sauces, and things really spiraled out of control. My search for a light, but flavorful, asparagus-based recipe morphed into a pasta dish with a creamy sauce. I can’t tell you how often this happens to me. Pasta dishes with creamy sauce are very high on my list of the good things in life.

The creamy sauce for this dish isn’t a typical alfredo. It’s ricotta-based, with lots of fresh garlic and basil, and some dried tarragon. It’s about the lightest creamy sauce you can make that still uses whole-milk cheese. This keeps the dish from feeling too heavy for the bright spring days we’ve been having. If you let it thicken on the stove long enough, after adding in the cooked pancetta, asparagus, and gnocchi, you end up with a kind of cross between creamy pasta and a warm, delicious potato salad. The pillow-y gnocchi goes perfectly with the thick sauce, and the asparagus adds bursts of crunch in each bite.

I cooked the pancetta first, so I could toss the asparagus into the skillet afterwards, with all that delicious pancetta grease. I chopped the asparagus into 1-inch pieces, and let them cook for about 5 minutes. This let them get just barely soft on the outside, while picking up the lovely pancetta flavor. I tend to find asparagus a little bitter, but cooking it like this made me want to just eat it straight from the pan. The only thing I’d change about this recipe for next time would be doubling the asparagus, because it really did sort of disappear among the gnocchi.

This dish makes a fairly small amount, about two good-sized portions, so it would be a perfect date-night option. If you want to get all fancy and cook for someone you like, I’m pretty sure they’d want to see you again after this one. It’s easy to make, but it sounds and looks so much more impressive than it really is. This isn’t quite a one-pot recipe, but it’s close. You can fry the pancetta, then cook the asparagus, and then make the sauce right in the same pan. The only other thing to do is cook the gnocchi, but even that only takes about 5 minutes. If gnocchi isn’t your favorite, you could try this dish with regular pasta or maybe some tortellini, because you can never have too much cheese. You can also use bacon in place of the pancetta.

The week leading up to Easter was one of the busiest I’ve had in a long time, so I’ve been eating on the go a lot. It felt great to get back into the kitchen and come up with something new and delicious, that also didn’t take a million years to cook. I had my Asparagus Pancetta Gnocchi for dinner yesterday, and it was such a nice balance of comforting (after a very busy week), and light and fresh. I have a feeling I’ll be making this one again soon – with more asparagus next time!

Asparagus Pancetta Gnocchi with Ricotta Sauce

Adapted from Asparagus Pancetta Hash from Smitten Kitchen, and Gnocchi with Asparagus and Pancetta from My Recipes. 

Ingredients

  • gnocchi
  • 1/2 medium yellow onion, diced
  • 3 cloves garlic, minced
  • 1 cup ricotta cheese
  • 1/2 cup whole milk
  • 4 oz pancetta
  • 1/2 tsp dried tarragon
  • 1/8 tsp dill
  • 1/2 tsp salt
  • 1/2 tsp fresh ground black pepper
  • 8-10 fresh basil leaves, thinly sliced
  • 1/2 lb asparagus

Instructions

  1. Dice the pancetta and cook in a skillet over medium heat, stirring occasionally, until crispy. Remove to a plate lined with paper towel to soak up excess grease. Slice the asparagus into one-inch sections and add to the skillet, after removing the pancetta. Cook on medium heat for about 5 minutes, until the outside is slightly tender.

    2. While asparagus is cooking, chop onion and garlic. Remove cooked asparagus from the pan and add onion and garlic.  There should still be plenty of grease in the skillet from the pancetta, but you can add a Tbsp of olive oil if it seems too dry. Cook the onion and garlic until the onion softens. Start cooking the gnocchi according to the directions on the package (typically, add to a large pot of boiling water and let cook for 4-5 minutes, until all the gnocchi floats to the top).

    3. Add ricotta and milk to the onion and garlic. Stir gently until the ricotta softens and becomes smooth. Lower heat, and stir in gnocchi, pancetta, and asparagus. Add salt, pepper, basil, tarragon, and dill, and stir until well-mixed. Add more salt to taste. If you prefer a thinner sauce, it should be ready to serve at this point. For a thicker sauce, let cook on low for another minute or two before serving. 


Salsa Verde Chicken Enchiladas

Salsa Verde Chicken Enchiladas

Most of the time when I’m dreaming up blog posts, I try to be inventive and give recipes delicious new twists. Other times, I’m just hungry for something really specific, and I get inspired to test recipes until I make my dream version of a classic. Salsa Verde Chicken Enchiladas is one such classic that I didn’t want to change too much. Why mess with perfection? These enchiladas are bursting with flavor, the chicken is moist and perfectly seasoned, and they aren’t hard to make at all. As a person who eats at a lot of Mexican restaurants, I can say that these are absolutely restaurant quality. All they need are some rice and beans on the side, and maybe a margarita or two.

Before testing this recipe, the only experience I had with salsa verde was eating a lot of it. I have found a wonderful version that is so much simpler to make than I ever would have imagined. Don’t you just love it when your favorite foods are actually so easy to throw together? I combined recipes for salsa verde from Tyler Florence and The Flavor Blender and I think I may have made the sauce of my dreams. I have been putting it on everything I eat and I’m not sure I’ll ever stop. I love the tangy, spicy flavor, and it can be made as hot or mild as you like, in case spicy food isn’t your favorite. Spicy food is definitely my favorite. But I actually prefer it toned down in a salsa like this, because there are so many interesting flavors at play, and I really want to be able to taste all of them.

Making enchiladas can seem like kind of an arduous process, because you have to prepare all of the ingredients and then fill and roll them. It definitely takes some time, but a lot of that is really just letting things cook in the oven. You start by roasting the tomatillos, peppers, and onions for the salsa verde. Then you roast a couple of chicken breasts with some olive oil and seasonings. You blend your salsa together, whip up a quick fresh tomato salsa while the chicken is cooking, shred the chicken after it’s done, and then you’re ready to assemble the enchiladas. I do recommend doing all of this before you start on the margaritas, but everyone has her own method!

Can we talk for a second about how Mexican food is the best food? My husband and I went to Mexico for our honeymoon and I’m dying to go back purely for the food. (That’s a lie, I also want to go back to lay out at a beautiful resort in Playa Del Carmen while someone brings me a cocktail, and relax all day). Anyway, even when we went off of the resort to eat, it seemed like the food wasn’t all that different from what you can get in a really good Mexican restaurant in D.C. I don’t know if this makes me really excited about D.C. or confused about Mexico, but I do know that it means Mexican food is consistently wonderful, if you know what to look for. And if all else fails, you now have a seriously amazing Salsa Verde Chicken Enchilada recipe up your sleeve!

These Enchiladas are probably one of my favorite things I’ve ever made. They’re stuffed with chicken, plenty of cheese, and fresh tomato salsa to brighten up the filling a little. Add a squeeze of lime, an extra dollop of salsa verde, and some cilantro on top, and you won’t even know what hit you. These are perfect to serve to a bigger group, because you can make a couple large trays at a time, and even pre-bake them, and then just heat them up in the oven when you want to serve. If you somehow end up with extra salsa verde, or want to prepare it ahead of time, it can be stored in an airtight container in the fridge for a week. I’m so excited to try variations on the filling with these, but every time I start considering that, I think about how much I really just want the perfect chicken version. It’s like I said before, some things just don’t need to be changed, because they’re exactly right the way they are.


Salsa Verde Chicken Enchiladas

Salsa Verde recipe adapted from Tyler Florence and The Flavor Blender.

Servings 16 enchiladas

Ingredients

Salsa Verde

  • 1 lb tomatillos, de-husked and washed
  • 1 poblano pepper
  • 2 jalapeno peppers
  • 4 cloves garlic, wrapped in foil
  • 1 medium white onion
  • 3/4 cup chicken broth
  • 1/2 cup cilantro
  • 2 tsps cumin
  • 3 Tbsp lime juice
  • 1 tsp salt

Chicken Filling

  • 2 lbs chicken breasts
  • 4 Tbsp olive oil, divided use
  • 1 Tbsp paprika
  • 1 Tbsp cumin
  • 1 Tbsp garlic powder
  • 1 tsp salt
  • 16 soft corn tortillas
  • 2 cups shredded Monterey Jack cheese

Fresh Tomato Salsa

  • 2 tomatoes
  • 1/2 medium white onion
  • 1/2 jalapeno
  • 1 Tbsp lime juice
  • 1/2 tsp salt
  • 3 Tbsps cilantro, chopped

Instructions

  1. Make the salsa verde. Place de-husked tomatillos, poblano, jalapeno, and garlic cloves (wrap the garlic cloves in foil to prevent burning) on a baking tray lined with foil. Broil in the oven for 7 minutes. Cut a white onion into quarters. Remove the tray from the oven, add the onions to it, and bake for an additional 7 minutes. 

    2. Place two chicken breasts on a baking sheet and pour two Tbsps of olive oil over top. Stir together spices and sprinkle evenly over top. After the salsa verde ingredients are out of the oven, reduce oven temperature to 350 degrees, and bake chicken for 35-40 minutes. 

    3. Allow tray of broiled tomatillos and peppers to cool, and then de-stem the tomatillos, poblano, and jalapenos, and cut into quarters. For the jalapenos, de-seed them if you want a milder salsa. Leave in the seeds of one jalapeno if you want the salsa to have a kick without being extremely hot. Add all of the ingredients from the tray to a food processor (my NutriBullet was perfect for this), and run until everything is broken down and mixed. Add the remaining ingredients to the food processor and pulse until well-blended.

    4. Make the fresh tomato salsa. Dice tomatoes and onion, and de-seed and finely chop jalapeno. Stir together all ingredients, adding more salt to taste. 

    5. When the chicken is done, allow to cool slightly, and place on a plate. Shred each chicken breast with two forks. 

    6. Spread salsa verde in the bottoms of 2 9x13 baking pans, about 1/4 cup for each. Assemble your enchiladas: Heat the tortillas in the microwave, and then brush them on each side with olive oil. This keeps them from breaking when you roll them. Fill each with a sprinkle of shredded cheese, chicken, and about a Tbsp of each kind of salsa. Roll, and place in the baking pan. When the pans are full, spread more salsa verde over the tops of the enchiladas, and sprinkle generously with cheese. Bake pans at 350 degrees for about 25-30 minutes, until the cheese just starts to lightly brown on top. Top each enchilada off with a little more salsa verde before serving. 


Better Chicken Vino Bianco

Better Chicken Vino Bianco

This recipe is one of my favorite dinners, and only partly because the recipe involves wine. It’s pretty quick to make, and all the prep can be done ahead of time, so you don’t have to spend hours in the kitchen to make something wonderful. Since the chicken doesn’t actually cook in the sauce, you can buy a roasted chicken and use that if you’re especially short on time. Short cuts that don’t diminish the final product are essentially just examples of good time management, right?

Chicken Vino Bianco is typically served over pasta, but I chose to make this dish with rice. The rice absorbs the sauce better than pasta ever could, soaking up the flavor and making sure it ends up in your mouth instead of on the bottom of the dish. The sauce itself is rich and creamy, without feeling heavy, and the flavor of the wine comes through without being overpowering. You can use chicken broth and maybe a little lemon juice in place of the wine and still have a silky, beautifully flavored sauce.

Better Chicken Vino Bianco is loaded with vegetables, but you hardly even notice them because with a little wine and cream in the mix, all the vegetables cook down into the glorious, smooth sauce. This recipe involves fresh grape tomatoes, spinach, shredded carrot, onion, and mushrooms. The tomatoes add a freshness that balances the heavy cream, and the onions, carrot, and spinach add loads of flavor as well as bulk and color.

Every recipe for Chicken Vino Bianco I looked at called for mushrooms. I’ll just say it – I hate mushrooms. I’ve been on a quest to force myself to like foods that I hate, in order to broaden my palate (it’s too complicated to be a food-lover who hates popular flavors like mushrooms and bananas). This was a great place to start, because I chopped the mushrooms so small that they all but disappeared into the sauce, and I could forget they were there.

I’ve tried the recipe sans mushrooms and the flavor just wasn’t the same. If you happen to love them, you can just roughly chop them before adding them to the skillet. You can do that with all of the vegetables in this dish, depending on what you like. If you’re of the vegetarian persuasion, you could also opt to increase the mushrooms in place of the chicken. I don’t think I’ll ever like mushrooms enough to live that life, but I hear some people think they’re amazing. Teach me your ways, please.

Like most of my recipes, this one was developed over time, based on a lot of similar recipes. I love taking a concept and changing it to fit my personal needs – especially when the result is something this tasty!  With its irresistible sauce and depth of flavors, Better Chicken Vino Bianco is a beautiful, savory dish that still feels light and healthy. And thank goodness for that, since it practically comes with a built-in wine course. The recipe only calls for a cup, and it would be a shame to waste the rest!


Better Chicken Vino Bianco


Prep Time 20 minutes
Cook Time 30 minutes
Total Time 50 minutes

Ingredients

  • 3 chicken breasts
  • 2 Tbsp olive oil
  • 1 cup yellow onion, diced
  • 1 cup shredded carrot
  • 4 garlic cloves, minced
  • 1 1/2 cup mushrooms, chopped
  • 1 cup quartered grape tomatoes
  • 1/2 cup heavy cream
  • 1 cup dry white wine
  • 1 tsp salt

Instructions

  1. Slice chicken into bite sized pieces and cook in a Tbsp of olive oil. Cook gently, over medium heat, to prevent chicken drying out. Remove cooked chicken from the skillet.

    2. Place onion, shredded carrot, garlic, and a Tbsp of olive oil in the same skillet over medium heat. Let cook until everything starts to soften, stirring occasionally.

    3. While onions are cooking, cut tomatoes into quarters, and chop mushrooms - I diced mine very very small, but you could just chop them roughly if you love mushrooms. Add both to the skillet with 1 tsp of salt and let cook until soft. 

    4. Add wine to the skillet and bring to a simmer. Cook until the sauce starts to reduce. Turn off heat and add cream. Stir until well combined. Salt to taste. Add chicken to the skillet and mix until coated with sauce. 

    5. Serve over warm rice or pasta. 

Pulled Pork and Cranberry Flatbread

Pulled Pork and Cranberry Flatbread

I was roaming the internet, looking for inspiration, when I came across this cranberry and goat cheese flatbread. It clearly has made the rounds on Pinterest, and for good reason – it’s quite pretty. Having posted a flatbread recipe recently, I figured this would be a great time to try out some interesting new toppings. Although to be fair, you could put just about anything on flatbread and I’d try it. Not to turn this post into an ode to flatbread or anything.

I love the goat cheese and cranberry combination, but I wanted to give the dish another dimension, and make it more filling. With the tart, yet sweet cranberry sauce already in mind, I knew spicy, smoky pulled pork would be the perfect addition. The cranberry sauce is reminiscent of a barbecue sauce on the pulled pork, but with a different, fruitier flavor profile. The goat cheese is a perfect element to mellow some of the spice from the pork, and keep the tang of the cranberry sauce from being overwhelming.

Cranberry sauce seems to get attention only around the holidays, and I think that’s kind of a tragedy. It’s delicious with so many other things besides turkey and stuffing. That said, finding fresh or even frozen cranberries after January 1st is like trying to find truly good gluten-free pizza crust: may exist, but hard to locate. My cranberry sauce calls for part dried cranberries and part canned whole cranberry sauce, so it can (and should!) be made between the months of January and October. My recipe for this is adapted from a Food Network version.

The pulled pork in this recipe is done in the slow cooker, with a rub from Kevin and Amanda. Their recipe has a lot more to it, brining, and cooking in the oven, etc., but I just took the rub, coated my pork, tossed it in the slow cooker with a little water, and let it go, and it’s some of the best pulled pork I’ve ever eaten. Every bite is extremely flavorful and a little spicy, without being overpowering. The goat cheese I used is “La Bonne Vie Garlic and Herb Goat Cheese”- I just got it from my local grocery store, but you could honestly use any decent herb goat cheese. Trader Joe’s has a great, inexpensive one.

Since I’ve essentially given you a rundown of how wonderful all the components of this dish are on their own, you can imagine how I reacted when I tried them together. There was a lot of swooning, and uncivilized devouring, and general elation.


Pulled Pork and Cranberry Flatbread

Pulled pork recipe is adapted from Kevin and Amanda's Perfect Pulled Pork.  

Cranberry sauce recipe is adapted from Gourmet Magazine's Savory Dried Cranberry Sauce - Recipe found through foodnetwork.com

Servings 3 flatbreads

Ingredients

Pulled Pork

  • 1 4-8 lb pork shoulder
  • 1 medium yellow onion
  • 1/2 cup water
  • 1 Tbsp ground cumin
  • 1 Tbsp garlic powder
  • 1 Tbsp onion powder
  • 1 Tbsp chili powder
  • 1 Tbsp cayenne pepper
  • 1 Tbsp salt
  • 1 Tbsp ground black pepper
  • 1 Tbsp paprika
  • 1/2 cup brown sugar

Cranberry Sauce

  • 1/4 cup brown sugar
  • 1/2 Tbsp cornstarch
  • 1/2 cup white wine
  • 3/4 cup chicken broth
  • 1 tsp balsamic vingar
  • 1/2 cup dried cranberries (I used Craisins)
  • 1/2 cup canned whole cranberry sauce
  • 1/8 tsp rosemary
  • 1/8 tsp cinnamon
  • 1/8 tsp tarragon

Other Ingredients

  • 3 large flatbreads
  • 8-12 oz herb goat cheese (2-3 small logs), depending on how much you like goat cheese - I used 12oz.
  • 2 Tbsp fresh thyme or parsley (optional)

Instructions

  1. Slow cook the pork: mix together all dry ingredients to create a rub. Roughly chop yellow onion, and place in slow cooker with the 1/2 cup of water. 

    2. Pat pork shoulder dry with paper towel, and coat generously with the dry rub on all sides. Massage it into the meat with your hands to make sure it really sticks. 

    3. Place pork in the slow cooker, on top of the onions. Cover and let cook on high 4-6 hours, or on low 8-10 hours, until pork is falling off the bone and tender. Remove bone from the pot, and shred the meat with two forks. 

    Note: this pulled pork recipe yields much more pork than you'll need to use for your flatbreads. Extra meat can be frozen to use later.

    4. If you're making your flatbread, do it when the pork is about an hour and a half from being done. You can easily use pre-made flatbread if you prefer. You can find my flatbread recipe linked in the post above.  Instead of splitting the dough into eight pieces like I typically do, I split it into three, to make larger flatbreads. The method for cooking them is the same. 

    5. When your pork is about a half hour from done, make the cranberry sauce. Stir together brown sugar and cornstarch in a small sauce pan. Add white wine and chicken broth and set over low heat. Stir until well combined. Add vinegar, dried cranberries and canned cranberry sauce, rosemary, tarragon, and cinnamon. Simmer for 15 minutes, stirring occasionally. Sauce should be quite thick. Remove from heat. Sauce can be stored in an airtight container in the refrigerator for at least a week. 

    6: Assemble Pulled Pork and Cranberry Flatbreads: spread each flatbread with a generous amount of goat cheese, saving 2-4 oz aside. Top with a layer of pulled pork- you can add as much or as little as you like here. Drizzle with cranberry sauce (again, quantities are up to you).  I used all of my sauce between three flatbreads. Top with small crumbles of the remaining goat cheese. Bake flatbreads in the oven at 350 degrees for about 8 minutes, until the cheese gets soft and the flatbreads are warm and a just little crispy on the bottoms. Garnish with fresh thyme or parsley. 


Apple, Feta, and Turmeric Stuffed Chicken

Apple, Feta, and Turmeric Stuffed Chicken

I was raised by a couple of serious foodies. My mom is known among family and friends as an enthusiastic baker, who is happiest playing in the kitchen. My dad’s secret dream is to be on one of the amateur episodes of Chopped, and I’m certain he’d be a strong contender – he’s got some kind of innate flavor-mixing sixth sense that continually amazes me.

We all owe my dad an enormous debt of gratitude for this recipe, because it’s all his creation, and it’s unbelievably good. Thinking about it makes me immediately hungry. It’s the kind of impressive, crowd-pleasing dish that people take a bite of and swoon over. At least, that is, if they’re anything like me. It’s a little unusual for a stuffed chicken recipe, and you definitely need to have some specific ingredients for this one, but it’s beyond worth that extra trip to the grocery store. They’re not weird ingredients that you’ll only use once and then lose in the back of the refrigerator or pantry. If you don’t use them up by making this dish over and over – it’s that good – you’ll find lots of other recipes for them. If you don’t cook with them already, prepare to have feta, sun-dried tomatoes, and turmeric become your new best friends.

This dish starts with garlic, onion, and sun-dried tomatoes, stewing in olive oil. Then you add apples, ginger, and turmeric, and let them cook until everything is soft and the flavor has started to develop. The filling is finished with a good helping of feta cheese, stirred in until it gets all melted and the whole mixture thickens. Tell me you’re not thinking about that filling and wondering if you’ve got time to stop at the grocery store to get sun-dried tomatoes and feta! The chicken breasts get seared in a pan, sliced open to create a pocket, stuffed with the filling, and then cooked in the oven. After baking, they’re topped with mozzarella cheese, and then go back in the oven just until the cheese melts.

I generally prefer food that has some kind of spicy heat, but this dish is an exception. The sweetness of the apple with the salty feta and mozzarella, mixed with the tart sun-dried tomatoes, and flavored with the turmeric, onion, garlic, and ginger, make this stuffed chicken an absolute standout. With so many flavors involved, it’s important that they’re balanced just right, and in this recipe they go together perfectly.

The turmeric in this dish turns everything a bright yellow color, so I definitely recommend serving it with some colorful veggies. I went with a simple spinach salad, topped with feta, apple, and a balsamic vinaigrette. The flavors in the stuffed chicken would go well with just about anything, so you could serve it with asparagus, roasted sweet potato, or brussels sprouts. Or you could just forgo worrying about aesthetics because you’re more concerned with eating your stuffed chicken than posting it on the internet. Sometimes I barely get my blog photos taken before I dive into the food!

The nice part about this recipe is that it can be done from start to finish in about 45 minutes. Once you’ve seared the chicken and made the filling, you’re only 25 minutes away from eating. Make a quick salad or steam some veggies, and dinner is served. This dish is a great choice if you want to really impress someone with your cooking skills, because it looks and tastes complex, but it’s so easy to put together. I’m excited to try variations of this filling, with different fruit and seasonings – let me know in the comments if you try it out, and how you put your own spin on it!


Apple, Feta, and Turmeric Stuffed Chicken

Servings 4 servings

Ingredients

  • 4 chicken breasts
  • 1/3 cup olive oil + 2 Tbsps, divided use
  • 3/4 cup feta cheese
  • 1 small Gala apple
  • 1 small yellow onion
  • 2 tsps ground turmeric
  • 1 tsp ground ginger
  • 4 garlic cloves
  • 5 oz shredded mozzarella cheese
  • 5 oz sun-dried tomatoes
  • dash of salt - add to taste

Instructions

  1. Dice onion and mince garlic. Add all to a small saucepan with 1/3 cup of olive oil. Begin cooking over medium heat. Dice apple with skin still on, slice sun-dried tomatoes into thin strips, and add both to the sauce pan. Let cook until the apples and onions become tender.

    2. While the filling is cooking, get a skillet hot. Add 2 Tbsps of olive oil, and place chicken breasts in the skillet. Sear chicken on each side for two minutes, and remove from heat. Chicken should still be raw on the inside. Searing it on the stove just makes it easier to stuff, and helps it cook in the oven faster.

    3. Add turmeric, ginger, and feta to the sauce pan. Stir gently until cheese melts and the filling is well-mixed. Remove from heat.

    4. Cut a pocket into each chicken breast along the long side - be careful not to cut all the way through. Fill each with a fourth of the filling.

    5. Place stuffed chicken breasts on a baking sheet lined with foil. Bake in the oven at 350 degrees for 20 minutes. Check to make sure chicken is cooked through.

    6. Remove from oven, top with mozzarella cheese, and cook in the oven for an additional 4-5 minutes. Serve and enjoy!


Jambalaya Zoodles

Jambalaya Zoodles

I mentioned in my last post that one of my prime reasons for learning to cook was to be able to make vegetables taste wonderful. This recipe is the epitome of delicious vegetables, as far as I’m concerned. It’s a take on about a million versions of jambalaya, turned into an unbelievably flavorful plate of meat and vegetables. Healthy eating should never boil down to boring, flavorless dishes.

If you’re unfamiliar with cooking dishes like jambalaya, then this is a good place to start. There’s a lot of prep work involved, but no tricky techniques, and the actual cooking is quick and easy.

My Jambalaya Zoodles start as all good Cajun and Cajun-inspired cooking does: with the holy trinity: onion, bell peppers, and celery, along with some diced tomatoes and garlic. The vegetables are coated in a blend of spices and sauteed in butter. They’re taken off the heat while shrimp and andouille sausage are cooked with more seasoning. After that, everything is combined in the pan with chicken stock, and reduced until the meat and vegetables have soaked up all the flavor. The zucchini is added last, cooked in with everything else until barely tender, and then it’s time to serve!

The zucchini is a fabulous base for this combination of meat and sauce. I find that zoodle recipes are often either underwhelming in texture, or drenched in a cream sauce that leaves them feeling heavy in your stomach. These Jambalaya Zoodles have loads of interesting textures going on, between the crunch of the zucchini, the soft peppers and onions, and the hearty shrimp and sausage. This dish is a little spicy, but not so hot that you can’t truly appreciate the flavor. You can always reduce or increase the cayenne and pepper to adjust to your liking – just remember that a little cayenne goes a very long way. I’ve learned this the hard way!

If shrimp and andouille sausage aren’t your thing, you can use chicken instead and still end up with an amazing dinner. Beef or pork would probably be delicious as well, although I haven’t tried them in this recipe. It would be a wonderful meatless dish as well, perhaps with pasta mixed in with the zoodles, or mushrooms in place of the meat.

Since this isn’t a recipe for a true jambalaya, there’s no need to worry that what you end up with isn’t technically right. This recipe doesn’t pretend to be Cajun jambalaya like you’ll find in New Orleans. This is a take on the deep, spicy flavors of jambalaya, with a healthy twist. Once you taste this dish, you’ll never want to flavor anything else differently. And you’ll probably spend a few hours casually planning a dream trip to New Orleans to try some truly authentic jambalaya. In my head, I’m headed to Louisiana tomorrow. In real life, I’m making this for dinner tonight to dull the pain of an existence that doesn’t support snap-decision excursions to interesting places.

Jambalaya Zoodles

Servings 3 people

Ingredients

  • 1/2 green bell pepper
  • 1/2 red bell pepper
  • 1/2 yellow onion
  • 2 celery stalks
  • 1 16 oz can diced tomatoes
  • 2 cloves garlic
  • 2 Tbsps butter
  • 1/4 tsp cayenne
  • 1/2 tsp fresh ground black pepper
  • 1 1/2 tsp salt
  • 1/2 tsp paprika
  • 1/2 tsp dried oregano
  • 1/2 tsp thyme
  • 1/2 tsp dried basil
  • 1/4 tsp onion powder
  • 1 lb shrimp
  • 1 lb andouille sausage (about 5 links)
  • 2 Tbsp white wine
  • 1/2 tsp cornstarch
  • 1 1/2 cups chicken stock
  • 3 medium zucchinis - about 9 cups of zoodles when spiralized

Instructions

  1. Note: This recipe requires a fairly sizeable skillet - I used a 12 inch skillet.  A wok would also do a great job.

    Step 1: Stir together cayenne, pepper, salt, paprika, onion powder, oregano, thyme, and basil. Spiralize three zucchinis. Roughly chop the spirals so you don't end up with very long zoodles.

    Step 2: Thinly slice peppers, onion, and celery. Mince garlic. Add peppers, onion, celery, garlic, tomatoes, and butter to a large skillet. Stir in half the blend of seasonings. Cook on high heat until vegetables are soft and starting to brown. 

    Step 3: Prick sausages all over with a fork and place in another skillet over medium heat. Pour in just enough water to come about a quarter of the way up the sides of the sausages. Cover and cook for 10 minutes. Uncover and cook until any remaining water in the skillet has evaporated and sausages are golden brown. Remove sausages from heat, cut into pieces, and set aside. 

    Step 4: When vegetables have started to brown, remove from skillet and set aside. Do not clean the skillet.  Add the shrimp to the same skillet and sprinkle the remaining spice blend over top. Cook shrimp on high heat just until they turn uniformly pink. 

    Step 5: Reduce heat to medium, and return sausage and cooked vegetables to the skillet with the shrimp. Pour about a cup of chicken stock into the skillet, and let cook, stirring occasionally. 

    Step 6: Stir together corn starch and wine. When chicken stock has reduced by half, pour corn starch and wine mixture into the skillet and stir. Continue cooking until the sauce begins to thicken. 

    Step 7: Pour remaining chicken stock into the skillet, let cook for three more minutes. Add zucchini to the skillet and cook just until it becomes tender. Remove from heat and serve!