Upside-Down Lemon Raspberry Pavlova

Upside-Down Lemon Raspberry Pavlova

Pavlova is something I’ve dreamed of making ever since I found out about its existence. A light, fluffy meringue crust, covered in whipped cream and fruit? Um yes please. Give me some now. Except Pavlova takes a really long time to make from scratch – the meringue has to be in the oven for literal hours to come out right. It’s not at all difficult to make the meringue, I’m just very impatient when delicious treats take forever to bake. I finally gathered my patience (read: made lots of snacks to eat while the meringue baked) and decided that it was time to give Pavlova a shot.

I used a recipe from Eating Well, waited the prescribed couple of hours for my meringue to bake, and made some lemon curd and whipped cream to top it off. It was completely delicious, but a little too sweet, and very hard to serve. If you’ve ever made meringue, you’ll know that they don’t exactly slice cleanly, or keep well for more than an hour or two, once topped with gooey, wonderful things like lemon curd and whipped cream.

I added a raspberry sauce to subsequent test Pavlovas, to add more dimension to the flavor, and reduced the sugar in the meringue by just a small amount. This resulted in a much more interesting Pavlova that I was certain I wanted to eat approximately all of. The crunch of the meringue with the tart lemon and raspberry and silky cream is the most wonderful combination of textures and flavors. You don’t have to make any of your own fillings, if that seems like too much work – you can get lemon curd and whipped cream pretty readily in stores, and I’ll admit that whisking the lemon curd can feel a little tedious if lemon curd isn’t something you absolutely love. If you do make the fillings yourself, there’s plenty of time to get them all done while the meringue is baking.

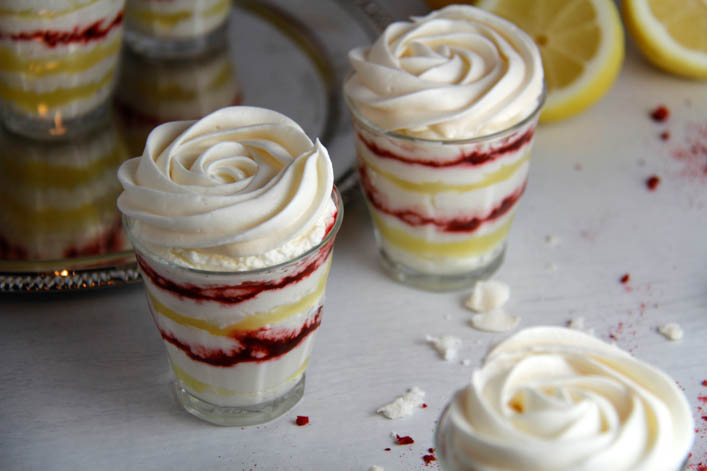
The question of how to serve this dessert neatly was answered when I was browsing online and saw some of those frosting roses on top of cupcakes. Here’s a tutorial if you’ve never made them – they’re easy to do, but you do need a special piping tip: an extra large 2D or 1M will work nicely. I’ve known about them for a long time, but I’d never thought to make meringue versions (meringues take too long and all that). After that, it became a question of how to incorporate pretty, white meringue roses without slathering them with lemon curd and cream, as you would with a normal Pavlova. Turning them upside-down was the obvious solution, and I think it worked marvelously.

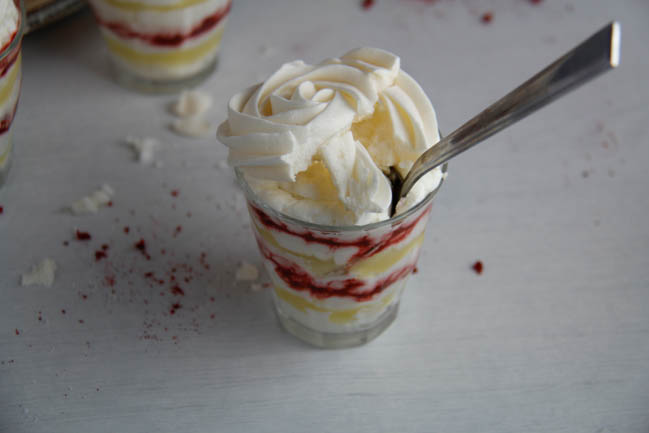
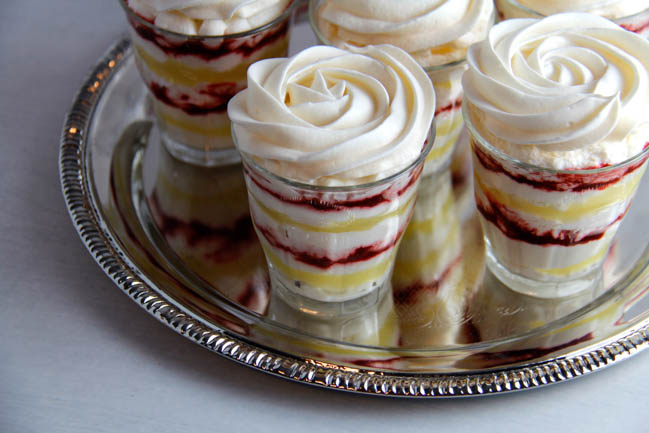
The Upside-Down Lemon Raspberry Pavlovas are perfect to bring to a party – I’ll be bringing mine to my family Easter celebration. I served mine in these sweet little glasses, but you could use any shot glass that you can fit a spoon into. You don’t have to worry about cutting and serving, since they’re all single-serve, and nearly all the prep can be done ahead of time. All you have to do is pop a meringue rose on top of each one at dessert time, and watch people ooh and ahh over how pretty they are. And then listen to them sigh about how delicious they were!


Upside-Down Lemon Raspberry Pavlovas

Meringue recipe adapted from Eating Well: Lemon Pavlova

Lemon Curd recipe from from Eating Well: Lemon Pavlova

Servings 12 Pavlovas

Ingredients

Meringue Roses

  • 2 egg whites
  • 1/3 cup superfine sugar
  • 1/8 tsp cream of tartar
  • pinch of salt

Lemon Curd

  • 1 egg
  • 2 egg whites
  • 3/4 cup granulated sugar
  • 2/3 cup lemon juice
  • 1 Tbsp freshly grated lemon zest
  • 1 Tbsp butter

Raspberry Sauce

  • 1 cup frozen raspberries
  • 2 Tbsps powdered sugar

Whipped Cream

  • 1 cup heavy whipping cream
  • 2 Tbsps powdered sugar

Instructions

  1. Start by making the meringue. Add egg whites, cream of tartar, and salt to a mixer, and beat on medium-high speed until soft peaks form. Make sure that your bowl is very, very clean before starting, because any grease will damage your results. If you don't have superfine sugar, you can blend it in a food processor  - I used my NutriBullet - for a few seconds. Make sure not to let it go too long, or it will just turn into powdered sugar. Increase the mixer speed to high, and gradually add the sugar. Whip until stiff peaks form and the mixture is glossy white. 

    2. Line a baking sheet with parchment paper. Turn one of your serving glasses upside down and trace the rim on the parchment paper, to create a guide for how large to pipe your meringue. Make 12-15 circles, and turn the paper over so the pencil marks are on the reverse.

    3. Spoon the meringue mixture into a piping bag, fitted with an extra large 2D or 1M tip. Pipe roses onto the parchment paper, starting in the center of each circle and moving in a swirl outward. Bake at 200 degrees for 1 hour, on the lowest rack in the oven. When baking time is up, turn off the oven, and prop open the door slightly. Allow meringue roses to dry completely in the oven for about 1 hour. When they're finished, meringues will be dry and light. 

    4. While the meringues are baking, make the lemon curd, raspberry sauce, and whipped cream. For the lemon curd, whisk together all ingredients except butter in a small sauce pan. Place pan over low heat, add butter, and whisk consistently for 5-12 minutes, depending on the temperature you're using. Mine took almost exactly 12 minutes. When you can coat a spoon with the curd and leave a mark when you run your finger across the curd on the spoon, it's done. Press curd through a fine-meshed sieve to remove solids (like the zest). Chill completely in the refrigerator before using. This can be make up to a week ahead of time. 

    5. For the raspberry sauce, combine frozen raspberries and powdered sugar in a sauce pan over low heat. Stir frequently until the raspberries soften and break down, and the sugar is completely dissolved. Press through a fine-meshed sieve to remove seeds. Store in the refrigerator. This can be made ahead, also. 

    6. For the whipped cream, place your mixer bowl and whisk attachment in the freezer for at least ten minutes. Remove from freezer and pour cream and sugar into the bowl. Whip at high speed until the cream thickens and stiff peaks form - this should only take a minute or two. 

    7. To assemble the Upside-Down Pavlovas, put whipped cream and lemon curd into piping bags, and pipe alternating layers of cream, curd and raspberry sauce into shot glasses until they're full. To create the layers of raspberry sauce, just drizzle a little with a spoon and tilt the glass to swirl it around and create an even layer. Make sure that the last layer is whipped cream. Just before serving, top each glass with a meringue rose (the meringue will go soft if put on more than a few minutes ahead of time). 


Falafel Hummus

Falafel Hummus

I was really hoping I’d invented Falafel Hummus as a concept, which is pretty silly since it seems like everything you can think of has already been done (I like to dream big). A couple Google searches show that this isn’t a completely new concept, but it’s also not all over the place. Well, it should be. I’ve been obsessed with falafel lately. The flavors are so interesting, with the mild, nutty chick peas and the sharp spicy parsley. I have to admit that turning falafel into a dip resulted from my failure to make actual falafel, but I’m not mad at about it even a little. Falafel Hummus is easier to make than falafel, and it has become my new favorite snack.

I started with a recipe from Gourmandelle for Healthy Vegan Falafel, formed the mixture into little patties and tried to fry them (the recipe calls for pan-frying instead of deep-frying), only to end up with squishy, soft, non-fried “falafel.” This is probably a case of my oil not being hot enough, but I can’t say for sure. What I can tell you for sure is that the whole time I was standing at the stove frying, I was eating the falafel “batter” that was still in the bowl. And it was delicious. I’m talking the kind of delicious where the flavors are curious and pleasing in a way where you have to keep tasting it to make sure you’re remembering it properly. And every bite is  better than the last.

I ditched the frying and decided to try the recipe again, but this time with a few additions to turn it into a dip.  During this experiment I left out the almond flour, which turned out to be a huge mistake. The almond flour balances the onion and the parsley in this dip to keep them from tasting bitter. I think almond butter would work as well, if not better, but almond flour worked just fine for me. I added some of the liquid from the can of chick peas and some olive oil to thin it to dip consistency. I also tossed in a couple of dates, which give the whole thing a slight undertone of sweetness, adding another dimension and tying all the flavors together.

I ate way too much of it in a single sitting, dipping warm pita and carrots in it and marveling at how something so similar to a million other versions of hummus could taste so different. It has the added bonus of involving zero frying, so this Falafel Hummus is technically healthier and quicker to make as well. Serve it to your vegan and non-vegan friends alike, or just have it for lunch spread inside a pita with some veggies. It’s perfect to share or to devour on your own when you’re experiencing serious falafel cravings or desperate wanderlust, or in my case, both.


5 from 1 vote
Print

Falafel Hummus

Recipe adapted from Gourmandelle's Healthy Vegan Falafel 

Ingredients

  • 1 can chick peas (drain but keep the water)
  • 2 Tbsp aquafaba (water from the can of chick peas)
  • 1 Tbsp ground flax seeds
  • 1/4 cup fresh parsley, chopped
  • 1/2 carrot, shredded
  • 1/2 yellow onion, diced
  • 3 garlic cloves, mashed
  • 2 Tbsps almond flour
  • 1/2 tsp paprika
  • 1/2 tsp ground cumin
  • 1 Tbsp tahini
  • 2 dates
  • 2 Tbsp olive oil
  • 3/4 tsp salt

Instructions

  1. Place all ingredients in a food processor and pulse until blended but not completely smooth. The dip is better if it's a little chunky. Salt to taste.

    Serve with warm pita, chips, and veggies.

    Note: I mixed mine in my nutri-bullet because I'm obsessed with it, but it definitely was not the very best tool for the job. I recommend using an actual food processor.


Better Chicken Vino Bianco

Better Chicken Vino Bianco

This recipe is one of my favorite dinners, and only partly because the recipe involves wine. It’s pretty quick to make, and all the prep can be done ahead of time, so you don’t have to spend hours in the kitchen to make something wonderful. Since the chicken doesn’t actually cook in the sauce, you can buy a roasted chicken and use that if you’re especially short on time. Short cuts that don’t diminish the final product are essentially just examples of good time management, right?

Chicken Vino Bianco is typically served over pasta, but I chose to make this dish with rice. The rice absorbs the sauce better than pasta ever could, soaking up the flavor and making sure it ends up in your mouth instead of on the bottom of the dish. The sauce itself is rich and creamy, without feeling heavy, and the flavor of the wine comes through without being overpowering. You can use chicken broth and maybe a little lemon juice in place of the wine and still have a silky, beautifully flavored sauce.

Better Chicken Vino Bianco is loaded with vegetables, but you hardly even notice them because with a little wine and cream in the mix, all the vegetables cook down into the glorious, smooth sauce. This recipe involves fresh grape tomatoes, spinach, shredded carrot, onion, and mushrooms. The tomatoes add a freshness that balances the heavy cream, and the onions, carrot, and spinach add loads of flavor as well as bulk and color.

Every recipe for Chicken Vino Bianco I looked at called for mushrooms. I’ll just say it – I hate mushrooms. I’ve been on a quest to force myself to like foods that I hate, in order to broaden my palate (it’s too complicated to be a food-lover who hates popular flavors like mushrooms and bananas). This was a great place to start, because I chopped the mushrooms so small that they all but disappeared into the sauce, and I could forget they were there.

I’ve tried the recipe sans mushrooms and the flavor just wasn’t the same. If you happen to love them, you can just roughly chop them before adding them to the skillet. You can do that with all of the vegetables in this dish, depending on what you like. If you’re of the vegetarian persuasion, you could also opt to increase the mushrooms in place of the chicken. I don’t think I’ll ever like mushrooms enough to live that life, but I hear some people think they’re amazing. Teach me your ways, please.

Like most of my recipes, this one was developed over time, based on a lot of similar recipes. I love taking a concept and changing it to fit my personal needs – especially when the result is something this tasty!  With its irresistible sauce and depth of flavors, Better Chicken Vino Bianco is a beautiful, savory dish that still feels light and healthy. And thank goodness for that, since it practically comes with a built-in wine course. The recipe only calls for a cup, and it would be a shame to waste the rest!


Better Chicken Vino Bianco


Prep Time 20 minutes
Cook Time 30 minutes
Total Time 50 minutes

Ingredients

  • 3 chicken breasts
  • 2 Tbsp olive oil
  • 1 cup yellow onion, diced
  • 1 cup shredded carrot
  • 4 garlic cloves, minced
  • 1 1/2 cup mushrooms, chopped
  • 1 cup quartered grape tomatoes
  • 1/2 cup heavy cream
  • 1 cup dry white wine
  • 1 tsp salt

Instructions

  1. Slice chicken into bite sized pieces and cook in a Tbsp of olive oil. Cook gently, over medium heat, to prevent chicken drying out. Remove cooked chicken from the skillet.

    2. Place onion, shredded carrot, garlic, and a Tbsp of olive oil in the same skillet over medium heat. Let cook until everything starts to soften, stirring occasionally.

    3. While onions are cooking, cut tomatoes into quarters, and chop mushrooms - I diced mine very very small, but you could just chop them roughly if you love mushrooms. Add both to the skillet with 1 tsp of salt and let cook until soft. 

    4. Add wine to the skillet and bring to a simmer. Cook until the sauce starts to reduce. Turn off heat and add cream. Stir until well combined. Salt to taste. Add chicken to the skillet and mix until coated with sauce. 

    5. Serve over warm rice or pasta. 

Perfect French Toast

Perfect French Toast

It’s no secret that I’m kind of particular about what I eat. I physically don’t want to waste time and calories on something that doesn’t taste wonderful. French Toast is one of my favorite foods, but I find that it’s very hit or miss at restaurants. I know that sounds crazy, like how much can you really mess it up? Hear me out. A lot of restaurants make it with thick brioche or challah bread, which sounds great in theory. In practice it leaves you with French Toast that looks fine on the outside, but then you start eating and realize the inside is dry and flavorless, and you have to use twice as much syrup. Not that I’m knocking syrup – syrup is a gift to humanity.

There are two problems at work with sub-par French Toast: The bread, and the batter. The issue with the bread is that unless it’s stuffed with some delicious filling, you have to soak it long enough for the batter to penetrate beyond the outer layer, but you can’t soak it too long without it getting soggy. I find that the thicker the bread, the harder it is to control this, and bread that’s too thin just doesn’t stand up to the batter to begin with. The issue with the batter is that it needs to have more than egg and milk and a little cinnamon to yield really star quality results. It’s like the bread – you don’t want it to be too thin or too thick. Fortunately for all of us, I have the solution: the perfect French Toast bread, and the perfect batter to go along with it.

Not sponsored – I just love the bread for this recipe.

The bread I’m referring to is Pepperidge Farm’s Farmhouse Hearty White Bread. It lives up to its name, being much more substantial than a regular white bread, but it’s not the extra-thick bread many people seem to prefer for French Toast. It stands up to batter beautifully, absorbing it quickly without getting too soft. Since loads of French Toast is never a bad thing, I tripled the batter recipe to make enough to cook the whole loaf. It makes a ton, so it’s perfect for a big family brunch – or a small family brunch, if you know lots of perpetually hungry people like I do!  To keep everything fresh and hot before serving time, transfer the cooked pieces to a tray/platter in a pre-warmed oven held at its lowest temperature while you finish working your way through the loaf.

The batter I use is from The New Best Recipe, and I haven’t changed the recipe except to add cinnamon. What I have changed is the method for preparing the batter. I’ll admit that it takes a bit of nerve to look at a recipe developed by America’s Test Kitchen and declare, “I can do better.” The first time I tried it, I followed it to the letter. And I spent 10 frustrating minutes trying to conquer lumps and clumps of flour that refused to whisk in. The flour is what sets this recipe apart, giving it a beautiful, crispy outside that keeps the inside tender.

To get a silky-smooth batter consistency, it’s important to begin by stirring the melted butter into the combined dry ingredients. A thick mess will form, and you’ll think I’m nuts. But stir in all the butter, and then add the milk and egg mixture very gradually until everything is combined and smooths to a paste-like consistency. Then, when you add the rest of the milk, it’ll combine with the paste, sans lumps. It’s amazing to me how such a simple alteration in the steps can yield highly improved results. The rest of the technique is straight-forward.  The bread is soaked in the batter and then fried in butter to a deep golden brown. It’s not any harder than making a grilled cheese sandwich. The only trick is keeping an eye on multiple pieces as they brown.

This French Toast recipe gives you those lovely golden-brown edges, and it tastes as good as it looks. There’s a little sugar and cinnamon in the batter, along with a healthy dose of vanilla, so you get loads of flavor. Add a little drizzle of syrup, and make sure you get a second helping before it’s all gone, because this French Toast does not stick around long.


Perfect French Toast

Recipe adapted from "The New Best Recipe" by America's Test Kitchen

Ingredients

  • 3 large eggs
  • 6 Tbsps unsalted butter, melted
  • 2 1/4 cups whole milk, divided use
  • 2 Tbsp vanilla
  • 6 Tbsp sugar
  • 1 cup flour
  • 3/4 tsp salt
  • 1 tsp cinnamon
  • 1 loaf Pepperidge Farm "Farm House White" Bread
  • unsalted butter for frying

Instructions

  1. Combine eggs, ¼ cup milk, and vanilla in a small bowl; set aside. Combine dry ingredients in a medium bowl. Melt the butter and stir into the dry ingredients thoroughly. Stir the egg mixture into the butter/flour mixture very gradually, and whisk until smooth. Add the remaining 2 cups of milk.

    2. Preheat the oven to warm (about 200 degrees), and have a large platter ready.

    3. Cut the bread slices in half (do the whole loaf at once – just open the wrapper down the top). Heat a 10 or 12” cast-iron skillet over medium heat. Add about 1 Tbsp butter for each of first few frying rounds, then add as needed. When the butter has melted, soak each bread slice in turn without saturating, about 20 seconds per side. Lift out and allow excess to drip off, and then immediately place in the hot pan.  

    4. Cook until golden brown, about 2 minutes per side. Flip or rotate half-slices as needed, to ensure even browning. Remove to a large platter in the warm oven until all slices are cooked and you are ready to serve.

Mom’s Chocolate Chip Cookies

Mom’s Chocolate Chip Cookies

Chocolate chip cookie recipes are a dime a dozen, but this is the one that always breaks my diet when I’m trying to eat clean. This is the one that I return to over and over, because it’s just that good. These Chocolate Chip Cookies have achieved something like cult-status in my family. My mom has been making this recipe, which is a Betty Crocker original, since she was eight years old. It’s gone through minor adaptations over the years, and is essentially the cookie that every single person in my family loves, without fail.

The texture of these Chocolate Chip Cookies is nothing short of perfection. They have those crispy edges and soft middles that I can’t get enough of. If you like over-done, crunchy cookies, leave these cookies in the oven a minute or two longer – they’ll develop more flavor while they’re in there too. They’re made with butter and shortening, so they taste rich without feeling too dense, something I’ve found that break-and-bake type cookies seriously lack.

The texture is wonderful, but I think the flavor is what really keeps me coming back to these. They have a slight hint of salt, so there’s no overwhelming sweetness, and it amplifies the chocolate hit in each cookie. The butter and sugars are balanced exactly right, and there’s just enough vanilla to complement the chocolate, so these taste like the Chocolate Chip Cookies of your dreams. If we’re being honest here, I could eat the whole bowlful of cookie dough before any of it makes it to the oven. Apparently that’s bad for you or whatever, but I’ve never gotten sick. I think someone is just trying to keep me from living my best life.

The thing about this cookie recipe is that it took me 26 years to master it. I’ve tried making it several times over the course of my adolescence and early 20’s, and for some reason, I could never get it exactly right. This recipe is a perfect example of why precision matters in baking. Even a little extra flour can throw off the dough and leave you with sub-par cookies. Fortunately, I found a way to solve my problem a while ago: with a food scale.

I’ve given the measurements for the ingredients in grams (I try to do it with most of my baking recipes,) and it’s pretty important that you actually weigh them on a food scale to get the cookies exactly right. I promise it’s worth it. Baking with a food scale instead of measuring cups means way less clean-up, and no more trying to measure things like shortening or peanut butter by squishing them into a cup. If you haven’t already invested in a food scale, this is me begging you to do so. Your entire life will be better for it.

I sort of view this recipe as my mom’s family legacy. That’s completely ridiculous, as she has six children (I know, it was like growing up in a zoo), but baking is something I’ve always done with my mom and learned from her, so her beloved cookie recipe stands out to me as particularly important. I love the idea of a family recipe that gets passed through generations, and I plan to keep this one going forever.

This dough unfortunately isn’t the type that will do best if you mix it up and pop it right in the oven. It generally needs at least three hours to chill to achieve good results, and you’ll get even better results if you let it chill overnight. My mom mentioned that she discovered this years ago while running her zoo, as she had to work during toddler nap times and do things in stages to get anything done! The wait time for this dough lets it develop the proper flavor and texture. You can chill the dough for up to two days if you want to make it ahead, but the quality will start to decline after that.

Both the cookies and the dough freeze well. If you bake more cookies than you can eat, they keep okay for a day in an airtight container – but nobody has ever found out if they keep well longer than that.


Chocolate Chip Cookies

Recipe adapted by Laura Landi from Betty Crocker Chocolate Chip Cookies.

Servings 72 cookies

Ingredients

  • 2/3 cup butter, softened 150g
  • 2/3 cup shortening (I use Crisco) 128g
  • 1 cup granulated sugar 200g
  • 1 cup brown sugar, firmly packed 215g
  • 2 eggs
  • 1 tsp vanilla
  • 3 cups plus one Tbsp flour 385g
  • 1 tsp salt
  • 1 tsp baking soda
  • 2 cup semi-sweet chocolate chips 340g

Instructions

  1. 1. Cream together butter, shortening, and both sugars. Stir in eggs and vanilla until well combined.

    2. In a separate bowl, stir together flour, baking soda, and salt. Mix thoroughly, and add to the sugar mixture. Stir gently just until everything is combined. Don't over-mix. Fold chocolate chips into the dough until evenly dispersed. 

    3. Place dough in an airtight container and refrigerate for at least three hours, up to two days. 

    4. Roll cookies into 1 inch balls and bake at 375 degrees for 7 minutes. Turn the tray in the oven and bake for an additional 1 to 1 1/2 minutes, depending on how they look. The bottom edges should look golden and baked through, the tops should look pale, but not doughy. Remove tray from oven and set on a cooling rack. Allow the cookies to remain on the tray for an additional 3 minutes before transferring to the cooling rack. If cookies look brown all over, skip this step and transfer to a cooling rack immediately. 

    Note: Freeze dough by rolling it into balls first. You can bake them directly from the freezer like this, increasing baking time by 30 seconds to 1 minute.

    This recipe makes quite a lot, as it's technically a double batch. It can be halved if you don't need 72 cookies, although I don't know anyone who has ever experienced that!


Nomad Shepherd’s Pie

Nomad Shepherd’s Pie

I wanted to take a classic Irish dish and give it an interesting new twist, in honor of St. Patrick’s day this week. Shepherd’s pie has been done in every form you can think of: loaded baked potato versions and mini versions and hand-pie versions are plentiful. I thought about doing a breakfast concept, which led me to want to cross Shepherd’s Pie with the wildly different Shakshuka. Shakshuka has been fairly trendy in the last couple of years, but in case you just think it just sounds like a sneeze, it’s a dish of cooked, seasoned tomatoes/tomato sauce, with fried eggs on top, sometimes involving cheese and/or meat.

Experimenting with Shakshuka Shepherd’s Pie, or “Shak-shepherd,” as I’ve been referring to it, led to what I’ve decided to call my Nomad Shepherd’s Pie. It’s got inspiration and flavors from all over the place. The filling starts like a normal Shepherd’s Pie filling does, with ground beef, carrots, onions, garlic, and peas, but it takes a turn for the exciting when you combine it with diced tomatoes, cumin, paprika and jalapenos. Nomad Shepherd’s Pie is topped with creamy feta-infused mashed potatoes, a recipe I developed based on Pioneer Woman’s Creamy Mashed Potatoes. With the addition of feta, the potatoes take on a slight sharpness that works with the smooth, rich flavor of the buttery potatoes. The filling ingredients are all simmered together on the stove, before being baked in the oven with the potatoes. This lets the beef soak up all the different spices and flavors as it cooks, so every bite is consistent. There’s no digging around to make sure you got the right balance of flavors on your fork. Unless that’s just me? Do other people try to make sure every bite of their meal is just right?

I gathered my inspiration from a ton of Shakshuka recipes, cherry (tomato)-picking ingredients that I thought would work with Alton Brown’s Shepherd’s Pie, which I used as a base. He uses lamb; I used beef, because it’s less expensive and people (myself included) are more familiar with cooking it. I kept his seasonings and added a few of my own. I tested the recipe with Hungarian Sweet Paprika, which smells absolutely divine, but regular paprika would be fine to use. Whatever you put in it, it’s important to make sure all of your ingredients make it into the dish. Otherwise, you’ll set your beautiful Nomad Shepherd’s Pie in the oven, only to turn around and see the peas that were supposed to go into it… Sitting on the counter top. Sad that you’ve forgotten them.

I’ll just say I decided not to use them after all. That’s my story, and I’m sticking to it.

Putting together this dish is fairly straightforward, since it’s only two layers. You pour the filling into a glass 9×13 pan and smooth it out to an even layer. The mashed potatoes present a slight challenge, as they don’t spread very well on top of the wet filling. You can pipe the mashed potatoes on top to get a really nice layer. I wanted a little of my filling to run onto the top of my potatoes to give them some extra color when they baked. I piped about 6 thick lines of potatoes along the top of my dish, and then smoothed them into a single layer. The liquid from the filling seeps up over the edges of the potato while you’re smoothing it out. I think the added color on the top of the mashed potatoes actually makes the whole dish look more inviting, and the added moisture kept the top from drying out in the oven.

I tried a version of this dish with the mashed potatoes on the bottom, and the beef filling on top, and a few eggs cracked into the saucy filling on top and before baking. I found that the eggs didn’t add enough to the dish to bother with the careful timing they require. You could absolutely fry eggs and place them on top of an already-baked Nomad Shepherd’s Pie if you like the idea of taking it to full Shakshuka territory. If you do achieve a full Shakshuka Shepherd’s Pie, let me know how you did it, because I’d love to try it out!


Nomad Shepherd's Pie

Feta Mashed Potatoes are adapted from Pioneer Woman's Creamy Mashed Potatoes

Shepherd's Pie base is adapted from Alton Brown's Shepherd's Pie recipe 

Prep Time 15 minutes
Cook Time 1 hour 20 minutes
Total Time 1 hour 35 minutes

Ingredients

Filling

  • 2 Tbsp olive oil
  • 2 carrots
  • 1 medium yellow onion
  • 4 cloves garlic
  • tomato paste
  • 1 14.5 oz can petite diced tomatoes
  • 1 14.5 oz can crushed tomatoes
  • 2 jalapenos, seeded and chopped small
  • 3 oz frozen peas
  • 2 tsps worcestershire sauce
  • 2 tsps dried rosemary, crushed
  • 2 tsps dried leaf thyme
  • 1/8 tsp cayenne
  • 1 Tbsp + 1 tsp paprika (I used Hungarian sweet paprika)
  • 2 tsps cumin
  • 1 lb raw ground beef
  • 3/4 tsp salt

Feta Mashed Potatoes

  • 2.5 lbs peeled russet potatoes
  • 1/2 cup half and half
  • 6 Tbsps butter
  • 4 oz crumbled feta cheese
  • 4 oz cream cheese
  • 1/8 tsp onion powder
  • 1/8 tsp garlic powder
  • salt to taste

Instructions

  1. Start by making the mashed potatoes. Peel potatoes, slice into quarters, and place in a large pot. Add water to cover the potatoes, and cook with the lid on, over high heat. When the pot reaches a boil, lower the temperature to medium, and cook for 17-20 minutes, until potatoes are fork tender. 

    2. While potatoes are cooking, soften cream cheese in the microwave. When potatoes are done, drain them in a collander. Put cream cheese, butter, and feta into the warm pot. Return potatoes to the pot, on top of the cheeses and butter. Mash using a potato masher - You can also put the potatoes through a ricer before returning them to the pot, if you prefer a smoother texture. Add onion and garlic powder, and salt. Stir and mash until all ingredients are well combined. 

    3. Add salt and half and half to the potatoes and stir until combined. Set aside. 

    4. Dice carrots and add to a hot skillet with olive oil. Let cook about 12 minutes. Dice onions and add to the skillet until they start to get tender, about 5 minutes. Mince garlic and add to the skillet. Let cook for an additional 2 minutes. Add tomato paste, cans of tomatoes, jalapeno, peas, worcestershire, and spices and stir. Add raw ground beef and allow to cook through, stirring occasionally. Add salt - add more than the 3/4 tsp if needed. 

    5. When the ground beef has cooked, and pour the mixture into a 9x13 dish. Top with the mashed potatoes. You can spread them with a spoon or pipe them on. Piping looks neater, and makes it easier to get an even layer. 

    6. Bake at 350 degrees for 30 minutes. Garnish with a sprinkle of paprika over the top of the dish. 


Spinach and Artichoke Tarte Soleil

Spinach and Artichoke Tarte Soleil

I try really hard to look at the end of daylight savings as the beginning of those long, glorious, sunny summer days. When you’re losing an hour of precious sleep, it’s hard to remember the bright side. I decided that this year I would stop worrying about the sleep aspect, and celebrate the end of daylight savings with the most appropriate dish I could think of: a Tarte Soleil. It’s made of puff pastry, cut and shaped to look like the most beautiful sunburst, with endless possibilities for fillings – just the thing to help cheer up tired people like us.

Puff pastry works well with all sorts of flavors. I filled mine with creamy, slightly tangy and salty spinach and artichoke dip. I was a little worried that the spinach and artichoke dip would run out of the pastry in the oven and make a huge mess, but it held up quite well. I adapted a recipe from Once Upon a Chef, which uses a Mornay sauce in place of cream cheese/mayo. A Mornay sauce is essentially just a white sauce with shredded cheese, and also a term that I was unaware of until I made my spinach and artichoke dip. You learn something new every day (even a day that’s missing an hour).

A Tarte Soleil is a wonderful thing to know how to make. I’ll be the first to admit that while puff pastry with spinach and artichoke dip is undeniably delicious, it’s not exactly boundary-pushing. But formed into an intricately twisty sun-shape, and baked to perfect golden crispiness, the combination is not only classic, it becomes irresistible.

I made my puff pastry from scratch. I think people assume puff pastry is difficult to make, because you do have to be a little careful about the temperature of the dough. I find that it’s actually a fairly quick and easy process, if you focus on what you’re doing. I would encourage everyone to try making their own at some point, but store-bought crust will work just as well for this recipe. I actually meant to buy mine this time (I’ve read Pepperidge Farm makes a great version), forgot to get it, and then was too lazy to run to the store when it was time to get cooking. So I just made it instead. I’m nothing if not a problem solver. The fact that I also create my own problems may have something to do with that.

The key to a good Tarte Soleil is cutting the sections of filled pastry uniformly, and then twisting them evenly. This is always a challenge for me, because I’m not as meticulous as I might choose to be. It’s important to twist each section of pastry about three times, and make sure the twists are evenly spaced along the section. My other advice would be to stop twisting and pop the whole thing in the freezer for a few minutes if you find your puff pastry is getting too soft and warm to work with. This solves a lot of frustration when trying to get those perfect twists.

My Spinach and Artichoke Tarte Soleil is exactly what I’d like to snack on at a party, but your taste could be drastically different from mine. Luckily, the filling possibilities for Tarte Soleil are endless. You could do a different savory option, like this feta tapenade from Smitten Kitchen, or even choose a sweet filling – I’ve seen loads of versions stuffed with Nutella. Whatever direction you go, it’s sure to be a crowd-pleaser. Even if the crowd is mostly you and your family sitting in your kitchen, eating it straight from the oven. But then, that’s the best sort of crowd, isn’t it?


Spinach and Artichoke Tarte Soleil

Spinach and Artichoke Dip recipe is adapted from Once Upon a Chef's Baked Spinach and Artichoke Dip. I changed it to make it gluten-free. 

Puff Pastry is a basic puff pastry from All Recipes - I used a different method for making it. 

Prep Time 30 minutes
Cook Time 35 minutes
Total Time 1 hour 5 minutes

Ingredients

Puff Pastry

  • 5 cups bread flour
  • 2 1/2 tsps salt
  • 2 cups very cold water
  • 2 cups cold unsalted butter (do not soften)

Spinach and Artichoke Dip Filling

  • 1/4 cup sour cream
  • 4 Tbsps butter, divided use
  • 1/2 tsp corn starch
  • 1 cup heavy cream
  • 1 medium yellow onion, diced
  • 5 oz frozen spinach
  • 9 oz frozen artichoke hearts, chopped
  • 1/3 cup shredded parmesan cheese
  • 1/3 cup shredded Monterey Jack cheese
  • 2 cloves garlic, minced
  • 1 tsp dried thyme

Tarte Soleil

  • flour for rolling
  • 1 egg

Instructions

  1. Make puff pastry, if you are doing it from scratch. Stir together flour and salt in a large bowl. Cut butter into small pieces and add to the bowl. Pour in water gradually, while stirring the mixture - add just enough water to get everything combined into a rough dough. You don't want the butter creamed into the flour, you want it to stay in chunks - this is what causes the dough to form those beautiful, flaky layers in the oven.

    2. Turn the mixture out onto a floured surface. Form it into a rectangle, and gently roll out until it's about a half inch thick. Fold the bottom third up into the middle, and fold the top third down on top of that. Turn it 90 degrees, add more flour to prevent sticking, and roll it out again. Repeat this process three more times, adding flour as needed. Wrap the dough in plastic wrap and refrigerate while you prepare the filling. You can also freeze it for about 10 minutes before using, if your filling is already made.

    Note: While making this dough, you need to work quickly, with very cold water and butter, to prevent the butter from melting into the dough. 

    3. Make the spinach and artichoke dip. Start with the Mornay sauce. Stir together 3 Tbsps butter and sour cream in a sauce pan over medium heat. Stir together cream and corn starch in a small bowl and add to the pan. Let the sauce come to a boil, stirring constantly. When it reaches a boil, turn off the heat and gradually stir in the shredded cheese, until sauce is smooth. It should be fairly thick. 

    4. In a skillet, cook onion over medium heat in the remaining 1 Tbsp of butter until it starts to become translucent. Add spinach, garlic, artichokes, thyme, and salt. Let cook for roughly five minutes, stirring occasionally, until the artichokes start to soften. Pour cheese sauce over the vegetables and stir until well combined.

    5. Prepare your Tarte Soleil. Take half of your puff pastry (leave the other half in the fridge)  and roll out into a 12 inch round on a floured surface. Take a round plate slightly smaller in diameter than your baking tray (I used a pizza tray) and place it upside down on the dough. Trace around it with a knife to form a perfect circle for the base of your Tarte. Place the circle on your baking tray (lined with parchment paper).

    6. Top with a generous layer of filling, leaving about a half inch bare around the outer edge of the circle. You may have some extra filling - don't feel like you need to use all of it, you just want a nice thick, even layer - no gobs. Cover with plastic wrap and refrigerate while you work with the rest of the puff pastry.

    6. Roll the second half of your pastry dough into a 12 inch round and cut a perfect circle as you did with the first layer. Place this layer on top of the first layer with the filling, so that the filling is sandwiched between the two layers. Place a small bowl or glass in the center of the the dough. This will mark the center of your Tarte, the section that doesn't get cut and twisted. 

    7. Cut away from the glass with a knife, slicing the dough into quarter sections. Cut each quarter section in half, and each of those sections in half again, until you have 16 total sections. You can choose to go a step further, cutting each section in half one more time, to end with 32 total sections coming from the center circle. It mostly depends on how many servings you want to make/how much work you want to do. Be careful not to cut through the parchment paper. 

    8. Twist each section 3-4 times, twisting all of the sections in the same direction. Don't just hold the end of a section and twist, because the dough won't automatically twist the way you want it to. The best way to do this is to try to twist each section once near the center circle, once in the middle of the section, and once closer to the end, so they're evenly spaced. 

    9. When all of the sections are twisted, you should have a beautiful sunburst. Beat egg in a small bowl and brush over the pastry. Bake at 350 degrees for 30-35 minutes, until golden brown. Let cool before moving to a serving tray, to prevent Tarte from tearing. 


Salsa Bruschetta

Salsa Bruschetta

This recipe is one of my favorite creations thus far. It happened sort of by accident, ending up in a much different place than it started. The original inspiration was the concept of Pan a la Catalana, and then I started researching recipes, and went a completely different way. I was in the kitchen with my tomatoes and garlic and my baguette, and suddenly I was just adding things to a bowl and tasting and adding some more. I seem to do that a lot lately, which makes me both very excited about what I could create, and very concerned that I’m missing a lot of interesting things that might result from me ever following a recipe properly. But, what would be the fun in that?

The Salsa Bruschetta that has resulted from my impatience and possible over-confidence in the kitchen is fresh, bursting with flavor, and a perfect addition to your favorite tapas recipes – I served it alongside my Baked Patatas Bravas. I used tomato and onion as a base, and added garlic and a bit of balsamic vinaigrette, along with basil, lemon, brown sugar, and olive oil. It’s got a lot of the flavor that you would find in Pan a la Catalana, and in traditional bruschetta, with some sweetness and citrus that really lift the onion and the garlic to make them a little brighter. The lemon and onion are what really take this bruschetta recipe into salsa territory, because there isn’t a lot of  salsa-esque heat. I added a pinch of cayenne, but I didn’t want that to overshadow the freshness of the tomatoes and the lemon. If you’re in the mood for something a bit spicier, I’d recommend adding chopped jalapeno to this recipe.

There’s one more element to this particular version of Bruschetta: After I sliced my baguette, I topped the slices with a light drizzle of olive oil, and a sprinkle of Monterey Jack cheese. Next time I may experiment with mozzarella for a caprese-inspired version, but the Monterey Jack worked extraordinarily well with the Salsa Brushetta. It’s the right amount of salty and creamy to pair with the tangy, slightly sweet flavor of the bruschetta. Cheese isn’t typically a part of bruschetta, possibly because that can take it to pizza-bread territory very quickly. I assure you that very little about this Salsa Bruschetta reminds me of pizza. The flavors are much lighter, yet richer and more complex than something you’d find on a pizza. (Unless it’s a very good, very unusual pizza, of course)!

These are definitely best served fresh, when the cheese is still gooey and melted. They do keep in the fridge fairly well overnight, and I have it on good authority that husbands named Bobby find that leftover Salsa Bruschetta makes an excellent afternoon snack. Whether you’re snacking or having your Salsa Bruschetta as part of a meal – perhaps as an interesting starter – this recipe is one you’ll make again and again. It’s very quick to make, and as uncomplicated as something that looks this elegant can get. No one will believe that you knocked the whole thing together in 20 minutes. But they won’t have much time to worry about that, as they’ll be worried about getting another bite before it all disappears.


Salsa Bruschetta

Prep Time 15 minutes
Cook Time 5 minutes
Total Time 20 minutes

Ingredients

  • 2 medium tomatoes
  • 1/4 small/medium white onion
  • 1 french baguette
  • 1 clove garlic
  • 1/2 Tbsp olive oil + more for drizzling
  • 1/2 tsp balsamic vinegar
  • 3/4 tsp brown sugar
  • 3/4 tsp dried basil
  • 1 dash cracked black pepper
  • 1 1/2 tsps lemon juice
  • 1/2 tsp salt
  • 1 dash cayenne
  • 1/4 cup shredded Monterey Jack

Instructions

  1. Dice tomatoes and mince garlic, stir together. Chop onions in a smaller dice than the tomatoes and add to the bowl. 

    2. Slice baguette into thin slices, about 1/4 of an inch thick. Place in a single layer on a baking sheet lined with foil. Drizzle olive oil lightly over each. Bake in the oven at 350 degrees for 4 minutes. You want the bread crisp on the edges, but still a little soft.

    3. Add remaining ingredients to the salsa mixture, except the cheese. Stir until well combined. Salt to taste - add more cayenne for a spicier salsa. 

    4. When baguette slices are done, remove from oven, top each with a little less than 1/2 Tbsp of Monterey Jack, and return to the oven for 2 minutes, or until cheese is melted. 

    5. Top each baguette with the salsa mixture. Try not to eat the whole batch by yourself. 


Baked Patatas Bravas

Baked Patatas Bravas

I think it’s only appropriate to begin this post by saying that I’ve never been to Spain. If you’d like to take me there, I can be packed and ready in an hour, but until then, my experience with authentic Spanish tapas will remain limited. That said, I have plenty of experience with tapas restaurants in the states – they’re possibly my favorite kind of restaurant. Sitting down with friends to experience not just a dish or two, but instead a wide variety, is how all meals would be served in my ideal world.

One of the best and simplest tapas out there is Patatas Bravas. How could anyone not get excited about golden brown potatoes that are crispy on the outside and soft on the inside, drizzled with a spicy tomato sauce and a creamy garlic aioli? There are a million recipes out there for Patatas Bravas – my intention was to replicate the ones I like best. All the tapas restaurants in my area seem to serve an almost identical version, so hopefully I’ve done it justice!

The spicy tomato sauce is actually very similar to my Tomato Basil Bisque recipe, with a few key flavor alterations. The aioli is a fairly standard lemon garlic aioli. Patatas Bravas are typically fried potatoes, but I chose to bake mine to make them slightly healthier, and for general ease. Deep frying at home is quite a process, compared to throwing a tray in the oven.

Baked fries/chunks of potato are a little difficult to get perfectly crispy in the oven, but the technique I used cooked them just the way I wanted. You start by putting your chopped potatoes in a pot of cold water and bringing it to a boil. Once the pot reaches a boil, you remove your potatoes from the heat, toss them in a couple tablespoons of olive oil and flour, and bake them on a tray at very high heat in the oven. I haven’t tried this method for fries but you better believe I intend to. This technique could also be something that experienced chefs have known about for years, and here I am just discovering it. The more I learn about cooking, the more I find that I will never know enough about cooking.

I served my Patatas Bravas with a cheese board, some salsa bruschetta (a recipe that I will be posting here soon!), and of course some sangria. Can’t forget the sangria. Bobby (my husband) and I basically gobbled it down, sitting on the floor of our apartment (we do have furniture – we’re just weird). I prefer to imagine that we sat on a balcony in Spain, in the warm glow of the last of the day’s sunlight, glasses of cold, fizzy, white sangria in hand, reaching for another helping of everything. Food can transport me the same way a good book does – or maybe I’m just delusional? You be the judge. I’ll be busy eating Patatas Bravas on my “balcony.”


Baked Patatas Bravas

Prep Time 15 minutes
Cook Time 45 minutes
Total Time 1 hour

Ingredients

Potatas

  • 3 russet potatoes
  • 2 Tbsps olive oil
  • 2 Tbsps white flour

Spicy Tomato Sauce

  • 1/4 medium yellow onion
  • 1 Tbsp butter
  • 1 clove garlic
  • 2 Tbsp tomato paste
  • 1/4 cup diced canned tomatoes
  • 1/4 cup chicken broth
  • 1 1/2 tsp brown sugar
  • 1/2 tsp dried basil
  • 1/8 tsp cumin
  • 1/8 tsp chili powder
  • 1/8 tsp cayenne
  • 1/8 tsp dried oregano
  • 1/8 tsp dried thyme

Lemon Garlic Aioli

  • 1/4 cup mayonnaise
  • 1/2 tsp lemon juice
  • 1 tsp olive oil
  • 1/4 tsp garlic powder
  • 1/16 tsp salt

Instructions

  1. Peel and dice potatoes into bite-sized chunks. Place in a pot with enough cold water to submerge them completely. Cook over high heat, just until the water reaches a boil. Drain, keeping the potatoes in the same pot. Add olive oil and flour to the potatoes and shake the pot until they're well coated - this is much easier than stirring to get them evenly coated. 

    2. Line a baking sheet with foil and spray with non-stick cooking spray. Spread potatoes on the tray in a single layer, and cook in the oven at 400 degrees for 30 minutes. Remove from the oven after 15 minutes, and flip the potatoes to ensure they brown on all sides. When they're golden brown and the outsides are all crispy, they're done. 

    3. While the potatoes cook, make your sauces. For the aioli, add all five ingredients to a small bowl and stir until well combined. For the tomato sauce, chop onion and add to a small pot with 1 Tbsp of butter. Let cook until the onion is soft and starting to become transparent. 

    4. Mince 1 clove of garlic and add it to the pot, with the tomato paste, diced tomatoes, and chicken broth. Let it come to a boil, reduce heat, and simmer for 15 minutes. After lowering the heat, add the remaining ingredients, and stir frequently.

    5. Remove sauce from heat and pour into a blender (I used my NutriBullet, as always). Blend until smooth. 

    6. Remove potatoes from the oven, pour into your serving dish and drizzle with both sauces. Enjoy!


Pulled Pork and Cranberry Flatbread

Pulled Pork and Cranberry Flatbread

I was roaming the internet, looking for inspiration, when I came across this cranberry and goat cheese flatbread. It clearly has made the rounds on Pinterest, and for good reason – it’s quite pretty. Having posted a flatbread recipe recently, I figured this would be a great time to try out some interesting new toppings. Although to be fair, you could put just about anything on flatbread and I’d try it. Not to turn this post into an ode to flatbread or anything.

I love the goat cheese and cranberry combination, but I wanted to give the dish another dimension, and make it more filling. With the tart, yet sweet cranberry sauce already in mind, I knew spicy, smoky pulled pork would be the perfect addition. The cranberry sauce is reminiscent of a barbecue sauce on the pulled pork, but with a different, fruitier flavor profile. The goat cheese is a perfect element to mellow some of the spice from the pork, and keep the tang of the cranberry sauce from being overwhelming.

Cranberry sauce seems to get attention only around the holidays, and I think that’s kind of a tragedy. It’s delicious with so many other things besides turkey and stuffing. That said, finding fresh or even frozen cranberries after January 1st is like trying to find truly good gluten-free pizza crust: may exist, but hard to locate. My cranberry sauce calls for part dried cranberries and part canned whole cranberry sauce, so it can (and should!) be made between the months of January and October. My recipe for this is adapted from a Food Network version.

The pulled pork in this recipe is done in the slow cooker, with a rub from Kevin and Amanda. Their recipe has a lot more to it, brining, and cooking in the oven, etc., but I just took the rub, coated my pork, tossed it in the slow cooker with a little water, and let it go, and it’s some of the best pulled pork I’ve ever eaten. Every bite is extremely flavorful and a little spicy, without being overpowering. The goat cheese I used is “La Bonne Vie Garlic and Herb Goat Cheese”- I just got it from my local grocery store, but you could honestly use any decent herb goat cheese. Trader Joe’s has a great, inexpensive one.

Since I’ve essentially given you a rundown of how wonderful all the components of this dish are on their own, you can imagine how I reacted when I tried them together. There was a lot of swooning, and uncivilized devouring, and general elation.


Pulled Pork and Cranberry Flatbread

Pulled pork recipe is adapted from Kevin and Amanda's Perfect Pulled Pork.  

Cranberry sauce recipe is adapted from Gourmet Magazine's Savory Dried Cranberry Sauce - Recipe found through foodnetwork.com

Servings 3 flatbreads

Ingredients

Pulled Pork

  • 1 4-8 lb pork shoulder
  • 1 medium yellow onion
  • 1/2 cup water
  • 1 Tbsp ground cumin
  • 1 Tbsp garlic powder
  • 1 Tbsp onion powder
  • 1 Tbsp chili powder
  • 1 Tbsp cayenne pepper
  • 1 Tbsp salt
  • 1 Tbsp ground black pepper
  • 1 Tbsp paprika
  • 1/2 cup brown sugar

Cranberry Sauce

  • 1/4 cup brown sugar
  • 1/2 Tbsp cornstarch
  • 1/2 cup white wine
  • 3/4 cup chicken broth
  • 1 tsp balsamic vingar
  • 1/2 cup dried cranberries (I used Craisins)
  • 1/2 cup canned whole cranberry sauce
  • 1/8 tsp rosemary
  • 1/8 tsp cinnamon
  • 1/8 tsp tarragon

Other Ingredients

  • 3 large flatbreads
  • 8-12 oz herb goat cheese (2-3 small logs), depending on how much you like goat cheese - I used 12oz.
  • 2 Tbsp fresh thyme or parsley (optional)

Instructions

  1. Slow cook the pork: mix together all dry ingredients to create a rub. Roughly chop yellow onion, and place in slow cooker with the 1/2 cup of water. 

    2. Pat pork shoulder dry with paper towel, and coat generously with the dry rub on all sides. Massage it into the meat with your hands to make sure it really sticks. 

    3. Place pork in the slow cooker, on top of the onions. Cover and let cook on high 4-6 hours, or on low 8-10 hours, until pork is falling off the bone and tender. Remove bone from the pot, and shred the meat with two forks. 

    Note: this pulled pork recipe yields much more pork than you'll need to use for your flatbreads. Extra meat can be frozen to use later.

    4. If you're making your flatbread, do it when the pork is about an hour and a half from being done. You can easily use pre-made flatbread if you prefer. You can find my flatbread recipe linked in the post above.  Instead of splitting the dough into eight pieces like I typically do, I split it into three, to make larger flatbreads. The method for cooking them is the same. 

    5. When your pork is about a half hour from done, make the cranberry sauce. Stir together brown sugar and cornstarch in a small sauce pan. Add white wine and chicken broth and set over low heat. Stir until well combined. Add vinegar, dried cranberries and canned cranberry sauce, rosemary, tarragon, and cinnamon. Simmer for 15 minutes, stirring occasionally. Sauce should be quite thick. Remove from heat. Sauce can be stored in an airtight container in the refrigerator for at least a week. 

    6: Assemble Pulled Pork and Cranberry Flatbreads: spread each flatbread with a generous amount of goat cheese, saving 2-4 oz aside. Top with a layer of pulled pork- you can add as much or as little as you like here. Drizzle with cranberry sauce (again, quantities are up to you).  I used all of my sauce between three flatbreads. Top with small crumbles of the remaining goat cheese. Bake flatbreads in the oven at 350 degrees for about 8 minutes, until the cheese gets soft and the flatbreads are warm and a just little crispy on the bottoms. Garnish with fresh thyme or parsley.