Sunshine Curry Dip

Sunshine Curry Dip

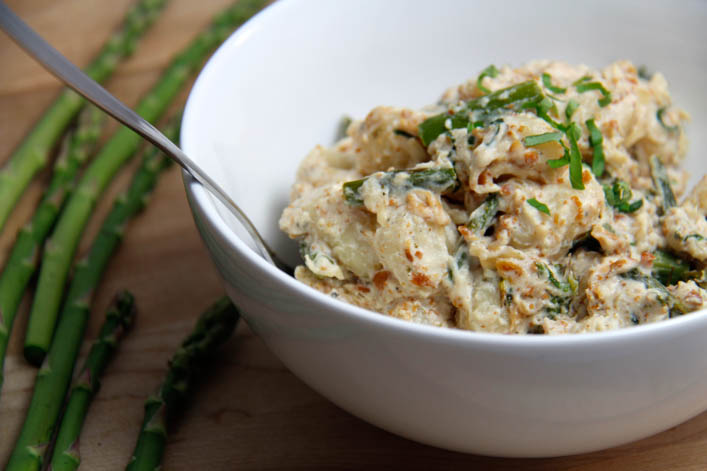
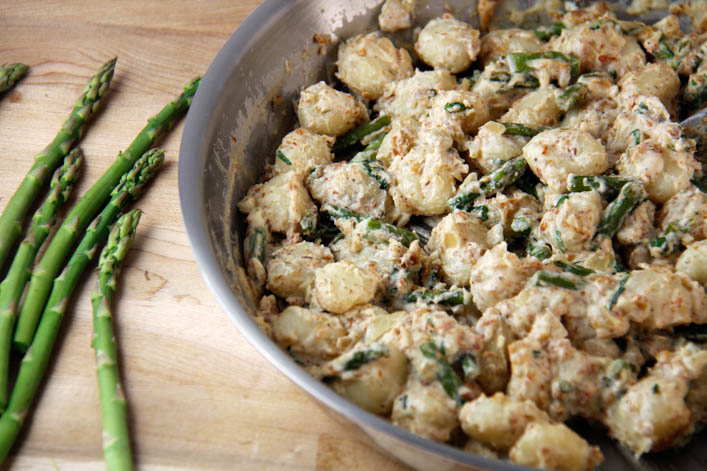
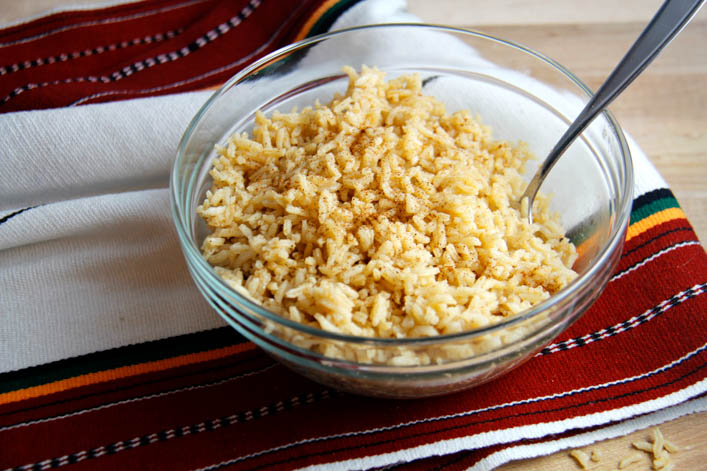
Chips and dip is my snack of choice when I need something to munch on while I watch TV. It’s impossible to binge watch The Great British Bake Off (or Baking Show – call it what you will) on Netflix without a snack, for obvious reasons. What I’m dipping my chips in changes all the time, depending on what I’m feeling. There are the obvious choices, like guacamole, salsa, queso, sour cream and onion dip – you get the idea. And then there are the dip options that are completely unique and invented by my dad for the sole purpose of being gobbled down with a new episode of your favorite show. I don’t know if he’ll appreciate that I’ve named his creation Sunshine Curry Dip, but I think that’s really the best way to describe it.

This recipe starts with a base of sour cream and Greek yogurt, although I imagine you could use all sour cream or all Greek yogurt, with similar results. It’s got a good amount of curry powder, sriracha, white balsamic vinegar, and a little turmeric. White balsamic vinegar is better for this recipe than a regular balsamic vinegar, because it’s milder, doesn’t overwhelm the other flavors, and doesn’t discolor the other ingredients. You could potentially sub white wine vinegar for the white balsamic, although I will admit I haven’t tested it.

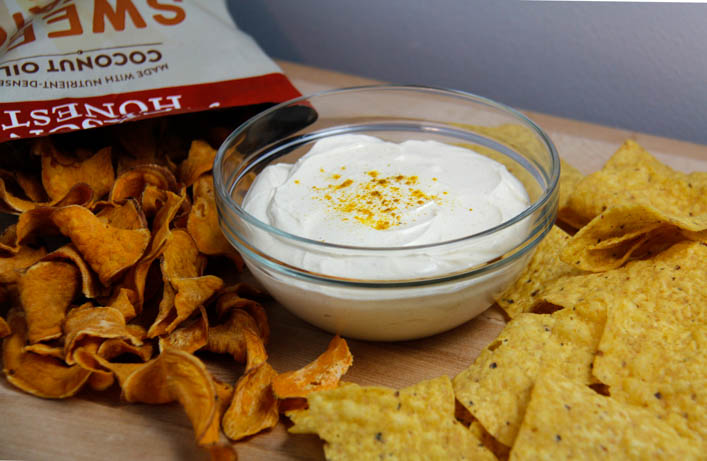
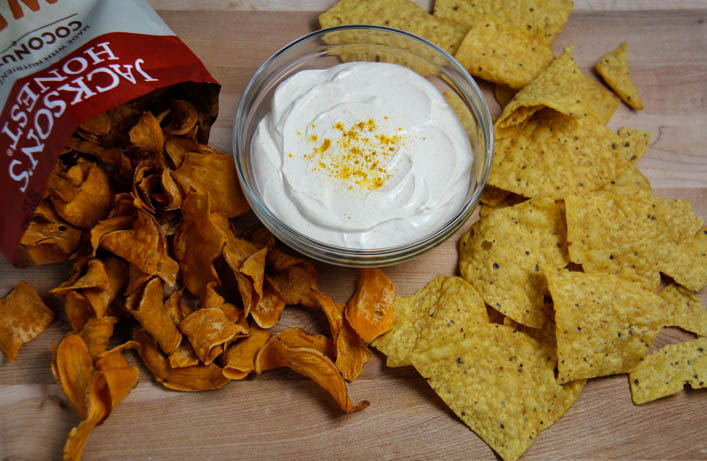
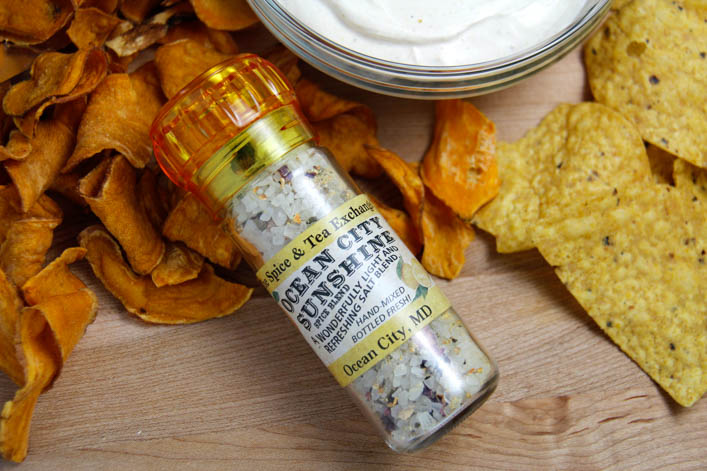
The last ingredient, and also a key component of naming this recipe, is a dash of Spice & Tea Exchange’s Sunshine Spice Blend. There’s not really a substitute for this blend that I’m aware of. It adds an interesting combination of ginger and citrus notes that combine with the curry for a unique flavor twist. The result of all of this is a light, tangy, slightly spicy, curry-infused cream that you will never be able to stop eating. I had to physically remove myself from the bowl in the photos to keep from eating all of it as soon as I was done taking the pictures.

(Not sponsored – My bottle was from Ocean City and not Florida, like the ones I’ve linked to, but they’re the same product).

I take a lot of the photos for this blog in my parent’s kitchen, because my tiny apartment kitchen doesn’t really satisfy my cooking needs. Often I’ll take home some of the food I’ve made for a post for dinner/dessert. My parents wouldn’t let me take any of the remaining Sunshine Curry Dip home, because they wanted it all for themselves. Luckily for them, I know the recipe now.

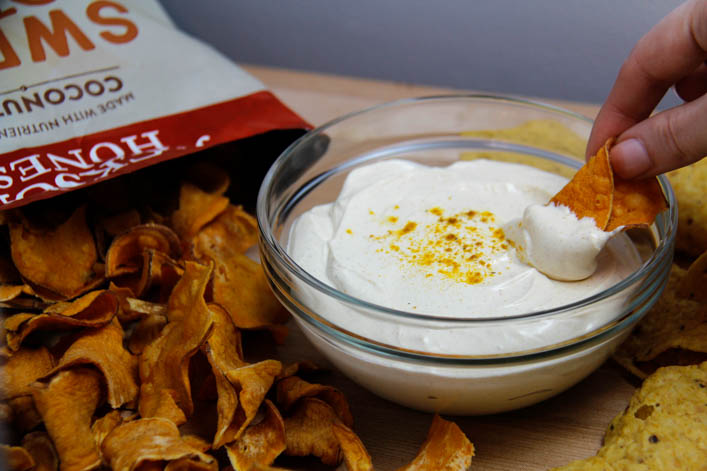
This dip is a great choice if you just want something a little more unusual, or if you’ve eaten chips and guac for dinner too many days in a row and need a change. It can be made spicier or milder with small adjustments to the proportions of sriracha to yogurt, and it goes well with a variety of dipping implements. My parents like it with Jackson’s Honest Sweet Potato Chips; I prefer tortilla chips or celery. Whatever you’re dipping in it, I assure you that you’ll become just as hopelessly addicted as I am. This is a dip that you can take to all those summer parties coming up, and know that you won’t find another bowl of the same thing already on the table. Unless of course you and all your friends read here, in which case, hello, and thanks for stopping by. Let me know if you need the location for the support group of people who made this dip, ate it all, and are suffering from withdrawal.

Sunshine Curry Dip

Ingredients

  • 1 1/2 cups sour cream 323g
  • 6 Tbsps Greek yogurt 75g
  • 1 1/2 tsp sriracha
  • 1 1/2 tsp curry powder
  • 1/4 tsp turmeric
  • 2 tsps white balsamic vinegar
  • 1/2 tsp Sunshine Spice Blend

Instructions

  1. Combine all ingredients and stir until well mixed. Dip with your favorite chips or veggies!


Chocolate Peanut Butter Rice Krispie Treats: No Marshmallow, Extra Crispy!

Chocolate Peanut Butter Rice Krispie Treats: No Marshmallow, Extra Crispy!

This recipe was inspired by Mom on Timeout’s No Bake Snickers Crunch Bars, which essentially uses this version of a Rice Krispie treat as a base on which to put peanut buttery nougat and caramel. That sounds lovely and it tastes delicious – of course I tried it, how could I not? However, I found that the only part I was really interested in eating was the Rice Krispie part. I was that person who was just picking off the bottom and top layer and leaving the rest of the dessert on my plate. I know, I’m appalled with myself for wasting so much of a perfectly nice dessert. I set out to turn my favorite part into its own dessert, and with a few minor changes to the original recipe, I’ve achieved what I think is my favorite version of a Chocolate Peanut Butter Rice Krispie Treat.

These are unlike any Rice Krispie treats you’ve had. They’re the crispiest, crunchiest version out there, without being even a little hard or brittle. They’re also loaded with peanut butter and chocolate, so they taste exactly like one of those Little Debbie Nutty Bars. I’m pretty sure if you replaced the peanut butter with caramel, these would essentially be homemade Star Crunch (I may have had a Little Debbie problem growing up). The interesting thing about these treats is that they have absolutely no marshmallow, so they’re not chewy like you might expect. They’re held together with melted chocolate and peanut butter, and chilled briefly to make sure they hold their shape.

This recipe is wonderful because it calls for all of 5 ingredients, and takes 5 minutes to make. It’s made with semi-sweet chocolate, milk chocolate, peanut butter, peanut butter chips, and Rice Krispies. It really doesn’t get much simpler than that. Bobby, who has been known to give speeches about the virtues of Reese’s Cups, loved these, so they’re certain to satisfy any chocolate and peanut butter aficionado. You melt together the semi-sweet chocolate, peanut butter chips, and peanut butter, stir in the Rice Krispies and then press it into a pan. Top with a thin layer of melted milk chocolate, and drizzle with some melted peanut butter chips, and chill for 15 minutes. It’s the last-minute dessert you’ve always  dreamed of, and it’s a little more impressive than plain Rice Krispie treats.

The milk chocolate spread on top is essential to giving these the right amount of sweetness, and for holding them together properly. You can skip the peanut butter drizzle if it seems like more work that you don’t want to do, but I like it because otherwise people assume that this is an all-chocolate dessert, and then they take a bite and feel confused about their lives. I do that to myself enough, I don’t want it to happen to other people, too. The original recipe calls for butterscotch chips and Cocoa Krispies, so this concept is flexible to what you have on hand, and it’ll still end up delicious. These would be perfect to have kids help with, since this recipe is the opposite of complicated, and there’s a lot of stirring and spreading things into a pan involved. And since there’s no baking time, there won’t be any complaining about not being able to eat them immediately. Chilling them is a formality that helps them hold their shape, but we all know that I only put up with that since I needed to take pictures. If I’m just making these for family, we eat them in their just-pressed-into-the-pan state, gooey and falling apart slightly.

5 from 1 vote
Print

Chocolate Peanut Butter Rice Krispie Treats: No Marshmallows

Recipe adapted from Mom on Timeout's No Bake Crunchy Snickers Bars

Ingredients

  • 4 oz semi-sweet chocolate chips
  • 5 oz peanut butter chips - divided use
  • 1/2 cup peanut butter 128g
  • 4 cups Rice Krispies
  • 3 oz milk chocolate chips

Instructions

  1. Melt together semi-sweet chocolate chips, 4oz of peanut butter chips and peanut butter in the microwave, stirring after every 15 seconds. 

    2. Pour Rice Krispies into the melted chocolate peanut butter mixture and stir until well mixed.

    3. Pour mixture into an 8x8 pan lined with wax paper. Smooth with the back of a spoon into an even layer. 

    4. Melt the milk chocolate chips in the microwave, stirring after every 10 seconds. Spread in a thin, even layer over the top of the Rice Krispie treats. Drizzle with melted peanut butter chips. Refrigerate for 15-20 minutes. Remove from pan, and cut into squares. 


Asparagus Pancetta Gnocchi with Ricotta Sauce

Asparagus Pancetta Gnocchi with Ricotta Sauce

I was searching for asparagus inspiration, because it’s a major spring vegetable, and I almost sort of like it. I’m trying to transition that ambivalence to full-on like. This recipe sort of hides the asparagus, but it does still have it, so that’s sort of a step in the right direction, yes? I was originally looking at Smitten Kitchen’s Spring Asparagus Pancetta Hash – can you tell I’m a fangirl? I only mention her like every 5th blog post. I was all set to just make the recipe to see if I liked it, but then I started tumbling into the depths of Google and found Gnocchi with Asparagus and Pancetta from My Recipes. And then I started thinking about sauces, and things really spiraled out of control. My search for a light, but flavorful, asparagus-based recipe morphed into a pasta dish with a creamy sauce. I can’t tell you how often this happens to me. Pasta dishes with creamy sauce are very high on my list of the good things in life.

The creamy sauce for this dish isn’t a typical alfredo. It’s ricotta-based, with lots of fresh garlic and basil, and some dried tarragon. It’s about the lightest creamy sauce you can make that still uses whole-milk cheese. This keeps the dish from feeling too heavy for the bright spring days we’ve been having. If you let it thicken on the stove long enough, after adding in the cooked pancetta, asparagus, and gnocchi, you end up with a kind of cross between creamy pasta and a warm, delicious potato salad. The pillow-y gnocchi goes perfectly with the thick sauce, and the asparagus adds bursts of crunch in each bite.

I cooked the pancetta first, so I could toss the asparagus into the skillet afterwards, with all that delicious pancetta grease. I chopped the asparagus into 1-inch pieces, and let them cook for about 5 minutes. This let them get just barely soft on the outside, while picking up the lovely pancetta flavor. I tend to find asparagus a little bitter, but cooking it like this made me want to just eat it straight from the pan. The only thing I’d change about this recipe for next time would be doubling the asparagus, because it really did sort of disappear among the gnocchi.

This dish makes a fairly small amount, about two good-sized portions, so it would be a perfect date-night option. If you want to get all fancy and cook for someone you like, I’m pretty sure they’d want to see you again after this one. It’s easy to make, but it sounds and looks so much more impressive than it really is. This isn’t quite a one-pot recipe, but it’s close. You can fry the pancetta, then cook the asparagus, and then make the sauce right in the same pan. The only other thing to do is cook the gnocchi, but even that only takes about 5 minutes. If gnocchi isn’t your favorite, you could try this dish with regular pasta or maybe some tortellini, because you can never have too much cheese. You can also use bacon in place of the pancetta.

The week leading up to Easter was one of the busiest I’ve had in a long time, so I’ve been eating on the go a lot. It felt great to get back into the kitchen and come up with something new and delicious, that also didn’t take a million years to cook. I had my Asparagus Pancetta Gnocchi for dinner yesterday, and it was such a nice balance of comforting (after a very busy week), and light and fresh. I have a feeling I’ll be making this one again soon – with more asparagus next time!

Asparagus Pancetta Gnocchi with Ricotta Sauce

Adapted from Asparagus Pancetta Hash from Smitten Kitchen, and Gnocchi with Asparagus and Pancetta from My Recipes. 

Ingredients

  • gnocchi
  • 1/2 medium yellow onion, diced
  • 3 cloves garlic, minced
  • 1 cup ricotta cheese
  • 1/2 cup whole milk
  • 4 oz pancetta
  • 1/2 tsp dried tarragon
  • 1/8 tsp dill
  • 1/2 tsp salt
  • 1/2 tsp fresh ground black pepper
  • 8-10 fresh basil leaves, thinly sliced
  • 1/2 lb asparagus

Instructions

  1. Dice the pancetta and cook in a skillet over medium heat, stirring occasionally, until crispy. Remove to a plate lined with paper towel to soak up excess grease. Slice the asparagus into one-inch sections and add to the skillet, after removing the pancetta. Cook on medium heat for about 5 minutes, until the outside is slightly tender.

    2. While asparagus is cooking, chop onion and garlic. Remove cooked asparagus from the pan and add onion and garlic.  There should still be plenty of grease in the skillet from the pancetta, but you can add a Tbsp of olive oil if it seems too dry. Cook the onion and garlic until the onion softens. Start cooking the gnocchi according to the directions on the package (typically, add to a large pot of boiling water and let cook for 4-5 minutes, until all the gnocchi floats to the top).

    3. Add ricotta and milk to the onion and garlic. Stir gently until the ricotta softens and becomes smooth. Lower heat, and stir in gnocchi, pancetta, and asparagus. Add salt, pepper, basil, tarragon, and dill, and stir until well-mixed. Add more salt to taste. If you prefer a thinner sauce, it should be ready to serve at this point. For a thicker sauce, let cook on low for another minute or two before serving. 


Gluten-Free Carrot Cake

Gluten-Free Carrot Cake

I know, I know. Carrot Cake for Easter, how inspired. But let me explain. See, this Carrot Cake is different. This Carrot Cake has the lovely texture and flavor of the Carrot Cake you’ve come to know and love, except that this one is completely gluten-free. Is it especially healthy? Not on your life. I don’t believe in taking all the sugar out of desserts. Is it perfect for gluten-intolerant friends and gluten eaters alike? It most certainly is. And to be perfectly honest, I’m almost as excited about the garnish as I am about the cake itself.

The last thing I wanted to do was pipe buttercream carrots all over the top of my cake. If I’m making something as popular as Carrot Cake, I at least want the topping to be unique. My garnish is made of carrot that I shredded with a microplane, with chopped walnuts, and dried, candied pineapple bits. Sprinkled on the top of the cake in layers, I think this garnish looks bright and fresh. I love the concept of taking fun ingredients from the cake itself and turning them into the garnish. It gives the top of the cake a little more interest, and displays what people can expect to find inside – this is particularly helpful with something as customize-able as Carrot Cake.

This recipe is adapted from What The Fork’s Gluten Free Carrot Cake, and hers was adapted from The Silver Palate Cookbook. Gluten-free baking benefits tremendously from this kind of borrowing and adaptation, and I love it. When recipes go through enough work and transformation, with everyone adding their own improvements, you can end up with some seriously magical desserts.

In the spirit of benefiting the baking community in general, I tested this recipe with King Arthur, Bob’s Red Mill, and Maple Grove Farm’s gluten-free all-purpose baking blends. I very seldom use boxed gluten-free baking mixes, but in this recipe, which includes several heavy ingredients, the lightness that a mix can contribute helps achieve a cake with a great texture. The thing about gluten-free baking mixes is that they vary widely from brand to brand.  King Arthur was the clear stand-out, giving me a delicious cake with a great texture. If you decide to make this recipe, do yourself a favor and use the King Arthur “Measure for Measure” mix.

Bob’s Red Mill uses bean flours in their all-purpose baking mix, which is great in a lot of recipes. But it also gives Carrot Cake a bean-reminiscent flavor. The texture of that test cake was fantastic, but it didn’t have the exact cake flavor I was going for. The Maple Grove Farm’s baking mix is closer to King Arthur’s, and the flavor of that cake was perfect. The texture, however, was very soft, and the cake layers didn’t bake evenly, cratering a little in the center, probably because the Maple Grove Farm mix includes a higher proportion of starch than the King Arthur mix. This kind of variation in mixes is equal parts frustrating and exciting, because while it means you can’t use them interchangeably, it also means that underwhelming results in a recipe made with one mix might be improved by switching to a different one.

Everyone knows the most important part of any carrot cake is the cream cheese frosting, and this one is certainly not lacking in that department. Thick, creamy layers of frosting make this simple gluten-free cake taste like absolute heaven.  This cake is, however, delicious on its own, if you’re inclined to skip frosting to keep the calories low. As always, you can go further and really make this recipe your own. You can swap out the walnuts for pecans if you’d like, boost the flavor by adding shredded coconut (I left it out of this version because coconut and I do not get along very well), or omit the raisins and substitute currants instead. However you make it, this cake is a perfect addition to your springtime festivities. I would know – I’ve been celebrating spring with my test versions of this cake all month!

Gluten Free Carrot Cake

Adapted from What the Fork's Gluten Free Carrot Cake Recipe.

Ingredients

Gluten-Free Carrot Cake

  • 2 1/2 cups King Arthur's "Measure for Measure" Baking Mix 350g
  • 1/2 cup almond flour 45g
  • 3 cups sugar 600g
  • 1 tsp salt
  • 2 tsps baking soda
  • 1 Tbsp cinnamon
  • 1/4 tsp nutmeg
  • 1/4 tsp cloves
  • 1 1/2 cups walnuts, chopped 130g
  • 1 1/2 cups butter, melted
  • 1/4 cup golden raisins 40g
  • 1 8oz can crushed pineapple, mostly drained - not too dry 100g drained weight
  • 4 large eggs
  • 1 1/3 cups pureed, cooked carrots (about 5 medium carrots) 320g, pureed

Cream Cheese Frosting

  • 8 oz cream cheese
  • 14 Tbsps butter
  • 1 3/4 cups powdered sugar 356g
  • 2 tsps vanilla

Garnish

  • 4 Tbsps carrot, shredded with a zester or microplane
  • 2 Tbsps chopped walnuts
  • 2 Tbsps candied pineapple, chopped small
  • 1 tsp cinnamon

Instructions

  1. 1. Preheat oven to 350 degrees. Generously butter 3 9-inch cake pans and dust with baking blend.

    2. In a large bowl, whisk together the gluten-free flour blend, almond flour, sugar, salt, baking soda, cinnamon, nutmeg, and cloves. Mix in the walnuts to coat them with the flour, then mix in the melted butter. Fold in the  raisins and the crushed pineapple, and set the bowl aside.

    3. In a medium bowl, lightly beat the eggs. Whisk in the pureed carrots and mix until well combined. Pour the wet ingredients into the dry ingredients, and gently mix until there isn't any dry flour. Pour the batter evenly between the 3 cake pans. I had roughly 720g of batter in each of my pans.

    4. Bake on the center rack for 35- 40 minutes, or until a cake tester comes out clean. Let the cakes cool for 15 minutes in the pans before inverting onto wire racks to cool. 

    5. While cakes are baking, prepare your frosting. Cream the cream cheese in an electric mixer until very smooth. Add butter and vanilla and mix well. Gradually add the powdered sugar, and whip on the highest speed until light and fluffy.

    6. For the garnish, stir together carrots and pineapple. Sprinkle on top of the cake in a circle, or whatever pattern you choose. Sprinkle walnuts over top of the carrot/pineapple mixture. Sprinkle cinnamon lightly over the garnish. 


Tex-Mex Rice

Tex-Mex Rice

I intend to post on this blog about delicious Mexican food for as long as humanly possible. With that in mind, I think it makes sense to share my favorite side dish to go with things like Salsa Verde Chicken Enchiladas. This Tex-Mex rice is a family recipe, and it’s a far cry from the stuff you sometimes get in restaurants with chunks of peas and carrots that were clearly recently defrosted.

This Tex-Mex rice is cooked in olive oil and chicken broth, and flavored with onion, garlic, and chili powder; oregano; cumin; and a little bit of enchilada sauce. It’s a perfect choice to complement black beans and just about any version of tacos, enchiladas, or burrito you want to make. The rice definitely isn’t spicy, but it has a depth of flavor that makes it delicious even just eaten by itself.

Tex-Mex rice doesn’t take much longer to make than traditional rice, because the only extra steps are browning it briefly in olive oil, and adding the seasonings. It can be made while the rest of dinner is cooking, and it keeps well in an air-tight container, in the refrigerator, for about a week. This rice has a slightly higher nutrition content than plain or cilantro-lime rice, since it’s cooked in chicken broth. You can also make it with vegetable broth to keep it animal-product free.

My favorite way to eat Tex-Mex rice is in a big burrito bowl, because it’s a perfectly mild, yet flavorful, base to build on with just about any Mexican flavors. However you decide to serve it, in a burrito, a bowl, or just on the side, this recipe will change the way you look at rice.

Tex-Mex Rice

Servings 3 cups

Ingredients

  • 1 cup raw white rice
  • 3/4 Tbsp olive oil
  • 14oz chicken broth (or a mix of broth and water, or vegetable broth)
  • 1 Tbsp enchilada sauce or smooth salsa
  • 1/2 tsp salt
  • 1/2 tsp onion powder
  • 1/2 tsp garlic powder
  • 1/2 tsp chili powder
  • 1/2 tsp cumin
  • 1/8 tsp dried leaf oregano

Instructions

  1. Stir together seasonings and salt, set aside. If the broth is cold, warm it to at least room temperature. Combine broth with the enchilada sauce. Set aside.

    2. Heat the olive oil in a medium pot with a tightly-fitting lid (lid off). Add the rice, and stir over medium-high heat until lightly browned, just to an ivory or light tan color.

    3. Stir the seasonings into the rice, and then add the broth. Stir once, to distribute evenly. When the broth comes to a full boil, put the lid on the pot, and turn the heat to the lowest setting. Let cook for 20 minutes. Do not remove the lid during cooking time. Check for doneness after 20 minutes; if the liquid has not been completely absorbed, cover the pot again and let it cook another 5 minutes or so.

    For best texture, cook a day or two ahead of serving, cool, and then refrigerate. Reheat in the microwave just before serving.


Salsa Verde Chicken Enchiladas

Salsa Verde Chicken Enchiladas

Most of the time when I’m dreaming up blog posts, I try to be inventive and give recipes delicious new twists. Other times, I’m just hungry for something really specific, and I get inspired to test recipes until I make my dream version of a classic. Salsa Verde Chicken Enchiladas is one such classic that I didn’t want to change too much. Why mess with perfection? These enchiladas are bursting with flavor, the chicken is moist and perfectly seasoned, and they aren’t hard to make at all. As a person who eats at a lot of Mexican restaurants, I can say that these are absolutely restaurant quality. All they need are some rice and beans on the side, and maybe a margarita or two.

Before testing this recipe, the only experience I had with salsa verde was eating a lot of it. I have found a wonderful version that is so much simpler to make than I ever would have imagined. Don’t you just love it when your favorite foods are actually so easy to throw together? I combined recipes for salsa verde from Tyler Florence and The Flavor Blender and I think I may have made the sauce of my dreams. I have been putting it on everything I eat and I’m not sure I’ll ever stop. I love the tangy, spicy flavor, and it can be made as hot or mild as you like, in case spicy food isn’t your favorite. Spicy food is definitely my favorite. But I actually prefer it toned down in a salsa like this, because there are so many interesting flavors at play, and I really want to be able to taste all of them.

Making enchiladas can seem like kind of an arduous process, because you have to prepare all of the ingredients and then fill and roll them. It definitely takes some time, but a lot of that is really just letting things cook in the oven. You start by roasting the tomatillos, peppers, and onions for the salsa verde. Then you roast a couple of chicken breasts with some olive oil and seasonings. You blend your salsa together, whip up a quick fresh tomato salsa while the chicken is cooking, shred the chicken after it’s done, and then you’re ready to assemble the enchiladas. I do recommend doing all of this before you start on the margaritas, but everyone has her own method!

Can we talk for a second about how Mexican food is the best food? My husband and I went to Mexico for our honeymoon and I’m dying to go back purely for the food. (That’s a lie, I also want to go back to lay out at a beautiful resort in Playa Del Carmen while someone brings me a cocktail, and relax all day). Anyway, even when we went off of the resort to eat, it seemed like the food wasn’t all that different from what you can get in a really good Mexican restaurant in D.C. I don’t know if this makes me really excited about D.C. or confused about Mexico, but I do know that it means Mexican food is consistently wonderful, if you know what to look for. And if all else fails, you now have a seriously amazing Salsa Verde Chicken Enchilada recipe up your sleeve!

These Enchiladas are probably one of my favorite things I’ve ever made. They’re stuffed with chicken, plenty of cheese, and fresh tomato salsa to brighten up the filling a little. Add a squeeze of lime, an extra dollop of salsa verde, and some cilantro on top, and you won’t even know what hit you. These are perfect to serve to a bigger group, because you can make a couple large trays at a time, and even pre-bake them, and then just heat them up in the oven when you want to serve. If you somehow end up with extra salsa verde, or want to prepare it ahead of time, it can be stored in an airtight container in the fridge for a week. I’m so excited to try variations on the filling with these, but every time I start considering that, I think about how much I really just want the perfect chicken version. It’s like I said before, some things just don’t need to be changed, because they’re exactly right the way they are.


Salsa Verde Chicken Enchiladas

Salsa Verde recipe adapted from Tyler Florence and The Flavor Blender.

Servings 16 enchiladas

Ingredients

Salsa Verde

  • 1 lb tomatillos, de-husked and washed
  • 1 poblano pepper
  • 2 jalapeno peppers
  • 4 cloves garlic, wrapped in foil
  • 1 medium white onion
  • 3/4 cup chicken broth
  • 1/2 cup cilantro
  • 2 tsps cumin
  • 3 Tbsp lime juice
  • 1 tsp salt

Chicken Filling

  • 2 lbs chicken breasts
  • 4 Tbsp olive oil, divided use
  • 1 Tbsp paprika
  • 1 Tbsp cumin
  • 1 Tbsp garlic powder
  • 1 tsp salt
  • 16 soft corn tortillas
  • 2 cups shredded Monterey Jack cheese

Fresh Tomato Salsa

  • 2 tomatoes
  • 1/2 medium white onion
  • 1/2 jalapeno
  • 1 Tbsp lime juice
  • 1/2 tsp salt
  • 3 Tbsps cilantro, chopped

Instructions

  1. Make the salsa verde. Place de-husked tomatillos, poblano, jalapeno, and garlic cloves (wrap the garlic cloves in foil to prevent burning) on a baking tray lined with foil. Broil in the oven for 7 minutes. Cut a white onion into quarters. Remove the tray from the oven, add the onions to it, and bake for an additional 7 minutes. 

    2. Place two chicken breasts on a baking sheet and pour two Tbsps of olive oil over top. Stir together spices and sprinkle evenly over top. After the salsa verde ingredients are out of the oven, reduce oven temperature to 350 degrees, and bake chicken for 35-40 minutes. 

    3. Allow tray of broiled tomatillos and peppers to cool, and then de-stem the tomatillos, poblano, and jalapenos, and cut into quarters. For the jalapenos, de-seed them if you want a milder salsa. Leave in the seeds of one jalapeno if you want the salsa to have a kick without being extremely hot. Add all of the ingredients from the tray to a food processor (my NutriBullet was perfect for this), and run until everything is broken down and mixed. Add the remaining ingredients to the food processor and pulse until well-blended.

    4. Make the fresh tomato salsa. Dice tomatoes and onion, and de-seed and finely chop jalapeno. Stir together all ingredients, adding more salt to taste. 

    5. When the chicken is done, allow to cool slightly, and place on a plate. Shred each chicken breast with two forks. 

    6. Spread salsa verde in the bottoms of 2 9x13 baking pans, about 1/4 cup for each. Assemble your enchiladas: Heat the tortillas in the microwave, and then brush them on each side with olive oil. This keeps them from breaking when you roll them. Fill each with a sprinkle of shredded cheese, chicken, and about a Tbsp of each kind of salsa. Roll, and place in the baking pan. When the pans are full, spread more salsa verde over the tops of the enchiladas, and sprinkle generously with cheese. Bake pans at 350 degrees for about 25-30 minutes, until the cheese just starts to lightly brown on top. Top each enchilada off with a little more salsa verde before serving. 


Balsamic Strawberry Nachos

Balsamic Strawberry Nachos

Strawberry Nachos aren’t a particularly new concept in the world of imaginative desserts, but they are a particularly delicious concept. Generally, they consist of some kind of cinnamon-sugar chip base, sweetened strawberries, a whipped cream component, and shaved chocolate. Mine follow all of these rules, but I’ve added the twist of balsamic vinegar with the strawberries to elevate the complexity of the flavors a little. It really takes the recipe from just “tasty” to “no, this plate is mine, go get your own!”

Strawberry Nachos are a perfect spring dessert. They’re quick to make, and don’t require a lot of baking time. The crisp cinnamon sugar chips take a total of 15 minutes in the oven for the whole batch, and all the toppings can be prepared during baking time. The best thing about these nachos is the combination of textures. The crunch of the chips with the soft strawberries and the smooth cream make each mouthful delightful. If you need a beautiful spring dessert, and don’t have time for something involved like Pavlova, these are the perfect solution.  Strawberries aren’t quite in season yet technically, but it doesn’t matter when you’re giving them a flavor boost with some sugar and balsamic vinegar. A lot of recipes that involve balsamic strawberries call for a balsamic reduction. As long as you use very high quality balsamic vinegar, this isn’t necessary for this dish. I use Florida Olive Oil’s 18 Year Balsamic Vinegar.

The cream that goes on top is part Cool Whip and part sour cream, with a little added sugar and cinnamon. It’s light and a little sweet, but also has some tang from the sour cream. It works beautifully with the strawberries and the chips, and has a distinctly different flavor than typical strawberry and cream desserts. Not that there’s anything wrong with those – writing about this recipe suddenly has me thinking of all the wonderful desserts I could make with strawberries when they do fully come into season!

After the chips are piled onto a plate, dolloped with cream and sprinkled with chopped strawberries, the whole dish is topped with shaved dark chocolate and sliced almonds. I can think of very few desserts that wouldn’t be improved by a sprinkle of chocolate and almonds. In Strawberry Nachos, the chocolate adds just a hint of flavor that goes especially well with the balsamic vinegar on the strawberries. Just remember that the actual assembly of this dish should take place right before serving, because the strawberries have a fair amount of liquid, and you don’t want that sitting on the chips for too long, making them soggy. Once you serve them, they’ll disappear quickly enough that the juice won’t be a problem.

I was thinking the other day about how fall baking is my favorite kind, what with all the gourds and stews and heavier components (read: piles of cheese and bread). Now that I’ve really gotten my spring baking rolling, I’m re-considering that stance. I could eat fresh, bright Strawberry Nachos every day, but they’re only truly satisfying in the spring and summer. Who wants a light, fruity dessert on a blustery November day? This April I’m focusing on appreciating the breezy, warm(ish) weather we’ve got here in the DC area, and all the delicious food options that go with that. It’s Strawberry Nacho season, and I plan to enjoy every second of it.


Balsamic Strawberry Nachos

Prep Time 10 minutes
Cook Time 15 minutes
Total Time 25 minutes
Servings 4

Ingredients

Cinnamon Sugar Chips

  • 3 7 inch flour tortillas
  • 1 tsp cinnamon
  • 2 tsps sugar
  • butter or canola oil cooking spray

Balsamic Strawberries

  • 1 1/2 cups strawberries, diced
  • 3 Tbsp sugar
  • 3 tsps high quality balsamic vinegar

Cream

  • 1/4 cup sour cream
  • 1/4 cup Cool Whip or whipped cream
  • 1 Tbsp sugar
  • 1/8 tsp cinnamon

Toppings

  • 2 Tbsp shaved dark chocolate
  • 2 Tbsp slivered almonds, roughly chopped

Instructions

  1. Make the cinnamon sugar chips. Preheat your oven to 350 degrees. Stack the flour tortillas and slice them into eight triangles, like a pizza. I actually use a pizza cutter for this job. Spread the triangles in single layers on two baking sheets lined with foil.

    2. Spray the tortillas with a light coating of cooking spray. Stir together cinnamon and sugar, and sprinkle lightly over the tortillas. Bake each tray for 8 minutes.

    3. While the chips are baking, prepare the toppings. Stir together diced strawberries, sugar, and balsamic vinegar. Set aside. In another bowl, mix sour cream, Cool Whip, sugar, and cinnamon. Cover and refrigerate until it's time to use the cream mixture.

    4. When the chips are done, allow them to cool completely before assembling your nachos. You can make all of the components a day ahead, and store in airtight containers until serving time. Strawberries and cream should be refrigerated.

    5. Assemble the nachos. Place the chips on a serving tray, being careful not to have too many overlapping. Use a spoon to drop small dollops of the cream mixture all over the chips. You want the cream to stay in blobs, rather than spreading it around. Start piling strawberries onto the chips in an even layer, being careful not to pick up too much of the liquid in the bowl. Too much liquid with the strawberries will give you soggy chips in no time!

    6. Top with shaved chocolate and slivered almonds, and enjoy!  

Quick Cauliflower Pizza Crust (That Doesn’t Taste Like Cauliflower)

Quick Cauliflower Pizza Crust (That Doesn’t Taste Like Cauliflower)

Whoever claims that cauliflower pizza crust made from scratch is quick and easy is lying to you. You have to rice the cauliflower and cook it and squeeze it. Squeezing it is an arduous task at best, because you really do have to wring as much moisture out as possible to achieve a good crust. If you’re making more than one pizza, which I usually am, because cauliflower crusts are not very large or filling, then it takes double the time and effort. It quickly becomes an expensive, time consuming endeavor to feed more than one person with cauliflower crust pizza.

Fortunately, I’ve discovered the secret weapon. Trader Joe’s Frozen, Riced Cauliflower. It’s only $1.99 for a 12 oz bag, which happens to be exactly the right amount for a beautiful crust, and it’s cheaper than buying fresh cauliflower that you’d have to rice and squeeze yourself. I do think you can buy frozen, riced cauliflower in regular grocery stores – I use Trader Joe’s because I love their store, and it’s the first time I discovered such a magical product.

* not sponsored, just love the product *

When you freeze food, it tends to lose some of its distinct flavor over time. I think this is at play with the frozen cauliflower, and why it makes such a wonderful crust: it doesn’t taste like vegetables. It also doesn’t have a huge amount of moisture, even after you defrost it. I pour it into a bowl, microwave for a minute or two, and then pat the top dry with a paper towel. No squeezing involved at all. Do you know what that means? You’re smart and you probably do, but I tell you anyway. That means that this crust takes approximately five minutes to make. Defrost the cauliflower, pat dry, toss in some cheese, an egg, and some seasonings, stir and pour out onto your tray to shape the mix into a nice crust-like circle. Although to be honest, when I’m making it to eat instead of photograph, mine tends to look like a very wobbly rectangle.

Now, about that cheese that I so casually mentioned. I think of the cheese as my second secret weapon: goat cheese. For Cauliflower Pizza Crust, most people use Parmesan to help bind the crust together. I’ve swapped that for garlic and herb goat cheese, and it’s made a world of difference. The only other ingredients I add to my crust are an egg, some Italian herbs and salt. The crust still crisps up just right, and doesn’t taste like cauliflower even a little bit. The single caveat of the whole endeavor is that the crust needs about 40 minutes to bake properly, so it could be considered time-consuming in that regard. We all know at this point how impatient I am when it comes to wanting to eat what I make, though, so believe me when I say it’s worth the time.

I topped my pizza with mozzarella, cherry tomatoes, basil and pesto. Pesto is my new favorite thing to put on pizza – it just adds a whole new dimension to the flavor. I tested this crust topped like a traditional margarita pizza with fresh mozzarella, but the fresh cheese has a lot more moisture to it, and makes the pizza difficult to eat without a fork and knife. If you don’t mind that, then definitely give fresh mozzarella a try, it tasted outstanding. I am very happy to say that my days of squeezing moisture out of cauliflower until my hands fall off are completely behind me, and I promise that once you try this method, yours will be too.


5 from 2 votes
Print

Quick Cauliflower Pizza Crust (That Doesn't Taste Like Cauliflower)

Prep Time 7 minutes
Cook Time 40 minutes
Total Time 47 minutes
Servings 1 pizza

Ingredients

Cauliflower Crust

  • 1 12oz bag frozen, riced cauliflower
  • 1 egg
  • 4 oz garlic and herb goat cheese
  • 1/2 tsp salt
  • 1 tsp Italian seasoning

Toppings

  • 2 cups pizza sauce
  • 2 cups shredded mozzarella cheese
  • 1/2 cup pesto
  • sliced cherry tomatoes
  • basil

Instructions

  1. Preheat oven to 400 degrees. Line a baking sheet (round or rectangle) with parchment paper. 

    2. Place frozen cauliflower in a microwave-safe bowl. Microwave for about 2 minutes until the cauliflower has started to defrost. Pat the top of the cauliflower with a paper towel to remove excess moisture. 

    3. Add goat cheese to the cauliflower and microwave for an additional 30 seconds. Add egg, seasoning, and salt. Stir until well combined. The mixture will seem a little soft and wet. If you don't have garlic and herd goat cheese, you can use plain goat cheese and add an extra tsp of the Italian seasoning. 

    4. Pour the mixture out onto the parchment paper and flatten into a circle (or whatever shape you like, really) about 10-11 inches in diameter, and 1/2 inch thick. 

    5. Bake for 40 minutes, rotating the tray halfway through baking time to ensure even color. Baked crust will be a dark, golden brown and the edges will be crispy. Top with sauce, cheese, and whatever else you fancy and bake for  5-10 minutes until the cheese melts and browns very slightly on top.